Panasonic WJND300A WJND300A User Guide - Page 31
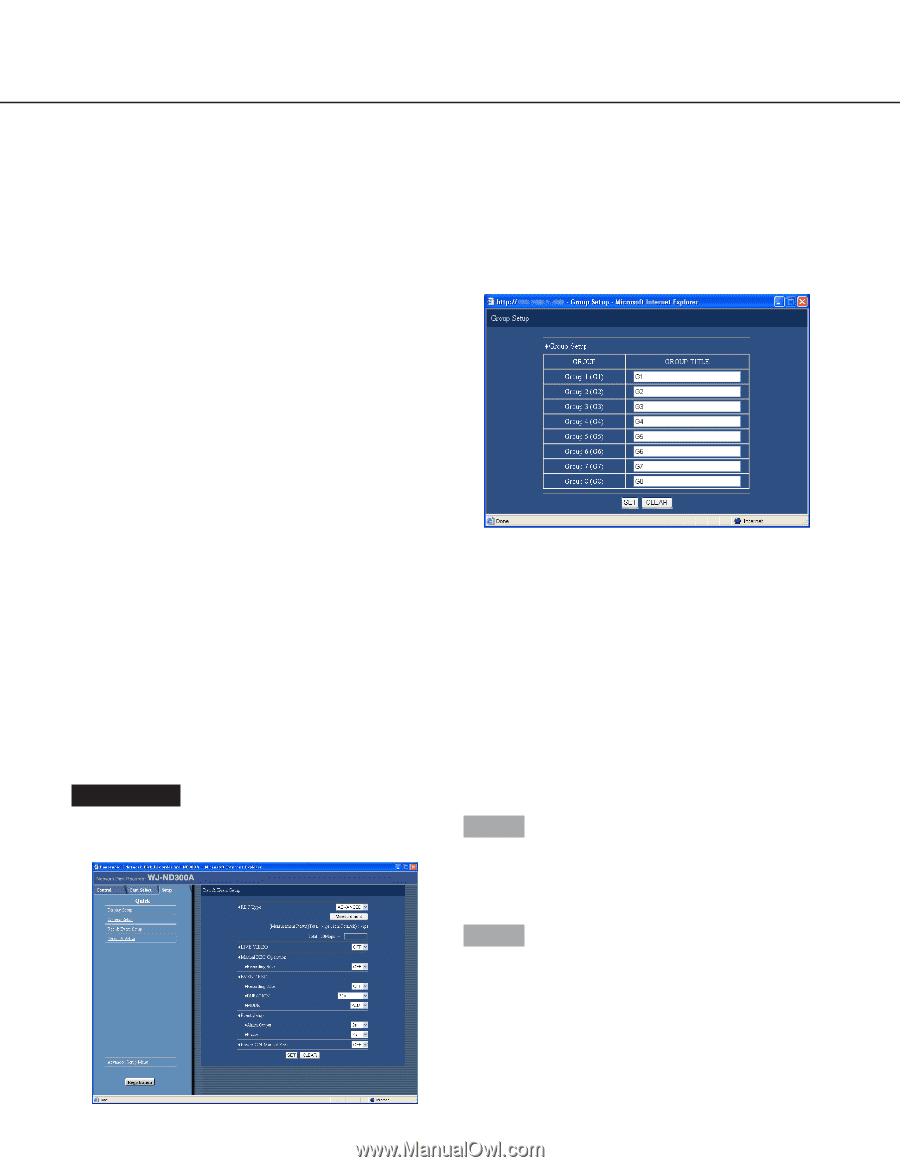
[Rec & Event Setup], USER ID], PASSWORD], TIME ZONE], CAM SETUP], Group Setup, Step 1
 |
View all Panasonic WJND300A manuals
Add to My Manuals
Save this manual to your list of manuals |
Page 31 highlights
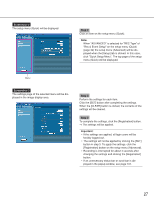
[USER ID] Set the user ID for accessing the cameras and logging in. Enter up to 32 alphanumeric characters. [PASSWORD] Set the password for accessing the cameras and logging in. Enter up to 32 alphanumeric characters. [TIME ZONE] Displays the time zone of the camera. I Group Setup Displays the group title of the camera. The following window will be displayed when the [SETUP] button is clicked. Click the [SET] button after completing the settings, and close the window by clicking the [×] button at the top right of the window. [CAM SETUP] Clicking the [SETUP] button of the desired camera will open the camera setting menu. Opening the camera setting menu is possible only if [Comm] - [Basic Setup] - [Port Forwarding] on the setup menu (Advanced) is set to "ON". Displays the group title of the camera. Enter up to 16 alphanumeric characters except the following Available characters are the same as for the camera title. [Rec & Event Setup] Perform the settings for the basic recording and the settings for event actions of each event type (site alarm, terminal alarm and command alarm). Screenshot 1 Click "Rec & Event Setup" on the setup menu (Quick) to display the recording & event setup window. Step 1 Perform the settings for each item. Refer to the following for further information about the settings for each item. Step 2 Click the [SET] button after completing the settings. 31
-
 1
1 -
2
-
3
-
4
-
5
-
6
-
7
-
8
-
9
-
10
-
11
-
12
-
13
-
14
-
15
-
16
-
17
-
18
-
19
-
20
-
21
-
22
-
23
-
24
-
25
-
 26
26 -
 27
27 -
 28
28 -
 29
29 -
 30
30 -
 31
31 -
 32
32 -
 33
33 -
 34
34 -
 35
35 -
 36
36 -
37
-
38
-
39
-
40
-
41
-
42
-
43
-
44
-
45
-
46
-
47
-
48
-
49
-
50
-
51
-
52
-
53
-
54
-
55
-
56
-
57
-
58
-
59
-
60
-
61
-
62
-
63
-
64
-
65
-
66
-
67
-
68
-
69
-
70
-
71
-
72
-
73
-
74
-
75
-
76
-
77
-
78
-
79
-
80
-
81
-
82
-
83
-
84
-
85
-
86
-
87
-
88
-
89
-
90
-
91
-
92
-
93
-
94
-
95
-
96
-
97
-
98
-
99
-
100
-
101
-
102
 |
 |