Panasonic WJND300A WJND300A User Guide - Page 65
Port Forwarding Setup], Port Setup], Notes, FTP Port Number, DHCP], IP Address], Subnet Mask]
 |
View all Panasonic WJND300A manuals
Add to My Manuals
Save this manual to your list of manuals |
Page 65 highlights
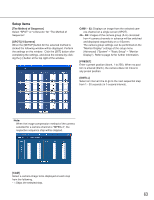
[Port Forwarding Setup] Select "ON" or "OFF" to determine whether or not to set the port forwarding. The camera setup menu can be displayed only when "ON" is selected for "Port Forwarding" on the setup menu (Advanced) ("Comm" - "Basic Setup" - "Port Forwarding"). [Port Setup] Set the port numbers used to connect each camera. I HTTP Port Number Specify the HTTP port number to be used to send images from the unit. A number from 1 - 65535 is available. It is unnecessary to change it for normal use. Notes: • Depending on the network settings of the LAN or Internet service provider, network communication may not be established if the http port number has been changed. In this case, refer to the administrator of the network. • The following port numbers and the port numbers used for the FTP port, the site alarm settings, and the port forwarding are unavailable for the HTTP port numbers. 20, 21, 23, 25, 42, 53, 67, 68, 69, 79, 105, 110, 123, 161, 162, 546, 547, 995, 10001, 10002, 10003, 10004, 10005, 10006, 10007 I FTP Port Number Specify the FTP port number to be used. Note: The following port numbers and the port numbers used for the HTTP port, the site alarm settings, and the port forwarding are unavailable for the FTP port number. 20, 23, 25, 42, 53, 67, 68, 69, 79, 80, 105, 110, 123, 161, 162, 546, 547, 995, 10001, 10002, 10003, 10004, 10005, 10006, 10007 I Port Setup Perform the settings for the following items for each port (camera port, client PC port and maintenance port). [DHCP] Select ON or OFF to determine whether or not to use the DHCP server. Select "ON" to obtain an IP address, a subnet mask and a gateway address from the DHCP server. Set to "OFF" when entering the addresses above manually. ON: Uses the DHCP server. OFF: Does not use the DHCP server. [IP Address] When "OFF" is selected for "DHCP", enter an IP address. For this unit, enter 4 units from the decimal numbers (0-254). [Subnet Mask] Enter a subnet mask according to the network configuration when OFF is selected for "DHCP". [Gateway] Enter the IP address of the gateway according to the network environment when "OFF" is selected for "DHCP". [Line Speed] The following are available for "Line Speed". AUTO: Line speed will be applied automatically. 10-HALF: 10 Mbps semi duplex 10-FULL: 10 Mbps full duplex 100-HALF: 100 Mbps semi duplex 100-FULL: 100 Mbps full duplex Notes: • It is impossible to change the line speed of the main- tenance port. • When the setup menu is closed after changing the line speed, the unit will automatically restart. 65
-
 1
1 -
2
-
3
-
4
-
5
-
6
-
7
-
8
-
9
-
10
-
11
-
12
-
13
-
14
-
15
-
16
-
17
-
18
-
19
-
20
-
21
-
22
-
23
-
24
-
25
-
26
-
27
-
28
-
29
-
30
-
31
-
32
-
33
-
34
-
35
-
36
-
37
-
38
-
39
-
40
-
41
-
42
-
43
-
44
-
45
-
46
-
47
-
48
-
49
-
50
-
51
-
52
-
53
-
54
-
55
-
56
-
57
-
58
-
59
-
 60
60 -
 61
61 -
 62
62 -
 63
63 -
 64
64 -
 65
65 -
 66
66 -
 67
67 -
 68
68 -
 69
69 -
 70
70 -
71
-
72
-
73
-
74
-
75
-
76
-
77
-
78
-
79
-
80
-
81
-
82
-
83
-
84
-
85
-
86
-
87
-
88
-
89
-
90
-
91
-
92
-
93
-
94
-
95
-
96
-
97
-
98
-
99
-
100
-
101
-
102
 |
 |
