Panasonic WJND300A WJND300A User Guide - Page 94
Initialize the pre-recording area [Pre Recording areas Format
 |
View all Panasonic WJND300A manuals
Add to My Manuals
Save this manual to your list of manuals |
Page 94 highlights
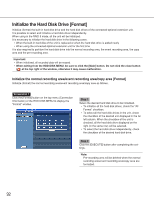
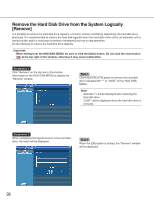
Initialize the pre-recording area [Pre Recording areas Format] Initialize the pre-recording area as follow. Important: When exiting from the HDD DISK MENU, be sure to click the [Main] button. Do not click the close button ( ) at the top right of the window, otherwise it may cause malfunction. Screenshot 1 Click "Pre Recording areas Format" on the top menu (Connection Information) of the HDD DISK MENU to display the "Pre Recording areas Format" window. Step 1 Select the desired hard disk drive to be initialized. Only a single hard disk drive can be initialized at a time. Step 2 Click the [EXECUTE] button after completing the settings. Screenshot 2 The table will be displayed and the capacity of the prerecording area can be configured with this table. Step 3 Enter the desired disk size to be allocated as the prerecording area for each camera channel. Notes: • Disk size of each pre-recording area should be larg- er than 15 GB. When it is unnecessary to designate the disk size, enter "0". • The actual size of the pre-event recording area may be 1-3 GB smaller than the entered value. • Pre-recording areas of up to 16 camera channels can be set at the unit or an extension unit. Important: • Before formatting the pre-event recording areas, configure the following settings for the camera channels to which pre-event recording area is assigned. (When formatting the pre-event recording areas without configuring the following settings, recorded images may not be saved with the desired recording duration.) • "MODEL/COMPRESSION", "ADDRESS", "USER ID" and "Password" on the "NW Camera Setup" page • "RATE" and "DURATION" of "PRE-EVENT" on the "Program Setup" page 94
-
 1
1 -
2
-
3
-
4
-
5
-
6
-
7
-
8
-
9
-
10
-
11
-
12
-
13
-
14
-
15
-
16
-
17
-
18
-
19
-
20
-
21
-
22
-
23
-
24
-
25
-
26
-
27
-
28
-
29
-
30
-
31
-
32
-
33
-
34
-
35
-
36
-
37
-
38
-
39
-
40
-
41
-
42
-
43
-
44
-
45
-
46
-
47
-
48
-
49
-
50
-
51
-
52
-
53
-
54
-
55
-
56
-
57
-
58
-
59
-
60
-
61
-
62
-
63
-
64
-
65
-
66
-
67
-
68
-
69
-
70
-
71
-
72
-
73
-
74
-
75
-
76
-
77
-
78
-
79
-
80
-
81
-
82
-
83
-
84
-
85
-
86
-
87
-
88
-
 89
89 -
 90
90 -
 91
91 -
 92
92 -
 93
93 -
 94
94 -
 95
95 -
 96
96 -
 97
97 -
 98
98 -
 99
99 -
100
-
101
-
102
 |
 |
