Panasonic WJND300A WJND300A User Guide - Page 79
Setup items, Edit/delete registered host information [Host Edit/Delete], Host IP Address, Notes, Level
 |
View all Panasonic WJND300A manuals
Add to My Manuals
Save this manual to your list of manuals |
Page 79 highlights
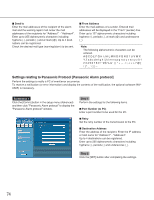
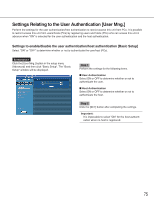
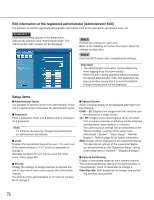
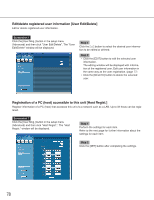
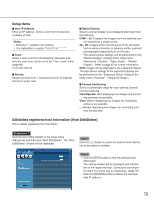
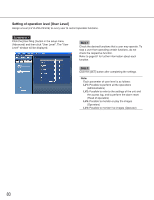
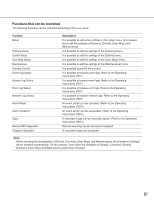
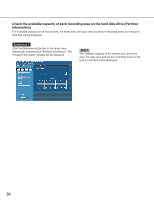
Setup items I Host IP Address Enter an IP address. Enter 4 units from the decimal numbers (0-254). Notes: • Entering "*" validates all numbers. • It is impossible to register "0.0.0.0" or "*.*.*.*". I Level Select a user level from the following. Operable functions for each level can be set in the "User Level" menu (page 80). LV1/LV2/LV3/LV4 I Priority Assign a priority from 1 (lowest priority) to 16 (highest priority) to every host. I Default Screen Select a startup display to be displayed after login from the following. CAM1 - 32: Displays live images from the selected cam- era channel on a single screen. 4A - 4H: Images of the camera group (A-H) consisted from 4 camera channels in advance will be switched and displayed sequentially on a 4-Screen. The camera group settings can be performed on the "Monitor Display" settings of the setup menu (Advanced) ("System" - "Basic Setup" - "Monitor Display"). Refer to page 42 for further information. SEQ: Images will be displayed in the sequential display. The operational settings of the sequential display can be performed on the "Sequence Setup" setting of the setup menu ("Camera" - "Sequence Setup"). I Camera Partitioning Select a controllable range for each camera channel from the following. View/Operate: Both displaying live images and control- ling cameras are possible. View: Neither displaying live images nor controlling cameras are possible. - -: Neither displaying live images nor controlling cam- eras are possible. Edit/delete registered host information [Host Edit/Delete] Edit or delete registered host information. Screenshot 1 Click the [User Mng.] button in the setup menu (Advanced) and then click "Host Edit/Delete". The "Host Edit/Delete" window will be displayed. Step 1 Click the [i] button to select the desired host information to be edited or deleted. Step 2 • Click the [EDIT] button to edit the selected host information. The editing window will be displayed with information of the registered host. Corrections can be performed in the same way as registration. (page 78) • Click the [DELETE] button to delete the selected host IP address. 79
-
 1
1 -
2
-
3
-
4
-
5
-
6
-
7
-
8
-
9
-
10
-
11
-
12
-
13
-
14
-
15
-
16
-
17
-
18
-
19
-
20
-
21
-
22
-
23
-
24
-
25
-
26
-
27
-
28
-
29
-
30
-
31
-
32
-
33
-
34
-
35
-
36
-
37
-
38
-
39
-
40
-
41
-
42
-
43
-
44
-
45
-
46
-
47
-
48
-
49
-
50
-
51
-
52
-
53
-
54
-
55
-
56
-
57
-
58
-
59
-
60
-
61
-
62
-
63
-
64
-
65
-
66
-
67
-
68
-
69
-
70
-
71
-
72
-
73
-
 74
74 -
 75
75 -
 76
76 -
 77
77 -
 78
78 -
 79
79 -
 80
80 -
 81
81 -
 82
82 -
 83
83 -
 84
84 -
85
-
86
-
87
-
88
-
89
-
90
-
91
-
92
-
93
-
94
-
95
-
96
-
97
-
98
-
99
-
100
-
101
-
102
 |
 |
