Panasonic WJND300A WJND300A User Guide - Page 88
Saving and loading of settings of the setup menu [Save/Load], Step 1, User Setup Save, Factory Default
 |
View all Panasonic WJND300A manuals
Add to My Manuals
Save this manual to your list of manuals |
Page 88 highlights
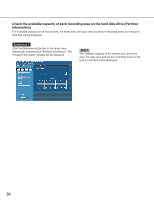
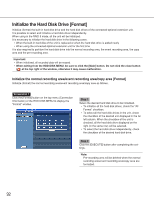
Saving and loading of settings of the setup menu [Save/Load] It is possible to save the settings of the setup menu in this unit. It is also possible to call up saved settings (load). The settings of the setup menu can be reset to the default settings on this menu. Screenshot 1 Click the [Maintenance] button in the setup menu (Advanced) and then click "Save/Load". The "Save/Load" window will be displayed. Step 1 User Setup Save Click the [SAVE] button to save the settings of the setup menu in this unit. User Setup Load Click the [LOAD] button to call up the saved settings. Factory Default Click the [EXECUTE] button to reset the settings to the default settings. Important: The settings of the menus under "Basic Setup" will not be reset even when the [EXECUTE] button is clicked. • NW Link down detection • NW Bandwidth Control • HTTP Port Number • FTP Port number • Port Setup • Maintenance Port Setup Even when the settings are loaded by clicking the [LOAD] button, the settings will not be applied until the [Registration] button is clicked. Note: When the "DHCP" setting of the loaded settings is "ON" and the IP address setting is different between the current setting and the saved setting, the displayed IP address and the current IP address will not match. In this case, set the "DHCP" setting to "ON" using the buttons on the front panel of this unit instead of using the web browser. 88
-
 1
1 -
2
-
3
-
4
-
5
-
6
-
7
-
8
-
9
-
10
-
11
-
12
-
13
-
14
-
15
-
16
-
17
-
18
-
19
-
20
-
21
-
22
-
23
-
24
-
25
-
26
-
27
-
28
-
29
-
30
-
31
-
32
-
33
-
34
-
35
-
36
-
37
-
38
-
39
-
40
-
41
-
42
-
43
-
44
-
45
-
46
-
47
-
48
-
49
-
50
-
51
-
52
-
53
-
54
-
55
-
56
-
57
-
58
-
59
-
60
-
61
-
62
-
63
-
64
-
65
-
66
-
67
-
68
-
69
-
70
-
71
-
72
-
73
-
74
-
75
-
76
-
77
-
78
-
79
-
80
-
81
-
82
-
 83
83 -
 84
84 -
 85
85 -
 86
86 -
 87
87 -
 88
88 -
 89
89 -
 90
90 -
 91
91 -
 92
92 -
 93
93 -
94
-
95
-
96
-
97
-
98
-
99
-
100
-
101
-
102
 |
 |
