Panasonic WJND300A WJND300A User Guide - Page 87
Deletion of image data on the hard disk [Data Delete], Notes, Step 1, HDD Auto Delete
 |
View all Panasonic WJND300A manuals
Add to My Manuals
Save this manual to your list of manuals |
Page 87 highlights
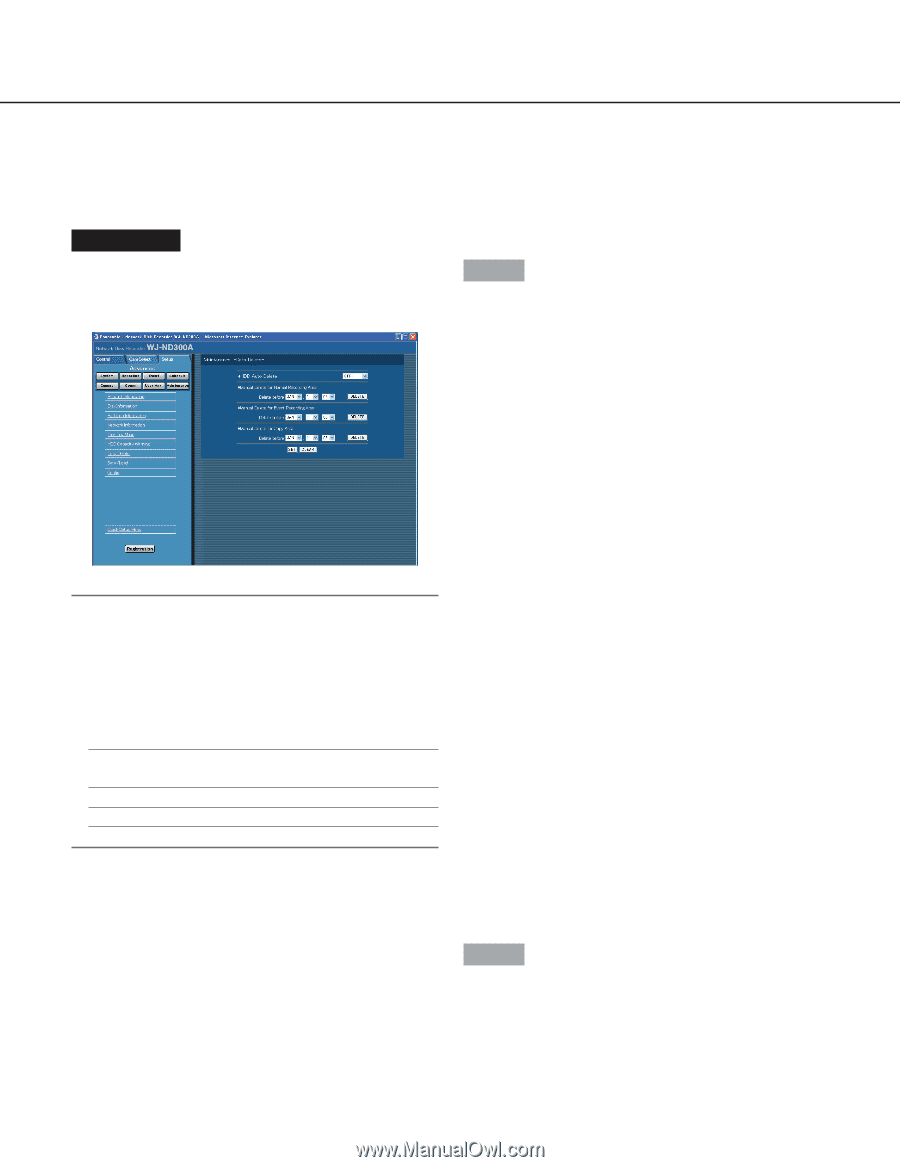
Deletion of image data on the hard disk [Data Delete] Image data on the built-in hard disk will be deleted. The two ways to delete data are auto deletion and manual deletion. Screenshot 1 Click the [Maintenance] button in the setup menu (Advanced) and then click "Data Delete". The "Data Delete" window will be displayed. Notes: • Images recorded on the HDD copy area will not be deleted even when the set retention days for "HDD Auto Delete" have passed. • Deletion by the "HDD Auto Delete" function will start at 0:05:00. When "1DAY" is selected, deletion will start as follows. Recorded image Aug.3.07 23:50:00 Aug.4.07 00:00:00 Time and date of auto deletion Aug.4.07 0:05:00 Aug.5.07 0:05:00 Step 1 Delete data in the following ways. I HDD Auto Delete Perform the settings to delete image data automatically when the set days have passed from the day the images were recorded. The following days can be set. When OFF is selected, auto deletion will not be performed. OFF/1 DAY/2 DAYS/3 DAYS/4 DAYS/5 DAYS/ 6 DAYS/7 DAYS/8 DAYS/9 DAYS/10 DAYS/ 14 DAYS/30 DAYS/1 MONTH/45 DAYS/60 DAYS/ 90 DAYS/120 DAYS/150 DAYS/180 DAYS I Manual Delete for Normal Recording Area By setting the time and date, images in the normal recording area of the hard disk that were recorded up until a day before the set time and date will be deleted. Click the [DELETE] button after setting the time and date by clicking the [i] button. I Manual Delete for Event Recording Area By setting the time and date, images in the event recording area of the hard disk that were recorded up until a day before the set time and date will be deleted. Click the [DELETE] button after setting the time and date by clicking the [i] button. I Manual Delete for Copy Area By setting the time and date, images in the copy area of the hard disk that were recorded up until a day before the set time and date will be deleted. Click the [DELETE] button after setting the time and date by clicking the [i] button. Step 2 Click the [SET] button after completing the settings. 87
-
 1
1 -
2
-
3
-
4
-
5
-
6
-
7
-
8
-
9
-
10
-
11
-
12
-
13
-
14
-
15
-
16
-
17
-
18
-
19
-
20
-
21
-
22
-
23
-
24
-
25
-
26
-
27
-
28
-
29
-
30
-
31
-
32
-
33
-
34
-
35
-
36
-
37
-
38
-
39
-
40
-
41
-
42
-
43
-
44
-
45
-
46
-
47
-
48
-
49
-
50
-
51
-
52
-
53
-
54
-
55
-
56
-
57
-
58
-
59
-
60
-
61
-
62
-
63
-
64
-
65
-
66
-
67
-
68
-
69
-
70
-
71
-
72
-
73
-
74
-
75
-
76
-
77
-
78
-
79
-
80
-
81
-
 82
82 -
 83
83 -
 84
84 -
 85
85 -
 86
86 -
 87
87 -
 88
88 -
 89
89 -
 90
90 -
 91
91 -
 92
92 -
93
-
94
-
95
-
96
-
97
-
98
-
99
-
100
-
101
-
102
 |
 |