Panasonic WJND300A WJND300A User Guide - Page 46
Functions for Recording [Recording], Basic settings for recording [REC Setup], Setup items
 |
View all Panasonic WJND300A manuals
Add to My Manuals
Save this manual to your list of manuals |
Page 46 highlights
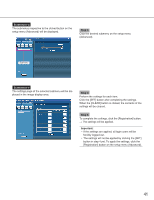
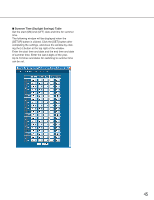
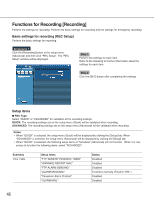
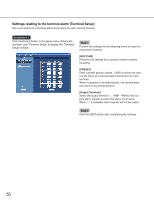
Functions for Recording [Recording] Perform the settings for recording. Perform the basic settings for recording and the settings for emergency recording. Basic settings for recording [REC Setup] Perform the basic settings for recording. Screenshot 1 Click the [Recording] button in the setup menu (Advanced) and then click "REC Setup". The "REC Setup" window will be displayed. Step 1 Perform the settings for each item. Refer to the following for further information about the settings for each item. Step 2 Click the [SET] button after completing the settings. Setup items I REC Type Select "QUICK" or "ADVANCED" for validation of the recording settings. QUICK: The recording settings set on the setup menu (Quick) will be validated when recording. ADVANCED: The recording settings set on the setup menu (Advanced) will be validated when recording. Notes: • When "QUICK" is selected, the setup menu (Quick) will be displayed by clicking the [Setup] tab. When "ADVANCED" is selected, the setup menu (Advanced) will be displayed by clicking the [Setup] tab. • When "QUICK" is selected, the following setup items of "Schedule" (Advanced) will not function. When it is nec- essary to function the following items, select "ADVANCED". Submenu Time Table Setup items "FTP SEND BY PERIODIC TIMER" "WARNING REPORT MAIL" "FTP ALARM SENDING" "ALARM MESSAGE" "Panasonic Alarm Protocol" "ALARM MAIL" Status Disabled Disabled Disabled Functions normally (Fixed to "ON".) Disabled Disabled 46
-
 1
1 -
2
-
3
-
4
-
5
-
6
-
7
-
8
-
9
-
10
-
11
-
12
-
13
-
14
-
15
-
16
-
17
-
18
-
19
-
20
-
21
-
22
-
23
-
24
-
25
-
26
-
27
-
28
-
29
-
30
-
31
-
32
-
33
-
34
-
35
-
36
-
37
-
38
-
39
-
40
-
 41
41 -
 42
42 -
 43
43 -
 44
44 -
 45
45 -
 46
46 -
 47
47 -
 48
48 -
 49
49 -
 50
50 -
 51
51 -
52
-
53
-
54
-
55
-
56
-
57
-
58
-
59
-
60
-
61
-
62
-
63
-
64
-
65
-
66
-
67
-
68
-
69
-
70
-
71
-
72
-
73
-
74
-
75
-
76
-
77
-
78
-
79
-
80
-
81
-
82
-
83
-
84
-
85
-
86
-
87
-
88
-
89
-
90
-
91
-
92
-
93
-
94
-
95
-
96
-
97
-
98
-
99
-
100
-
101
-
102
 |
 |
