Panasonic WJND300A WJND300A User Guide - Page 73
Perform the settings for mail notification [Mail Setup], Setup items, Step 1, Attach Alarm Image
 |
View all Panasonic WJND300A manuals
Add to My Manuals
Save this manual to your list of manuals |
Page 73 highlights
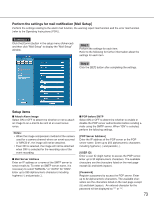
Perform the settings for mail notification [Mail Setup] Perform the settings relating to the alarm mail function, the warning report mail function and the error mail function (refer to the Operating Instructions (PDF)). Screenshot 1 Click the [Comm] button in the setup menu (Advanced) and then click "Mail Setup" to display the "Mail Setup" window. Step 1 Perform the settings for each item. Refer to the following for further information about the settings for each item. Step 2 Click the [SET] button after completing the settings. Setup items I Attach Alarm Image Select ON or OFF to determine whether or not to attach an image to an e-mail to be sent at an event occurrence. Notes: • When the image compression method of the camera used for a camera channel where an event occurred is "MPEG-4", the image will not be attached. • Even ON is selected, the image will not be attached when OFF is selected for the recording rate of the event recording. I Mail Server Address Enter an IP address or a name of the SMTP server to send e-mails to. To enter an SMTP server name, it is necessary to select "MANUAL" or "AUTO" for "DNS". Enter up to 255 alphanumeric characters including hyphens (-) and periods (.). I POP before SMTP Select ON or OFF to determine whether to enable or disable the POP server authentication before sending emails using the SMTP server. When "ON" is selected, perform the following settings. [POP Server Address] Enter the IP address of the POP server or the POP server name. Enter up to 255 alphanumeric characters including hyphens (-) and periods (.). [USER ID] Enter a user ID (login name) to access the POP server. Enter up to 32 alphanumeric characters. The available characters are the characters listed on the next page except (&) and blank (space). [Password] Register a password to access the POP server. Enter up to 32 alphanumeric characters. The available characters are the characters listed on the next page except (&) and blank (space). An entered character for the password will be displayed as "*" or "•". 73
-
 1
1 -
2
-
3
-
4
-
5
-
6
-
7
-
8
-
9
-
10
-
11
-
12
-
13
-
14
-
15
-
16
-
17
-
18
-
19
-
20
-
21
-
22
-
23
-
24
-
25
-
26
-
27
-
28
-
29
-
30
-
31
-
32
-
33
-
34
-
35
-
36
-
37
-
38
-
39
-
40
-
41
-
42
-
43
-
44
-
45
-
46
-
47
-
48
-
49
-
50
-
51
-
52
-
53
-
54
-
55
-
56
-
57
-
58
-
59
-
60
-
61
-
62
-
63
-
64
-
65
-
66
-
67
-
 68
68 -
 69
69 -
 70
70 -
 71
71 -
 72
72 -
 73
73 -
 74
74 -
 75
75 -
 76
76 -
 77
77 -
 78
78 -
79
-
80
-
81
-
82
-
83
-
84
-
85
-
86
-
87
-
88
-
89
-
90
-
91
-
92
-
93
-
94
-
95
-
96
-
97
-
98
-
99
-
100
-
101
-
102
 |
 |