Panasonic WJND300A WJND300A User Guide - Page 91
Step 3, The Partition Information menu will be displayed.
 |
View all Panasonic WJND300A manuals
Add to My Manuals
Save this manual to your list of manuals |
Page 91 highlights
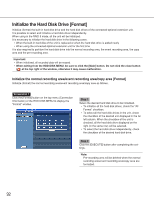
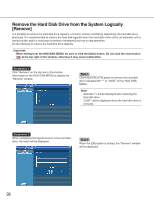
Screenshot 3 The top menu (Connection Information) of the HDD DISK MENU will be displayed. Step 3 Information of the hard disk drives of the unit or the connected extension unit will be displayed. To display the available disk space of each recording area, click "Partition Information". Screenshot 4 The "Partition Information" menu will be displayed. Step 4 The available disk size of each recording area on the hard disk drive will be displayed. 91
-
 1
1 -
2
-
3
-
4
-
5
-
6
-
7
-
8
-
9
-
10
-
11
-
12
-
13
-
14
-
15
-
16
-
17
-
18
-
19
-
20
-
21
-
22
-
23
-
24
-
25
-
26
-
27
-
28
-
29
-
30
-
31
-
32
-
33
-
34
-
35
-
36
-
37
-
38
-
39
-
40
-
41
-
42
-
43
-
44
-
45
-
46
-
47
-
48
-
49
-
50
-
51
-
52
-
53
-
54
-
55
-
56
-
57
-
58
-
59
-
60
-
61
-
62
-
63
-
64
-
65
-
66
-
67
-
68
-
69
-
70
-
71
-
72
-
73
-
74
-
75
-
76
-
77
-
78
-
79
-
80
-
81
-
82
-
83
-
84
-
85
-
 86
86 -
 87
87 -
 88
88 -
 89
89 -
 90
90 -
 91
91 -
 92
92 -
 93
93 -
 94
94 -
 95
95 -
 96
96 -
97
-
98
-
99
-
100
-
101
-
102
 |
 |

91
Screenshot 3
The top menu (Connection Information) of the HDD
DISK MENU will be displayed.
Step 3
Information of the hard disk drives of the unit or the con-
nected extension unit will be displayed.
To display the available disk space of each recording
area, click "Partition Information".
Screenshot 4
The "Partition Information" menu will be displayed.
Step 4
The available disk size of each recording area on the
hard disk drive will be displayed.