Panasonic WJND300A WJND300A User Guide - Page 61
Manufacturer], MODEL/COMPRESSION], Notes, ADDRESS], Port Number], GROUP], CAM TITLE], USER ID]
 |
View all Panasonic WJND300A manuals
Add to My Manuals
Save this manual to your list of manuals |
Page 61 highlights
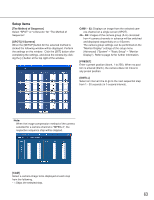
Setup items [Manufacturer] Select the manufacturer of the camera. [MODEL/COMPRESSION] Select the model of the camera and the image compression method. Notes: • When the [SETUP] button is clicked after changing only the compression method, the set recording rate/transmission rate will be automatically changed as follows. • When changed from "MPEG-4" to "JPEG" or "MJPEG", they will be "1 ips". • When changed from "JPEG" or "M-JPEG" to "MPEG-4", they will be "I-Frame". • When the [SETUP] button is clicked after changing the compression method and any other setting item, the set recording rate/transmission rate will be automatically changed to "OFF". [CAM SETUP] It is possible to display the camera setup menu by clicking the [SETUP] button of the desired camera. Refer to the operating instructions of the camera in use for descriptions of how to perform the camera settings. Important: • The camera setup menu can be displayed only when "ON" is selected for "Port Forwarding" on the setup menu (Advanced) ("Comm" - "Basic Setup" - "Port Forwarding"). • Depending on the network environment, some of the camera settings menu may not be displayed. • Images sometimes may not be displayed on the camera settings menu. [ADDRESS] Enter an IP address. Enter up to 255 alphanumeric characters. [Port Number] Set the HTTP port number to be used for the camera. A number from 1 - 65535 is available. [GROUP] Select the desired group (G1-G8) to which the camera is to be belonged. [CAM TITLE] Set the camera title displayed on the [Cam Select] tab, etc. Enter up to 16 alphanumeric characters except the following [USER ID] Set the user ID to be used to access and log in the camera. Enter up to 32 alphanumeric characters. [Password] Set the password to be used to access and log in the camera. Enter up to 32 alphanumeric characters. [TIME ZONE] Displays the time zone of the camera. 61
-
 1
1 -
2
-
3
-
4
-
5
-
6
-
7
-
8
-
9
-
10
-
11
-
12
-
13
-
14
-
15
-
16
-
17
-
18
-
19
-
20
-
21
-
22
-
23
-
24
-
25
-
26
-
27
-
28
-
29
-
30
-
31
-
32
-
33
-
34
-
35
-
36
-
37
-
38
-
39
-
40
-
41
-
42
-
43
-
44
-
45
-
46
-
47
-
48
-
49
-
50
-
51
-
52
-
53
-
54
-
55
-
 56
56 -
 57
57 -
 58
58 -
 59
59 -
 60
60 -
 61
61 -
 62
62 -
 63
63 -
 64
64 -
 65
65 -
 66
66 -
67
-
68
-
69
-
70
-
71
-
72
-
73
-
74
-
75
-
76
-
77
-
78
-
79
-
80
-
81
-
82
-
83
-
84
-
85
-
86
-
87
-
88
-
89
-
90
-
91
-
92
-
93
-
94
-
95
-
96
-
97
-
98
-
99
-
100
-
101
-
102
 |
 |
