Ricoh Aficio MP 2500 General Settings Guide - Page 92
Folder TX Result Report, Parameter Setting, Program Special Sender, Program Memory Lock ID
 |
View all Ricoh Aficio MP 2500 manuals
Add to My Manuals
Save this manual to your list of manuals |
Page 92 highlights
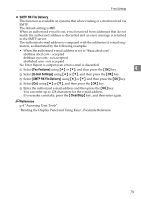
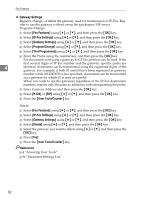
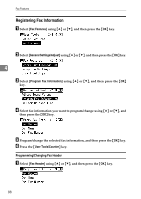
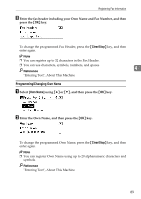
Fax Features ❖ Folder TX Result Report When a folder is included in the forwarding destination or the forwarding destination by special sender, the specified destination will be notified of the results of forwarding. To forward to two or more destinations, specify group destination. For information about how to specify group destination, see "Registering a Names to a Group". The default setting is Do not E-mail. Even when an e-mail to notify the results of forwarding a folder cannot be sent, no report is out from this machine. A Select [Fax Features] using {U} or {T}, and then press the {OK} key. B Select [Administrator Tools] using {U} or {T}, and then press the {OK} key. C Select [Folder TX Result Report] using {U} or {T}, and then press the {OK} 4 key. D Select [E-mail] using {U} or {T}, and then press the {OK} key. E Search and select a receiver using the Quick Dial keys or the {Search Destination} key, and then press the {OK} key. F Press the {User Tools/Counter} key. ❖ Parameter Setting Parameter Setting allow you to customize various settings to suit your needs. To change function settings, set the Parameter Switches. For details, see "Parameter Setting". ❖ Program Special Sender Program/Change/Delete Special Senders, perform initial setup, and print the Special Sender List. You can set functions for each sender if Special Senders are preprogrammed. For details, see "Program Special Sender". ❖ Program Memory Lock ID Program a Memory Lock ID to be entered before printing documents when the Memory Lock function is activated. Preprogram the ID when you set "Memory Lock" and "Memory Lock" in Special Senders function. A Select [Fax Features] using {U} or {T}, and then press the {OK} key. B Select [Administrator Tools] using {U} or {T}, and then press the {OK} key. C Select [Program Memory Lock ID] using {U} or {T}, and then press the {OK} key. D Enter the ID using the number key, and then press the {OK} key. A Memory Lock ID can be any four-digit number, except 0000. If you make a mistake, press the {Clear/Stop} key before pressing the {OK} key, and then enter again. 84
-
 1
1 -
2
-
3
-
4
-
5
-
6
-
7
-
8
-
9
-
10
-
11
-
12
-
13
-
14
-
15
-
16
-
17
-
18
-
19
-
20
-
21
-
22
-
23
-
24
-
25
-
26
-
27
-
28
-
29
-
30
-
31
-
32
-
33
-
34
-
35
-
36
-
37
-
38
-
39
-
40
-
41
-
42
-
43
-
44
-
45
-
46
-
47
-
48
-
49
-
50
-
51
-
52
-
53
-
54
-
55
-
56
-
57
-
58
-
59
-
60
-
61
-
62
-
63
-
64
-
65
-
66
-
67
-
68
-
69
-
70
-
71
-
72
-
73
-
74
-
75
-
76
-
77
-
78
-
79
-
80
-
81
-
82
-
83
-
84
-
85
-
86
-
 87
87 -
 88
88 -
 89
89 -
 90
90 -
 91
91 -
 92
92 -
 93
93 -
 94
94 -
 95
95 -
 96
96 -
 97
97 -
98
-
99
-
100
-
101
-
102
-
103
-
104
-
105
-
106
-
107
-
108
-
109
-
110
-
111
-
112
-
113
-
114
-
115
-
116
-
117
-
118
-
119
-
120
-
121
-
122
-
123
-
124
-
125
-
126
-
127
-
128
-
129
-
130
-
131
-
132
-
133
-
134
-
135
-
136
-
137
-
138
-
139
-
140
-
141
-
142
-
143
-
144
-
145
-
146
-
147
-
148
-
149
-
150
-
151
-
152
-
153
-
154
-
155
-
156
-
157
-
158
-
159
-
160
-
161
-
162
-
163
-
164
-
165
-
166
-
167
-
168
-
169
-
170
-
171
-
172
-
173
-
174
-
175
-
176
-
177
-
178
-
179
-
180
-
181
-
182
-
183
-
184
-
185
-
186
-
187
-
188
-
189
-
190
-
191
-
192
-
193
-
194
-
195
-
196
-
197
-
198
-
199
-
200
-
201
-
202
-
203
-
204
-
205
-
206
-
207
-
208
-
209
-
210
-
211
-
212
-
213
-
214
-
215
-
216
-
217
-
218
-
219
-
220
-
221
-
222
-
223
-
224
-
225
-
226
-
227
-
228
-
229
-
230
-
231
-
232
-
233
-
234
-
235
-
236
-
237
-
238
-
239
-
240
-
241
-
242
-
243
-
244
-
245
-
246
-
247
-
248
-
249
-
250
-
251
-
252
-
253
-
254
-
255
-
256
-
257
-
258
-
259
-
260
-
261
-
262
-
263
-
264
-
265
-
266
-
267
-
268
-
269
-
270
-
271
-
272
-
273
-
274
-
275
-
276
-
277
-
278
-
279
-
280
-
281
-
282
-
283
-
284
-
285
-
286
-
287
-
288
-
289
-
290
-
291
-
292
-
293
-
294
-
295
-
296
-
297
-
298
-
299
-
300
-
301
-
302
-
303
-
304
 |
 |