Roxio Creator 2011 Product Manual - Page 204
Adjusting exposure, To adjust the exposure, Exposure, Show Preview, AutoFix, Dark Areas, Midtones
 |
View all Roxio Creator 2011 manuals
Add to My Manuals
Save this manual to your list of manuals |
Page 204 highlights
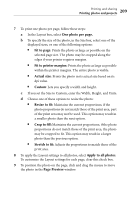
204 Roxio Creator User Guide www.roxio.com Adjusting exposure Follow this procedure to improve the quality of over- or under-exposed photos. When you adjust the exposure, you change the intensity level of the photo's dark areas and shadows, and its highlights and bright areas. PhotoSuite can adjust the exposure for you automatically, or you can adjust it manually. To adjust the exposure: 1 If the photo you want to edit is an object in the PhotoSuite project file, select it in the Canvas. 2 On the Fix your photos tab, click Exposure. 3 To preview the results of the adjustment before applying them, select Show Preview. 4 Choose one of the following ways to adjust the exposure: ■ To let PhotoSuite automatically adjust the exposure, click AutoFix. PhotoSuite automatically adjusts the exposure based on predefined exposure settings. ■ To manually adjust the exposure, use the sliders to adjust the exposure settings for the Dark Areas, Midtones, and Bright Areas in the photo. Tip: To restore the exposure settings to their original values, click Reset.
-
 1
1 -
2
-
3
-
4
-
5
-
6
-
7
-
8
-
9
-
10
-
11
-
12
-
13
-
14
-
15
-
16
-
17
-
18
-
19
-
20
-
21
-
22
-
23
-
24
-
25
-
26
-
27
-
28
-
29
-
30
-
31
-
32
-
33
-
34
-
35
-
36
-
37
-
38
-
39
-
40
-
41
-
42
-
43
-
44
-
45
-
46
-
47
-
48
-
49
-
50
-
51
-
52
-
53
-
54
-
55
-
56
-
57
-
58
-
59
-
60
-
61
-
62
-
63
-
64
-
65
-
66
-
67
-
68
-
69
-
70
-
71
-
72
-
73
-
74
-
75
-
76
-
77
-
78
-
79
-
80
-
81
-
82
-
83
-
84
-
85
-
86
-
87
-
88
-
89
-
90
-
91
-
92
-
93
-
94
-
95
-
96
-
97
-
98
-
99
-
100
-
101
-
102
-
103
-
104
-
105
-
106
-
107
-
108
-
109
-
110
-
111
-
112
-
113
-
114
-
115
-
116
-
117
-
118
-
119
-
120
-
121
-
122
-
123
-
124
-
125
-
126
-
127
-
128
-
129
-
130
-
131
-
132
-
133
-
134
-
135
-
136
-
137
-
138
-
139
-
140
-
141
-
142
-
143
-
144
-
145
-
146
-
147
-
148
-
149
-
150
-
151
-
152
-
153
-
154
-
155
-
156
-
157
-
158
-
159
-
160
-
161
-
162
-
163
-
164
-
165
-
166
-
167
-
168
-
169
-
170
-
171
-
172
-
173
-
174
-
175
-
176
-
177
-
178
-
179
-
180
-
181
-
182
-
183
-
184
-
185
-
186
-
187
-
188
-
189
-
190
-
191
-
192
-
193
-
194
-
195
-
196
-
197
-
198
-
 199
199 -
 200
200 -
 201
201 -
 202
202 -
 203
203 -
 204
204 -
 205
205 -
 206
206 -
 207
207 -
 208
208 -
 209
209 -
210
-
211
-
212
-
213
-
214
-
215
-
216
-
217
-
218
-
219
-
220
-
221
-
222
-
223
-
224
-
225
-
226
-
227
-
228
-
229
-
230
-
231
-
232
-
233
-
234
-
235
-
236
-
237
-
238
-
239
 |
 |
