Sony PMWF3K Operating Instructions - Page 23
Turning Power On, Setting the Area of Use and the Clock
 |
View all Sony PMWF3K manuals
Add to My Manuals
Save this manual to your list of manuals |
Page 23 highlights
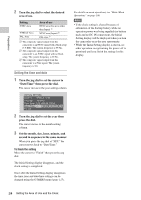
Preparations For details, refer to the Operating Instructions of the AC-DN10. When recording or playback is in progress on power from the DC IN connector, the input voltage is displayed on the LCD monitor/ viewfinder screen. DC-IN 12.0V A: 25min B: 50min Z99 STBY S&Q REC Turning Power On Set the power switch to the ON position. The indicator (green) lights and the camcorder enters E-E Display mode. Power switch ON OFF Turning Power Off Set the power switch to the OFF position. Notes • This camcorder uses a little standby power even when the power switch is set to OFF. Remove the battery pack if the camcorder will not be used for a prolonged period. • When removing the battery pack or the DC IN power, be sure to set the switch to OFF in advance and wait until the indicator goes dark. Removing the battery pack or the DC IN power while the indicator is lit may cause damage to the camcorder or SxS memory cards. Setting the Area of Use and the Clock When you turn the camcorder on for the first time after purchasing or replacing the backup battery (page 135), the Initial Setting display appears on the LCD monitor/viewfinder screen. Set the area of use and the date and time of the built-in clock, using this display. INITIAL SETTING Count r y : NTSC A rea Language : English Time Zone: UTC GREENWICH Date / Time: 2011/01/01 00:00:00 F i n i sh Language You can select the language for messages. When you select "Chinese," the menus and status indications are also displayed in Chinese. Time Zone The value shows the time difference from UTC (Coordinated Universal Time). Change the setting if needed. Use the jog dial on the rear panel for setting. Jog dial MENU SEL/SET CANCEL AB PICTURE PROF Setting the area of use 1 Turn the jog dial to set the cursor to "Country" then press the dial. Setting the Area of Use and the Clock 23
-
 1
1 -
2
-
3
-
4
-
5
-
6
-
7
-
8
-
9
-
10
-
11
-
12
-
13
-
14
-
15
-
16
-
17
-
 18
18 -
 19
19 -
 20
20 -
 21
21 -
 22
22 -
 23
23 -
 24
24 -
 25
25 -
 26
26 -
 27
27 -
 28
28 -
29
-
30
-
31
-
32
-
33
-
34
-
35
-
36
-
37
-
38
-
39
-
40
-
41
-
42
-
43
-
44
-
45
-
46
-
47
-
48
-
49
-
50
-
51
-
52
-
53
-
54
-
55
-
56
-
57
-
58
-
59
-
60
-
61
-
62
-
63
-
64
-
65
-
66
-
67
-
68
-
69
-
70
-
71
-
72
-
73
-
74
-
75
-
76
-
77
-
78
-
79
-
80
-
81
-
82
-
83
-
84
-
85
-
86
-
87
-
88
-
89
-
90
-
91
-
92
-
93
-
94
-
95
-
96
-
97
-
98
-
99
-
100
-
101
-
102
-
103
-
104
-
105
-
106
-
107
-
108
-
109
-
110
-
111
-
112
-
113
-
114
-
115
-
116
-
117
-
118
-
119
-
120
-
121
-
122
-
123
-
124
-
125
-
126
-
127
-
128
-
129
-
130
-
131
-
132
-
133
-
134
-
135
-
136
-
137
-
138
-
139
-
140
-
141
-
142
-
143
-
144
-
145
-
146
-
147
-
148
-
149
-
150
 |
 |
