Sony PMWF3K Operating Instructions - Page 27
Attaching a Lens, Caution
 |
View all Sony PMWF3K manuals
Add to My Manuals
Save this manual to your list of manuals |
Page 27 highlights
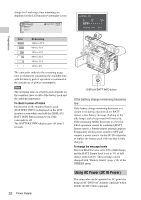
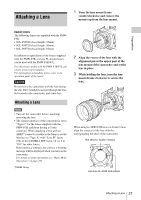
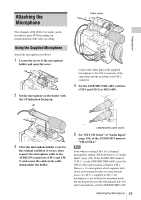
Preparations Attaching a Lens 1 Turn the lens mount frame counterclockwise and remove the mount cap from the lens mount. Usable lenses The following lenses are supplied with the PMWF3K. • SCL-P35T20 (focal length: 35mm) • SCL-P50T20 (focal length: 50mm) • SCL-P85T20 (focal length: 85mm) In addition to equivalents of the lenses supplied with the PMW-F3K, various PL-mount lenses can be used with the PMW-F3K/F3L. For other lenses usable with the PMW-F3K/F3L, ask a Sony service representative. For information on handling lenses, refer to the operation guide of the lenses. Caution Do not leave the camcorder with the lens facing the sun. Direct sunlight can enter through the lens, be focused in the camcorder, and cause fire. 2 Align the recess of the lens with the alignment pin at the upper part of the lens mount of the camcorder and set the lens in place. 3 While holding the lens, turn the lens mount frame clockwise to secure the lens. Attaching a Lens Notes • Turn off the camcorder before attaching/ removing the lens. • The camera interface of the camcorder is set to "Type C" for the lenses supplied with the PMW-F3K and those having a Cooke connector. When attaching a lens with an ARRI1) connector (usable in the future), set the interface to "Type A" with "Lens IF" (page 106) of the CAMERA SET menu. Or set it to "Off" for other lenses. If the interface setting is not correct, a warning message will be displayed when you turn on the camcorder. For details on menu operations, see "Basic Menu Operations" on page 100. 1)ARRI Group 3 2 When using an ARRI LDS lens or a Cooke /i lens, align the contacts of the lens with the corresponding hot shoe of the camcorder. Hot shoe for Cooke /i lenses Hot shoe for ARRI LDS lenses Attaching a Lens 27
-
 1
1 -
2
-
3
-
4
-
5
-
6
-
7
-
8
-
9
-
10
-
11
-
12
-
13
-
14
-
15
-
16
-
17
-
18
-
19
-
20
-
21
-
 22
22 -
 23
23 -
 24
24 -
 25
25 -
 26
26 -
 27
27 -
 28
28 -
 29
29 -
 30
30 -
 31
31 -
 32
32 -
33
-
34
-
35
-
36
-
37
-
38
-
39
-
40
-
41
-
42
-
43
-
44
-
45
-
46
-
47
-
48
-
49
-
50
-
51
-
52
-
53
-
54
-
55
-
56
-
57
-
58
-
59
-
60
-
61
-
62
-
63
-
64
-
65
-
66
-
67
-
68
-
69
-
70
-
71
-
72
-
73
-
74
-
75
-
76
-
77
-
78
-
79
-
80
-
81
-
82
-
83
-
84
-
85
-
86
-
87
-
88
-
89
-
90
-
91
-
92
-
93
-
94
-
95
-
96
-
97
-
98
-
99
-
100
-
101
-
102
-
103
-
104
-
105
-
106
-
107
-
108
-
109
-
110
-
111
-
112
-
113
-
114
-
115
-
116
-
117
-
118
-
119
-
120
-
121
-
122
-
123
-
124
-
125
-
126
-
127
-
128
-
129
-
130
-
131
-
132
-
133
-
134
-
135
-
136
-
137
-
138
-
139
-
140
-
141
-
142
-
143
-
144
-
145
-
146
-
147
-
148
-
149
-
150
 |
 |
