Sony PMWF3K Operating Instructions - Page 38
Switching between HD and SD, SD mode DVCAM mode
 |
View all Sony PMWF3K manuals
Add to My Manuals
Save this manual to your list of manuals |
Page 38 highlights
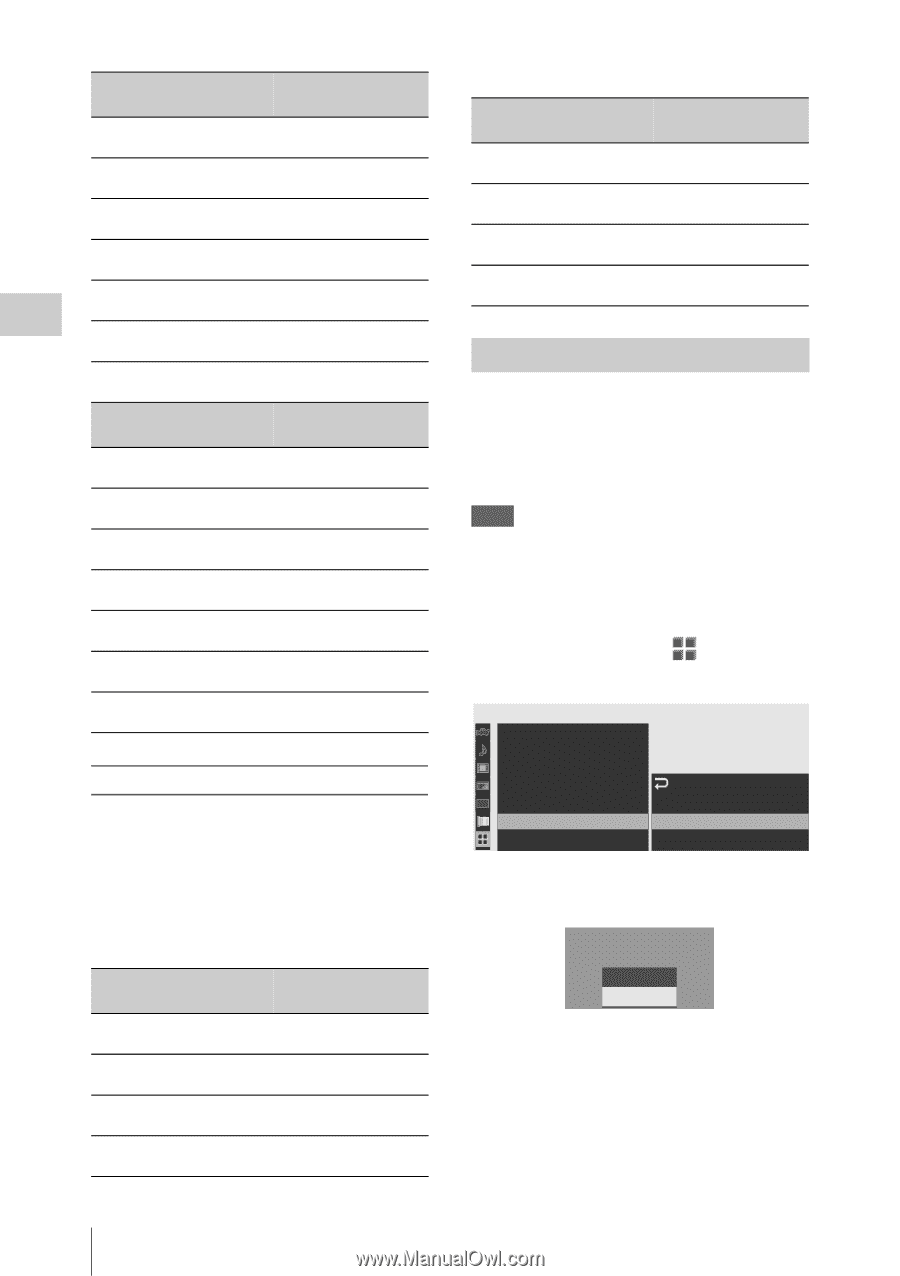
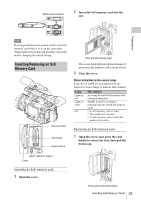
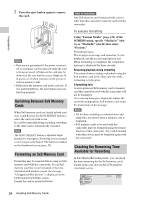
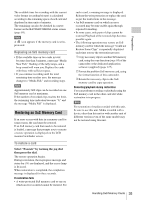
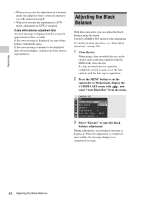
Recording Format HQ 1440 × 1080 23.98 Progressive SP 1440 × 1080 59.94 interlace SP 1440 × 1080 23.98 Progressive HQ 1280 × 720 59.94 Progressive HQ 1280 × 720 29.97 Progressive HQ 1280 × 720 23.98 Progressive Indication on this camcorder HQ 1440/23.98P SP 1440/59.94i SP 1440/23.98P HQ 1280/59.94i HQ 1280/29.97P HQ 1280/23.98P With "PAL Area" selected Format HQ 1920 × 1080 50 interlace HQ 1920 × 1080 25 Progressive HQ 1440 × 1080 50 interlace HQ 1440 × 1080 25 Progressive SP 1440 × 1080 50 interlace HQ 1280 × 720 50 Progressive HQ 1280 × 720 25 Progressive Indication on this camcorder HQ 1920/50i HQ 1920/25P HQ 1440/50i HQ 1440/25P SP 1440/50i HQ 1280/50P HQ 1280/25P SD mode (DVCAM mode) When the camcorder is set to SD mode, the video formats set on this camcorder cover the recording frame rate, recording scan system (i/P), and aspect (SQ/EC). When you select SD mode, recording is made with the bit rate of 25 Mbps CBR. With "NTSC Area" or "NTSC(J) Area" selected Format Indication on this camcorder 720 × 480 DVCAM59.94i SQ 59.94 interlace, squeeze 720 × 480 DVCAM59.94i EC 59.94 interlace, edge crop 720 × 480 DVCAM29.97P SQ 29.97 Progressive, squeeze 720 × 480 DVCAM29.97P EC 29.97 Progressive, edge crop With "PAL Area" selected Format 720 × 576 50 interlace, squeeze 720 × 576 50 interlace, edge crop 720 × 576 25 Progressive, squeeze 720 × 576 25 Progressive, edge crop Indication on this camcorder DVCAM50i SQ DVCAM50i EC DVCAM25P SQ DVCAM25P EC Switching between HD and SD For HD/SD switching use "HD/SD" under "System" of the OTHERS menu. When you change the menu setting, the camcorder automatically restarts, executing the switching. Note HD/SD switching is disabled during recording and playback. 1 Press the MENU button to set the camcorder to Menu mode, display the OTHERS menu with , and select "HD/SD" from "System." O T H ER S I R Remote : Of f Bat tery Alarm B Ba t t ery I N FO B Genlock B 00:00 Tr i gger Mode : Both System B Clip B Count r y : NTSC(J) Area HD/SD : HD Format : HQ 1080 / 59.94 i 2 Select the desired mode. A confirmation message is displayed. Change Mode? HD > SD Execute Cancel 3 Select "Execute." The camcorder is automatically turned off, then is restarted, activating the menu setting. For details on menu operations, see "Basic Menu Operations" on page 100. 38 Selecting the Video Format
-
 1
1 -
2
-
3
-
4
-
5
-
6
-
7
-
8
-
9
-
10
-
11
-
12
-
13
-
14
-
15
-
16
-
17
-
18
-
19
-
20
-
21
-
22
-
23
-
24
-
25
-
26
-
27
-
28
-
29
-
30
-
31
-
32
-
 33
33 -
 34
34 -
 35
35 -
 36
36 -
 37
37 -
 38
38 -
 39
39 -
 40
40 -
 41
41 -
 42
42 -
 43
43 -
44
-
45
-
46
-
47
-
48
-
49
-
50
-
51
-
52
-
53
-
54
-
55
-
56
-
57
-
58
-
59
-
60
-
61
-
62
-
63
-
64
-
65
-
66
-
67
-
68
-
69
-
70
-
71
-
72
-
73
-
74
-
75
-
76
-
77
-
78
-
79
-
80
-
81
-
82
-
83
-
84
-
85
-
86
-
87
-
88
-
89
-
90
-
91
-
92
-
93
-
94
-
95
-
96
-
97
-
98
-
99
-
100
-
101
-
102
-
103
-
104
-
105
-
106
-
107
-
108
-
109
-
110
-
111
-
112
-
113
-
114
-
115
-
116
-
117
-
118
-
119
-
120
-
121
-
122
-
123
-
124
-
125
-
126
-
127
-
128
-
129
-
130
-
131
-
132
-
133
-
134
-
135
-
136
-
137
-
138
-
139
-
140
-
141
-
142
-
143
-
144
-
145
-
146
-
147
-
148
-
149
-
150
 |
 |