Sony PMWF3K Operating Instructions - Page 74
Items, Subitems and setting values, Contents, Skin Tone Detail, Aperture
 |
View all Sony PMWF3K manuals
Add to My Manuals
Save this manual to your list of manuals |
Page 74 highlights
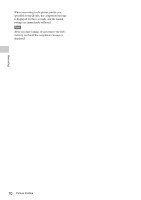
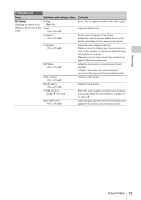
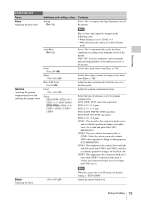
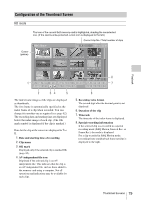
Recording P. PROFILE SET Items Skin Tone Detail Adjusting the details to be applied to the areas of a specific color phase Aperture Making settings related to aperture correction Subitems and setting values Contents Setting On / Off Set to "On" to enable the detail level adjustment for specific color-phase areas. The detail level is uniform over the entire picture with the Off setting. Level -99 to +99 (±0) Adjust the skin-tone detail level. Area Detection2) Execute/Cancel Execute to detect the color in the center of the screen. The area centering around the detected color becomes the target area for Skin Tone Detail control. Area Indication1) On / Off Set to "On" to display the Zebra 1 pattern for the target area for Skin Tone Detail control. Saturation -99 to +99 (±0) Adjust the color (saturation) level for Skin Tone Detail control. Note Phase 0 to 359 (130) When Area Detection is executed, this setting is automatically returned to 0. Adjust the center color-phase value for the target area for Skin Tone Detail control. Note Width 0 to 90 (40) When Area Detection is executed, this setting is automatically changed to the value equivalent to that of the detected color. Adjust the width of the color phase of the target area for Skin Tone Detail control. Note Setting On / Off Level -99 to +99 (±0) When Area Detection is executed, the Width setting automatically returns to 40. Set to "On" to enable aperture correction (processing to improve resolution by adding highfrequency aperture signals to the video signal, which corrects degeneration due to high-frequency characteristics). Select the level for the aperture correction. 74 Picture Profiles
-
 1
1 -
2
-
3
-
4
-
5
-
6
-
7
-
8
-
9
-
10
-
11
-
12
-
13
-
14
-
15
-
16
-
17
-
18
-
19
-
20
-
21
-
22
-
23
-
24
-
25
-
26
-
27
-
28
-
29
-
30
-
31
-
32
-
33
-
34
-
35
-
36
-
37
-
38
-
39
-
40
-
41
-
42
-
43
-
44
-
45
-
46
-
47
-
48
-
49
-
50
-
51
-
52
-
53
-
54
-
55
-
56
-
57
-
58
-
59
-
60
-
61
-
62
-
63
-
64
-
65
-
66
-
67
-
68
-
 69
69 -
 70
70 -
 71
71 -
 72
72 -
 73
73 -
 74
74 -
 75
75 -
 76
76 -
 77
77 -
 78
78 -
 79
79 -
80
-
81
-
82
-
83
-
84
-
85
-
86
-
87
-
88
-
89
-
90
-
91
-
92
-
93
-
94
-
95
-
96
-
97
-
98
-
99
-
100
-
101
-
102
-
103
-
104
-
105
-
106
-
107
-
108
-
109
-
110
-
111
-
112
-
113
-
114
-
115
-
116
-
117
-
118
-
119
-
120
-
121
-
122
-
123
-
124
-
125
-
126
-
127
-
128
-
129
-
130
-
131
-
132
-
133
-
134
-
135
-
136
-
137
-
138
-
139
-
140
-
141
-
142
-
143
-
144
-
145
-
146
-
147
-
148
-
149
-
150
 |
 |