Sony PMWF3K Operating Instructions - Page 56
Recording Shot Marks, Adding the OK Mark
 |
View all Sony PMWF3K manuals
Add to My Manuals
Save this manual to your list of manuals |
Page 56 highlights
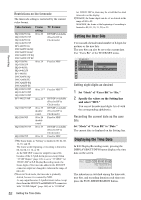
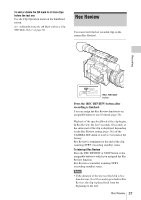
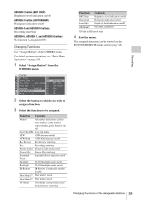
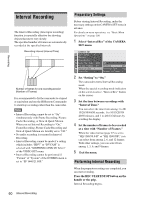
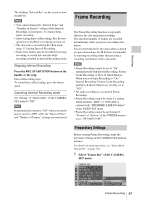
Recording Recording Shot Marks Adding the OK Mark When you record shot marks for important scenes of a clip recorded in HD mode as subsidiary data, you can access the marked points easily on a Shot Mark screen, which only displays scenes with shot marks only. This increases editing efficiency. For the Shot Mark screen, see "Displaying the SHOT MARK Screen (HD Mode Only)" on page 91. The camcorder permits you to record two types of shot marks: shot mark 1 and shot mark 2. Shot marks can be recorded as needed during recording or can be added after recording while checking the playback pictures. Note Shot marks cannot be recorded for clips recorded in SD mode. Inserting a shot mark during recording Activate the IR Remote Commander (page 30), and use the SHOTMARK 1 or 2 button. SHOTMARK 1 button SHOTMARK 2 button 1 SHOTMARK 2 T ZOOM W PUSH SET THUMBNAIL SUB CLIP PREV . PLAY/PAUSE u NEXT > STOP x Press the SHOTMARK 1 or 2 button where you wish to insert a mark. If the Shot Mark1 or Shot Mark2 function is assigned to an assignable button, you can also use it instead (page 58). A shot mark of the type corresponding to the button you press is recorded. For operations to add shot marks after recording, see "Adding Shot Marks During Playback (HD Mode)" on page 84 and "Adding/Deleting Shot Marks (HD Mode Only)" on page 92. By adding the OK mark to a clip recorded in HD mode, you can prevent the clip from being deleted or divided inadvertently. The OK mark is also used to obtain a thumbnail screen of only the marked clips (OK-Clip thumbnail screen) when you press the THUMBNAIL button. For the OK-Clip thumbnail screen, see "Displaying the OK-Clip thumbnail screen (HD mode)" on page 81. Note The OK mark cannot be added to clips recorded in SD mode. To add the OK mark in E-E Display mode, assign the OK Mark function to an assignable button. For function assignment, see "Changing Functions of the Assignable Buttons" on page 58. Adding the OK mark In E-E Display mode, you can add the OK mark to the last clip recorded on the SxS memory card currently selected. When recording of a clip ends, press the assignable button to which you assigned the OK Mark function. The message "OK Mark" is displayed on the screen for three seconds. Deleting the OK mark In E-E Display mode, you can delete the OK mark added to the last clip on the SxS memory card currently selected. 1 Press the assignable button to which you assigned the OK Mark function. The confirmation message "Execute/Cancel" is displayed. 2 Select "Execute." The OK mark of the last clip is deleted. 56 Recording Shot Marks / Adding the OK Mark
-
 1
1 -
2
-
3
-
4
-
5
-
6
-
7
-
8
-
9
-
10
-
11
-
12
-
13
-
14
-
15
-
16
-
17
-
18
-
19
-
20
-
21
-
22
-
23
-
24
-
25
-
26
-
27
-
28
-
29
-
30
-
31
-
32
-
33
-
34
-
35
-
36
-
37
-
38
-
39
-
40
-
41
-
42
-
43
-
44
-
45
-
46
-
47
-
48
-
49
-
50
-
 51
51 -
 52
52 -
 53
53 -
 54
54 -
 55
55 -
 56
56 -
 57
57 -
 58
58 -
 59
59 -
 60
60 -
 61
61 -
62
-
63
-
64
-
65
-
66
-
67
-
68
-
69
-
70
-
71
-
72
-
73
-
74
-
75
-
76
-
77
-
78
-
79
-
80
-
81
-
82
-
83
-
84
-
85
-
86
-
87
-
88
-
89
-
90
-
91
-
92
-
93
-
94
-
95
-
96
-
97
-
98
-
99
-
100
-
101
-
102
-
103
-
104
-
105
-
106
-
107
-
108
-
109
-
110
-
111
-
112
-
113
-
114
-
115
-
116
-
117
-
118
-
119
-
120
-
121
-
122
-
123
-
124
-
125
-
126
-
127
-
128
-
129
-
130
-
131
-
132
-
133
-
134
-
135
-
136
-
137
-
138
-
139
-
140
-
141
-
142
-
143
-
144
-
145
-
146
-
147
-
148
-
149
-
150
 |
 |