Sony PMWF3K Operating Instructions - Page 54
Monitoring the Audio, To adjust the levels manually, Audio recording in special recording, modes
 |
View all Sony PMWF3K manuals
Add to My Manuals
Save this manual to your list of manuals |
Page 54 highlights
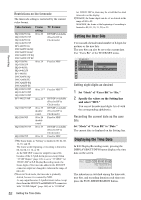
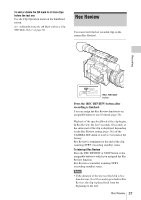
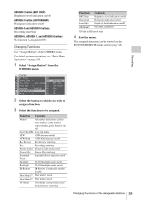
Low: For music recording or recording in an event where high sound pressure may be generated To adjust the levels manually Set the AUDIO SELECT switches CH-1 and CH2 to MANUAL and adjust the audio recording levels by turning the AUDIO LEVEL controls. Set the controls to 5 for the reference setting (0 dB). Setting to 10 maximizes the level (+12 dB), and setting to 0 minimizes it (-∞). The input levels are displayed on the screen when you press the DISPLAY/BATT INFO button. gg Monitoring the Audio You can monitor the sounds being recorded with the headphones connected to the headphone connector (stereo mini jack). Headphone connector Recording 5 7 10 15 20 30 oo m 18dB SHT: 1/2000 CH1 CH2 Fine adjustment of the recording is possible using "TRIM CH-1" and "TRIM CH-2" of "Audio Input" (page 106) of the AUDIO SET menu, For high-quality recording, adjust not only the AUDIO LEVEL controls but also "TRIM CH-1" and "TRIM CH-2" so that the optimum microphone sensitivity is obtained. When you perform fine adjustments with "TRIM CH-1" and "TRIM CH-2," set the AUDIO LEVEL controls to 5 and adjust the items so that the appropriate meter indications are obtained. If the maximum sound pressure cannot be estimated or sudden sound pressure is expected, set "Limiter" of "Audio Input" (page 106) of the AUDIO SET menu to "On." Notes • When you manually adjust the recording levels, check that no distortion is generated, by monitoring through headphones, etc. • If the AUDIO LEVEL controls are set to a value less than 5, the recording levels will not reach the full scale. Audio recording in special recording modes • No audio recording is made in Interval Recording or Frame Recording. • No audio recording is made in Slow & Quick recording if the recording frame rate is set to a value different from the playback frame rate. 54 Recording Audio Signals MONITOR VOLUME MONITOR VOLUME buttons Note The built-in speaker is disabled in E-E Display/ Recording mode. To adjust the audio monitoring volume Use the MONITOR VOLUME buttons. Pressing the + button increases the volume, and pressing the - button decreases it. To muffle the sound, set it to the minimum level. While you adjust the volume, the level is displayed as a bar on the screen.
-
 1
1 -
2
-
3
-
4
-
5
-
6
-
7
-
8
-
9
-
10
-
11
-
12
-
13
-
14
-
15
-
16
-
17
-
18
-
19
-
20
-
21
-
22
-
23
-
24
-
25
-
26
-
27
-
28
-
29
-
30
-
31
-
32
-
33
-
34
-
35
-
36
-
37
-
38
-
39
-
40
-
41
-
42
-
43
-
44
-
45
-
46
-
47
-
48
-
 49
49 -
 50
50 -
 51
51 -
 52
52 -
 53
53 -
 54
54 -
 55
55 -
 56
56 -
 57
57 -
 58
58 -
 59
59 -
60
-
61
-
62
-
63
-
64
-
65
-
66
-
67
-
68
-
69
-
70
-
71
-
72
-
73
-
74
-
75
-
76
-
77
-
78
-
79
-
80
-
81
-
82
-
83
-
84
-
85
-
86
-
87
-
88
-
89
-
90
-
91
-
92
-
93
-
94
-
95
-
96
-
97
-
98
-
99
-
100
-
101
-
102
-
103
-
104
-
105
-
106
-
107
-
108
-
109
-
110
-
111
-
112
-
113
-
114
-
115
-
116
-
117
-
118
-
119
-
120
-
121
-
122
-
123
-
124
-
125
-
126
-
127
-
128
-
129
-
130
-
131
-
132
-
133
-
134
-
135
-
136
-
137
-
138
-
139
-
140
-
141
-
142
-
143
-
144
-
145
-
146
-
147
-
148
-
149
-
150
 |
 |