Sony PMWF3K Operating Instructions - Page 24
Setting the time and date, press the dial.
 |
View all Sony PMWF3K manuals
Add to My Manuals
Save this manual to your list of manuals |
Page 24 highlights
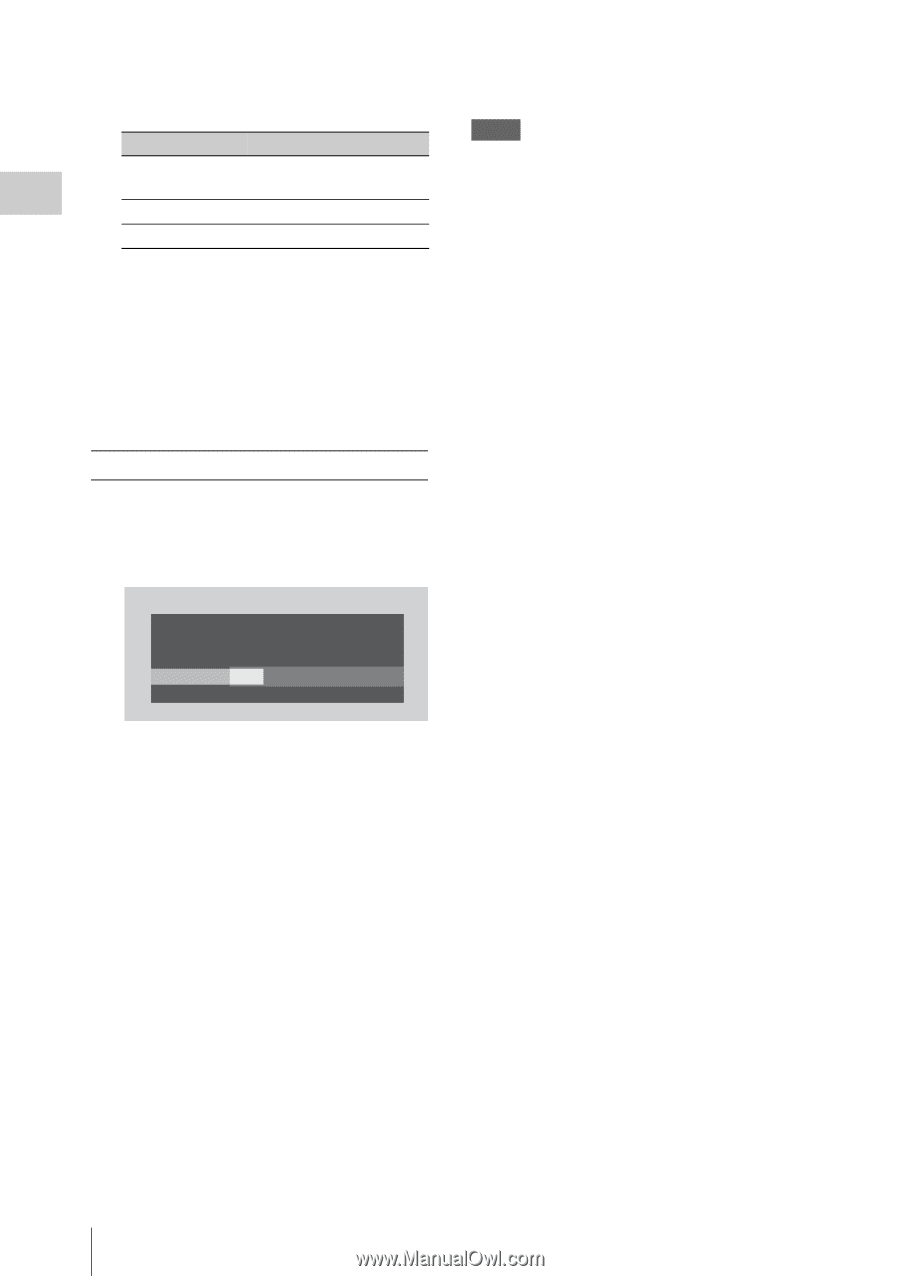
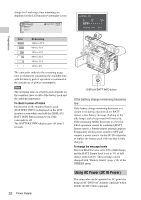
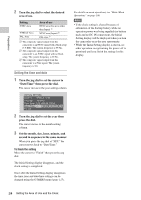
Preparations 2 Turn the jog dial to select the desired area of use. Setting NTSC Area NTSC(J) Area PAL Area Area of use NTSC area (for areas other than Japan) 1) NTSC area (Japan) 2) PAL area 3) 1) The composite signal output from this camcorder is an NTSC signal with a black setup (7.5 IRE). The system frequency is 59.94i. 2) The composite signal output from this camcorder is an NTSC signal with no black setup. The system frequency is 59.94i. 3) The composite signal output from this camcorder is a PAL signal. The system frequency is 50i. Setting the time and date 1 Turn the jog dial to set the cursor to "Date/Time" then press the dial. The cursor moves to the year-setting column. INITIAL SETTING Count r y : NTSC(J) A rea Language : Japanese Time Zone: UTC +09:00 TOKYO Date / Time: 2011/01/01 00:00:00 SET Fi nish 2 Turn the jog dial to set the year then press the dial. The cursor moves to the month-setting column. 3 Set the month, day, hour, minute, and second in sequence in the same manner. When you press the jog dial at "SET," the cursor moves back to "Date/Time." To finish the setting Move the cursor to "Finish" then press the jog dial. The Initial Setting display disappears, and the clock setting is completed. Once after the Initial Setting display disappears, the time zone and date/time settings can be changed using the OTHERS menu (page 115). For details on menu operations, see "Basic Menu Operations" on page 100. Notes • If the clock setting is cleared because of exhaustion of the backup battery while no operation power was being supplied (no battery pack and no DC IN connection), the Initial Setting display will be displayed when you turn the camcorder on at the next opportunity. • While the Initial Setting display is shown, no other operation except turning the power off is permitted until you finish the setting for this display. 24 Setting the Area of Use and the Clock
-
 1
1 -
2
-
3
-
4
-
5
-
6
-
7
-
8
-
9
-
10
-
11
-
12
-
13
-
14
-
15
-
16
-
17
-
18
-
 19
19 -
 20
20 -
 21
21 -
 22
22 -
 23
23 -
 24
24 -
 25
25 -
 26
26 -
 27
27 -
 28
28 -
 29
29 -
30
-
31
-
32
-
33
-
34
-
35
-
36
-
37
-
38
-
39
-
40
-
41
-
42
-
43
-
44
-
45
-
46
-
47
-
48
-
49
-
50
-
51
-
52
-
53
-
54
-
55
-
56
-
57
-
58
-
59
-
60
-
61
-
62
-
63
-
64
-
65
-
66
-
67
-
68
-
69
-
70
-
71
-
72
-
73
-
74
-
75
-
76
-
77
-
78
-
79
-
80
-
81
-
82
-
83
-
84
-
85
-
86
-
87
-
88
-
89
-
90
-
91
-
92
-
93
-
94
-
95
-
96
-
97
-
98
-
99
-
100
-
101
-
102
-
103
-
104
-
105
-
106
-
107
-
108
-
109
-
110
-
111
-
112
-
113
-
114
-
115
-
116
-
117
-
118
-
119
-
120
-
121
-
122
-
123
-
124
-
125
-
126
-
127
-
128
-
129
-
130
-
131
-
132
-
133
-
134
-
135
-
136
-
137
-
138
-
139
-
140
-
141
-
142
-
143
-
144
-
145
-
146
-
147
-
148
-
149
-
150
 |
 |