Sony PMWF3K Operating Instructions - Page 63
Picture Cache Recording, Preparatory Settings, Performing Picture Cache Recording, Recording
 |
View all Sony PMWF3K manuals
Add to My Manuals
Save this manual to your list of manuals |
Page 63 highlights
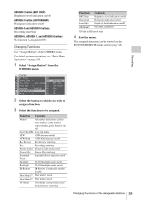
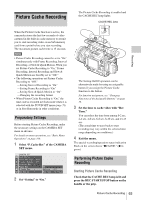
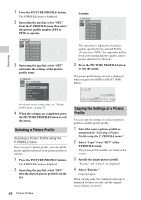
Picture Cache Recording The Picture Cache Recording is enabled and the CACHE REC lamp lights. CACHE REC lamp Recording When the Picture Cache function is active, the camcorder stores the last few seconds of video captured in the built-in cache memory to permit you to start recording video on an SxS memory card from a point before you start recording. The maximum picture cache time is 15 seconds. Notes • Picture Cache Recording cannot be set to "On" simultaneously with Frame Recording, Interval Recording, or Slow & Quick Motion. When you set Picture Cache Recording to "On," Frame Recording, Interval Recording and Slow & Quick Motion are forcibly set to "Off." • The following operations set Picture Cache Recording to "Off." -Setting Interval Recording to "On" -Setting Frame Recording to "On" -Setting Slow & Quick Motion to "On" -Changing the recording format • When Picture Cache Recording is "On," the time code is recorded in Clock mode when it is selected with the TC/UB SET menu (page 51) or in Free Run mode in other conditions. Preparatory Settings Before starting Picture Cache Recording, make the necessary settings on the CAMERA SET menu in advance. For details on menu operations, see "Basic Menu Operations" on page 100. 1 Select "P.Cache Rec" of the CAMERA SET menu. CAMERA SET Slow Shut t e r B Color Bar Type : Mul t i F l i c ker Reduce : O f f I n t e r val Rec B 00:00 Frame Rec B P. Cache Rec B S&Q Mot i on B Setting : Off Rec Time : 13-15sec 2 Set "Setting" to "On." CACHE REC The Setting On/Off operation can be alternatively made by using an assignable button if you assign the Picture Cache function to the button. For function assignment, see "Changing Functions of the Assignable Buttons" on page 58. 3 Set the time to cache video with "Rec Time." You can select the time from among 0-2 sec, 2-4 sec, 4-6 sec, 6-8 sec, 8-10 sec, and 13-15 sec. (The actual time to trace back to start recording may vary within the selected time range depending on conditions.) 4 Exit the menu. The special recording/operation status indication block on the screen shows "zCACHE." (z in green). Performing Picture Cache Recording Starting Picture Cache Recording Check that the CACHE REC lamp is lit and press the REC START/STOP button on the handle or the grip. Picture Cache Recording 63
-
 1
1 -
2
-
3
-
4
-
5
-
6
-
7
-
8
-
9
-
10
-
11
-
12
-
13
-
14
-
15
-
16
-
17
-
18
-
19
-
20
-
21
-
22
-
23
-
24
-
25
-
26
-
27
-
28
-
29
-
30
-
31
-
32
-
33
-
34
-
35
-
36
-
37
-
38
-
39
-
40
-
41
-
42
-
43
-
44
-
45
-
46
-
47
-
48
-
49
-
50
-
51
-
52
-
53
-
54
-
55
-
56
-
57
-
 58
58 -
 59
59 -
 60
60 -
 61
61 -
 62
62 -
 63
63 -
 64
64 -
 65
65 -
 66
66 -
 67
67 -
 68
68 -
69
-
70
-
71
-
72
-
73
-
74
-
75
-
76
-
77
-
78
-
79
-
80
-
81
-
82
-
83
-
84
-
85
-
86
-
87
-
88
-
89
-
90
-
91
-
92
-
93
-
94
-
95
-
96
-
97
-
98
-
99
-
100
-
101
-
102
-
103
-
104
-
105
-
106
-
107
-
108
-
109
-
110
-
111
-
112
-
113
-
114
-
115
-
116
-
117
-
118
-
119
-
120
-
121
-
122
-
123
-
124
-
125
-
126
-
127
-
128
-
129
-
130
-
131
-
132
-
133
-
134
-
135
-
136
-
137
-
138
-
139
-
140
-
141
-
142
-
143
-
144
-
145
-
146
-
147
-
148
-
149
-
150
 |
 |
