Sony PMWF3K Operating Instructions - Page 91
Displaying the SHOT MARK Screen (HD Mode Only), EXPAND CLIP screen in SD mode
 |
View all Sony PMWF3K manuals
Add to My Manuals
Save this manual to your list of manuals |
Page 91 highlights
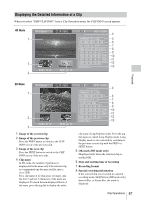
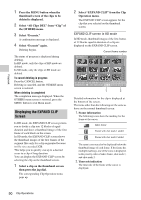
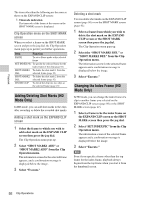
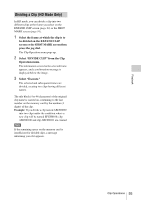
EXPAND CLIP screen in SD mode In SD mode, the thumbnail images of the first frames of segment files are displayed for a clip segmented because its file size exceeded 2GB on the EXPAND CLIP screen. 120min Current frame number EXPAND CLIP 0000001 00 : 00 : 00 : 00 00 : 09 : 30 : 00 00 : 19 : 00 : 00 01 / JAN /2011 10 : 53 JPAN0011 _01 DVCAM29.9P SQ TCR 00 : 00 : 00 : 00 DUR 00 : 09 : 30 : 00 12 Detailed information for the clip is displayed at the bottom of the screen. The items other than the following are the same as those on the normal thumbnail screen: 1. Timecode indication The timecode of the segmentation file at the cursor is displayed. 2. Duration The duration of the segmentation file at the cursor is displayed. Clip Operation menu on the EXPAND CLIP screen HD mode When you select a frame on the EXPAND CLIP screen and press the jog dial, the Clip Operation menu pops up to enable further operations. Item EXPAND (COARSE) EXPAND (FINE) PAUSE SET INDEX PIC SHOT MARK1 ADD SHOT MARK2 ADD Function To decrease the number of partitions of the clip To increase the number of partitions of the clip To set to Pause mode at the selected frame To specify the selected frame for the index frame of the clip (page 92) To add shot mark 1 to the selected frame (page 92) To add shot mark 2 to the selected frame (page 92) Item SHOT MARK1 DEL SHOT MARK2 DEL DIVIDE CLIP Function To delete shot mark 1 from the selected frame (page 92) To delete shot mark 2 from the selected frame (page 92) To divide the clip into two clips at the selected frame (page 93) SD mode You can select "PAUSE" only on the EXPAND CLIP screen in SD mode. Displaying the SHOT MARK Screen (HD Mode Only) When one or more shot marks are recorded for a single clip in HD mode, the SHOT MARK screen permits you to display only the marked frames as the thumbnail images on the screen. 1 Select a clip on the thumbnail screen. 2 Press the jog dial. The Clip Operation menu pops up. 3 Select "SHOT MARK," "SHOT MARK1," or "SHOT MARK2." SHOT MARK: To display thumbnails only of the frames marked with shot mark 1 and/or shot mark 2 recorded SHOT MARK1: To display thumbnails only of the frames marked with shot mark 1 SHOT MARK2: To display thumbnails only of the frames marked with shot mark 2 SHOT MARK screen example 120min SHOT MARK 0031 / 0031 S1 01 : 10 : 20 : 00 S2 01 : 10 : 30 : 00 S2 01 : 10 : 40 : 00 S1 01 : 10 : 50 : 00 S1 01 : 11 : 00 : 00 S1 01 : 11 : 10 : 00 - - - - - - - - - - - - - - - - - - 01 / JAN / 2011 10 : 53 S&Q Mot i on 29 / 24 f p s TCR 01 : 12: 00 : 00 JPAN0011( 1 ) HQ 1920 / 23 . 9 P DUR 00 : 03 : 19 : 23 1 The detailed information of the clip is displayed at the bottom of the screen. Clip Operations 91 Playback
-
 1
1 -
2
-
3
-
4
-
5
-
6
-
7
-
8
-
9
-
10
-
11
-
12
-
13
-
14
-
15
-
16
-
17
-
18
-
19
-
20
-
21
-
22
-
23
-
24
-
25
-
26
-
27
-
28
-
29
-
30
-
31
-
32
-
33
-
34
-
35
-
36
-
37
-
38
-
39
-
40
-
41
-
42
-
43
-
44
-
45
-
46
-
47
-
48
-
49
-
50
-
51
-
52
-
53
-
54
-
55
-
56
-
57
-
58
-
59
-
60
-
61
-
62
-
63
-
64
-
65
-
66
-
67
-
68
-
69
-
70
-
71
-
72
-
73
-
74
-
75
-
76
-
77
-
78
-
79
-
80
-
81
-
82
-
83
-
84
-
85
-
 86
86 -
 87
87 -
 88
88 -
 89
89 -
 90
90 -
 91
91 -
 92
92 -
 93
93 -
 94
94 -
 95
95 -
 96
96 -
97
-
98
-
99
-
100
-
101
-
102
-
103
-
104
-
105
-
106
-
107
-
108
-
109
-
110
-
111
-
112
-
113
-
114
-
115
-
116
-
117
-
118
-
119
-
120
-
121
-
122
-
123
-
124
-
125
-
126
-
127
-
128
-
129
-
130
-
131
-
132
-
133
-
134
-
135
-
136
-
137
-
138
-
139
-
140
-
141
-
142
-
143
-
144
-
145
-
146
-
147
-
148
-
149
-
150
 |
 |
