Sony PMWF3K Operating Instructions - Page 36
Recording, Basic Operation Procedure, Preparations, Checking the last recorded clip Rec, Review
 |
View all Sony PMWF3K manuals
Add to My Manuals
Save this manual to your list of manuals |
Page 36 highlights
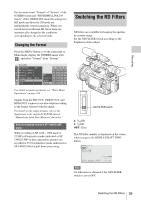
Recording Basic Operation Procedure Recording Basic recording can be performed with the following procedures: Preparations 1 Mount a fully charged battery pack. 2 Load SxS memory card(s). If you load two cards, recording is continued by automatically switching to the second card when the first card becomes full. 3 Adjust the angle of the LCD monitor for the best view. When you wish to use the viewfinder, fold the LCD monitor to its park position and adjust the angle of the viewfinder. 4 Set the power switch to ON. The camcorder is turned on. When using the Remote Commander, activate the remote control mode (page 30). Note When you hold the camcorder by the grip, support it from underneath with your left hand. Recording 5 Adjust the iris, gain, electric shutter, and white balance, as required. See "Adjusting the Iris" on page 48, "Setting the Gain" on page 45, "Setting the Electronic Shutter" on page 46, "Adjusting the White Balance" on page 40. 6 Focus on the subject. 7 Press the REC START/STOP button on the handle or the grip. (If you are using the IR Remote Commander, press the REC button simultaneously with the unmarked button.) The front and rear tally lamps light and recording begins. 8 To stop recording, press the REC START/STOP button again. (If you are using the IR Remote Commander, press the REC PAUSE button simultaneously with the unmarked button.) Recording stops and the camcorder enters STBY (recording standby) mode. Note If you press the REC START/STOP button to start next recording while previous data writing is not completed, the message "Cannot Proceed" may be displayed and recording may not start. To record external input signals Changing the "Input Source Select" setting of the VIDEO SET menu from "Camera" (factory setting) to "i.LINK" enables recording of an HDV stream fed via the i.LINK (HDV/DV) connector. For details, see "Recording External Input Signals" on page 129. To prevent a switching error The REC START/STOP button on the handle is incorporated with a protective cover. If the REC START/STOP button on the handle will not be used, it is recommended to cover the button. Checking the last recorded clip (Rec Review) 9 Press the REC REVIEW button. The Rec Review function (page 57) is activated, and the last recorded clip is played back for the specified time on the LCD monitor/viewfinder screen. When playback reaches the end of the clip, the camcorder returns to STBY (recording standby) mode. To delete clips You can delete the last recorded clip by using the Last Clip DEL function. See"Deleting the Last Recorded Clip" on page 77. Use the All Clips DEL function when you wish to delete all recorded clips from a memory card. 36 Basic Operation Procedure
-
 1
1 -
2
-
3
-
4
-
5
-
6
-
7
-
8
-
9
-
10
-
11
-
12
-
13
-
14
-
15
-
16
-
17
-
18
-
19
-
20
-
21
-
22
-
23
-
24
-
25
-
26
-
27
-
28
-
29
-
30
-
 31
31 -
 32
32 -
 33
33 -
 34
34 -
 35
35 -
 36
36 -
 37
37 -
 38
38 -
 39
39 -
 40
40 -
 41
41 -
42
-
43
-
44
-
45
-
46
-
47
-
48
-
49
-
50
-
51
-
52
-
53
-
54
-
55
-
56
-
57
-
58
-
59
-
60
-
61
-
62
-
63
-
64
-
65
-
66
-
67
-
68
-
69
-
70
-
71
-
72
-
73
-
74
-
75
-
76
-
77
-
78
-
79
-
80
-
81
-
82
-
83
-
84
-
85
-
86
-
87
-
88
-
89
-
90
-
91
-
92
-
93
-
94
-
95
-
96
-
97
-
98
-
99
-
100
-
101
-
102
-
103
-
104
-
105
-
106
-
107
-
108
-
109
-
110
-
111
-
112
-
113
-
114
-
115
-
116
-
117
-
118
-
119
-
120
-
121
-
122
-
123
-
124
-
125
-
126
-
127
-
128
-
129
-
130
-
131
-
132
-
133
-
134
-
135
-
136
-
137
-
138
-
139
-
140
-
141
-
142
-
143
-
144
-
145
-
146
-
147
-
148
-
149
-
150
 |
 |
