Sony PMWF3K Operating Instructions - Page 42
Adjusting the Black Balance
 |
View all Sony PMWF3K manuals
Add to My Manuals
Save this manual to your list of manuals |
Page 42 highlights
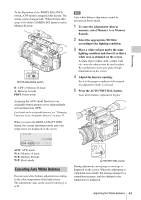
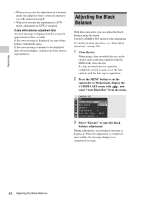
Recording • When you execute the adjustment in a memory mode, the adjusted value is stored in memory (A or B) selected in step 1. • When you execute the adjustment in ATW mode, adjustment in ATW is resumed. If auto white-balance adjustment fails An error message is displayed on the screen for approximately three seconds. If the error message is displayed, try auto whitebalance adjustment again. If the error message continues to be displayed after several attempts, consult your Sony service representative. Adjusting the Black Balance With this camcorder, you can adjust the black balance using the menu. Use the CAMERA SET menu for the adjustment. For details on menu operations, see "Basic Menu Operations" on page 100. 1 Close the iris. When using a lens on which the iris can be closed, such as the lens supplied with the PMW-F3K, close the iris. If a lens on which the iris cannot be completely closed is used, cover the lens entirely with the lens cap or equivalent. 2 Press the MENU button to set the camcorder to Menu mode, display the CAMERA SET menu with , and select "Auto Black Bal." from the menu. CAMERA SET Auto Black Bal. Gain Setup Shu t t e r 00:00 S l ow Shu t t e r Color Bar Type F l i c ker Reduce Execute B Cancel B B : Mul t i B 3 Select "Execute" to start the black balance adjustment. During adjustment, an in-progress message is displayed. When the adjustment is completed successfully, the message changes to a completion message. 42 Adjusting the Black Balance
-
 1
1 -
2
-
3
-
4
-
5
-
6
-
7
-
8
-
9
-
10
-
11
-
12
-
13
-
14
-
15
-
16
-
17
-
18
-
19
-
20
-
21
-
22
-
23
-
24
-
25
-
26
-
27
-
28
-
29
-
30
-
31
-
32
-
33
-
34
-
35
-
36
-
 37
37 -
 38
38 -
 39
39 -
 40
40 -
 41
41 -
 42
42 -
 43
43 -
 44
44 -
 45
45 -
 46
46 -
 47
47 -
48
-
49
-
50
-
51
-
52
-
53
-
54
-
55
-
56
-
57
-
58
-
59
-
60
-
61
-
62
-
63
-
64
-
65
-
66
-
67
-
68
-
69
-
70
-
71
-
72
-
73
-
74
-
75
-
76
-
77
-
78
-
79
-
80
-
81
-
82
-
83
-
84
-
85
-
86
-
87
-
88
-
89
-
90
-
91
-
92
-
93
-
94
-
95
-
96
-
97
-
98
-
99
-
100
-
101
-
102
-
103
-
104
-
105
-
106
-
107
-
108
-
109
-
110
-
111
-
112
-
113
-
114
-
115
-
116
-
117
-
118
-
119
-
120
-
121
-
122
-
123
-
124
-
125
-
126
-
127
-
128
-
129
-
130
-
131
-
132
-
133
-
134
-
135
-
136
-
137
-
138
-
139
-
140
-
141
-
142
-
143
-
144
-
145
-
146
-
147
-
148
-
149
-
150
 |
 |