Toshiba GSC-R60 Owners Manual - Page 112
Protecting Images, Selecting and Protecting Images
 |
View all Toshiba GSC-R60 manuals
Add to My Manuals
Save this manual to your list of manuals |
Page 112 highlights
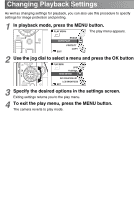
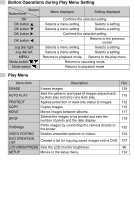
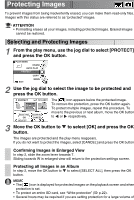
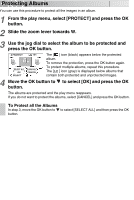
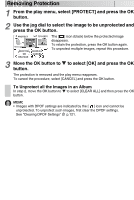
Protecting Images To prevent images from being inadvertently erased, you can make them read-only files. Images with this status are referred to as "protected" images. ATTENTION • Formatting erases all your images, including protected images. Erased images cannot be restored. Selecting and Protecting Images 1 From the play menu, use the jog dial to select [PROTECT] and press the OK button. PLAY MENU ERASE AUTO PLAY PROTECT EXIT COPY MOVE 2 Use the jog dial to select the image to be protected and press the OK button. PROTECT 101-0001 PREVIOUS ALBUM SELECT ALL OK SELECT CLEAR ALL CANCEL The [ ] icon appears below the protected image. To remove the protection, press the OK button again. To protect multiple images, repeat this procedure. To move to the previous or next album, move the OK button to or respectively. 3 Move the OK button to to select [OK] and press the OK button. The images are protected and the play menu reappears. If you do not want to protect the images, select [CANCEL] and press the OK button. Confirming Images in Enlarged View In step 2, slide the zoom lever towards T. Sliding towards W in enlarged view will return to the protection settings screen. Protecting all Images in an Album In step 2, move the OK button to to select [SELECT ALL], then press the OK button. MEMO • The [ ] icon is displayed for protected images on the playback screen and when protection is set. • To protect an entire SD card, see "Write-protection" ( p.22). • Several hours may be required if you are setting protection for a large volume of
-
 1
1 -
2
-
3
-
4
-
5
-
6
-
7
-
8
-
9
-
10
-
11
-
12
-
13
-
14
-
15
-
16
-
17
-
18
-
19
-
20
-
21
-
22
-
23
-
24
-
25
-
26
-
27
-
28
-
29
-
30
-
31
-
32
-
33
-
34
-
35
-
36
-
37
-
38
-
39
-
40
-
41
-
42
-
43
-
44
-
45
-
46
-
47
-
48
-
49
-
50
-
51
-
52
-
53
-
54
-
55
-
56
-
57
-
58
-
59
-
60
-
61
-
62
-
63
-
64
-
65
-
66
-
67
-
68
-
69
-
70
-
71
-
72
-
73
-
74
-
75
-
76
-
77
-
78
-
79
-
80
-
81
-
82
-
83
-
84
-
85
-
86
-
87
-
88
-
89
-
90
-
91
-
92
-
93
-
94
-
95
-
96
-
97
-
98
-
99
-
100
-
101
-
102
-
103
-
104
-
105
-
106
-
 107
107 -
 108
108 -
 109
109 -
 110
110 -
 111
111 -
 112
112 -
 113
113 -
 114
114 -
 115
115 -
 116
116 -
 117
117 -
118
-
119
-
120
-
121
-
122
-
123
-
124
-
125
-
126
-
127
-
128
-
129
-
130
-
131
-
132
-
133
-
134
-
135
-
136
-
137
-
138
-
139
-
140
-
141
-
142
-
143
-
144
-
145
-
146
-
147
-
148
-
149
-
150
-
151
-
152
-
153
-
154
-
155
-
156
-
157
-
158
-
159
-
160
-
161
-
162
-
163
-
164
-
165
-
166
-
167
-
168
-
169
-
170
-
171
-
172
-
173
-
174
-
175
-
176
-
177
-
178
-
179
-
180
-
181
-
182
-
183
-
184
-
185
-
186
-
187
-
188
-
189
-
190
-
191
-
192
-
193
-
194
-
195
-
196
-
197
-
198
-
199
-
200
-
201
-
202
-
203
-
204
-
205
-
206
-
207
-
208
-
209
-
210
-
211
-
212
-
213
-
214
-
215
-
216
-
217
-
218
-
219
-
220
-
221
-
222
-
223
-
224
-
225
-
226
-
227
-
228
-
229
-
230
-
231
-
232
-
233
-
234
-
235
-
236
-
237
-
238
-
239
-
240
-
241
-
242
-
243
-
244
-
245
-
246
-
247
-
248
-
249
-
250
-
251
-
252
-
253
-
254
-
255
-
256
-
257
-
258
-
259
-
260
-
261
-
262
-
263
-
264
-
265
-
266
-
267
 |
 |
