Toshiba GSC-R60 Owners Manual - Page 128
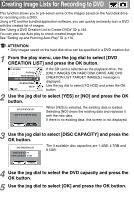
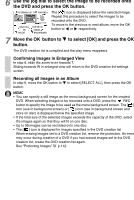
Use the jog dial to select the image to be recorded onto, the DVD and press the OK button.
 |
View all Toshiba GSC-R60 manuals
Add to My Manuals
Save this manual to your list of manuals |
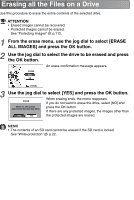
Page 128 highlights
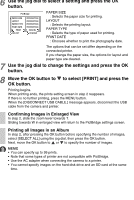
6 Use the jog dial to select the image to be recorded onto the DVD and press the OK button. DVD CREATION LIST 100-0021 SELECT ALL OK SELECT NEXT ALBUM 00.0 GB / 00 CANCEL BACKGROUND The [ ] icon is displayed below the selected image. Repeat this procedure to select the images to be recorded onto the DVD. To move to the previous or next album, move the OK button to or respectively. 7 Move the OK button to to select [OK] and press the OK button. The DVD creation list is compiled and the play menu reappears. Confirming Images in Enlarged View In step 6, slide the zoom lever towards T. Sliding towards W in enlarged view will return to the DVD creation list settings screen. Recording all Images in an Album In step 6, move the OK button to to select [SELECT ALL], then press the OK button. MEMO • You can specify a still image as the menu background screen for the created DVD. When selecting images to be recorded onto a DVD, press the REC button to specify the image to be used as the menu background screen. The [ ] icon (use in background screen) or [ ] icon (use in background screen and store on disc) is displayed below the specified image. • If the total size of the selected images exceeds the capacity of the DVD, select the images again so that they will fit on one disc. • Up to 99 images can be recorded onto one disc. • The [ ] icon is displayed for images specified in the DVD creation list. When erasing images set to a DVD creation list, remove the protection. An error may occur during creation of a DVD if you had erased images set to the DVD creation list, create the DVD creation list again. See "Protecting Images" p.112.
-
 1
1 -
2
-
3
-
4
-
5
-
6
-
7
-
8
-
9
-
10
-
11
-
12
-
13
-
14
-
15
-
16
-
17
-
18
-
19
-
20
-
21
-
22
-
23
-
24
-
25
-
26
-
27
-
28
-
29
-
30
-
31
-
32
-
33
-
34
-
35
-
36
-
37
-
38
-
39
-
40
-
41
-
42
-
43
-
44
-
45
-
46
-
47
-
48
-
49
-
50
-
51
-
52
-
53
-
54
-
55
-
56
-
57
-
58
-
59
-
60
-
61
-
62
-
63
-
64
-
65
-
66
-
67
-
68
-
69
-
70
-
71
-
72
-
73
-
74
-
75
-
76
-
77
-
78
-
79
-
80
-
81
-
82
-
83
-
84
-
85
-
86
-
87
-
88
-
89
-
90
-
91
-
92
-
93
-
94
-
95
-
96
-
97
-
98
-
99
-
100
-
101
-
102
-
103
-
104
-
105
-
106
-
107
-
108
-
109
-
110
-
111
-
112
-
113
-
114
-
115
-
116
-
117
-
118
-
119
-
120
-
121
-
122
-
 123
123 -
 124
124 -
 125
125 -
 126
126 -
 127
127 -
 128
128 -
 129
129 -
 130
130 -
 131
131 -
 132
132 -
 133
133 -
134
-
135
-
136
-
137
-
138
-
139
-
140
-
141
-
142
-
143
-
144
-
145
-
146
-
147
-
148
-
149
-
150
-
151
-
152
-
153
-
154
-
155
-
156
-
157
-
158
-
159
-
160
-
161
-
162
-
163
-
164
-
165
-
166
-
167
-
168
-
169
-
170
-
171
-
172
-
173
-
174
-
175
-
176
-
177
-
178
-
179
-
180
-
181
-
182
-
183
-
184
-
185
-
186
-
187
-
188
-
189
-
190
-
191
-
192
-
193
-
194
-
195
-
196
-
197
-
198
-
199
-
200
-
201
-
202
-
203
-
204
-
205
-
206
-
207
-
208
-
209
-
210
-
211
-
212
-
213
-
214
-
215
-
216
-
217
-
218
-
219
-
220
-
221
-
222
-
223
-
224
-
225
-
226
-
227
-
228
-
229
-
230
-
231
-
232
-
233
-
234
-
235
-
236
-
237
-
238
-
239
-
240
-
241
-
242
-
243
-
244
-
245
-
246
-
247
-
248
-
249
-
250
-
251
-
252
-
253
-
254
-
255
-
256
-
257
-
258
-
259
-
260
-
261
-
262
-
263
-
264
-
265
-
266
-
267
 |
 |
