Toshiba GSC-R60 Owners Manual - Page 48
Taking Still Images
 |
View all Toshiba GSC-R60 manuals
Add to My Manuals
Save this manual to your list of manuals |
Page 48 highlights
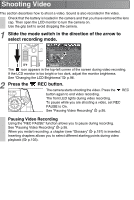
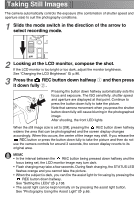
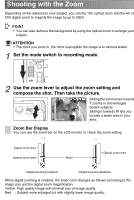
Taking Still Images The camera automatically controls the exposure (the combination of shutter speed and aperture size) to suit the photography conditions. 1 Slide the mode switch in the direction of the arrow to select recording mode. 2 Looking at the LCD monitor, compose the shot. If the LCD monitor is too bright or too dark, adjust the monitor brightness. See "Changing the LCD Brightness" p.96. 3 Press the REC button down halfway and then press it down fully . Pressing the button down halfway automatically sets the focus and exposure. The ISO sensitivity, shutter speed and aperture are displayed at that point. Continue to press the button down fully to take the picture. Note that camera movement when you press the shutter button down fully will cause blurring in the photographed image. After shooting, the front LED lights. When the still image size is set to [2M], pressing the REC button down halfway widens the area that can be photographed and the screen display changes accordingly. When this occurs, the center of the image may shift. If you release the REC button or press the button down fully to take the picture and then do not use the camera controls for around 3 seconds, the screen display reverts to its original area. MEMO • In the interval between the REC button being pressed down halfway and the focus being set, the LCD monitor image may turn dark. • Flash charging may take a few seconds. During flash charging, the STATUS LED flashes orange and you cannot take the picture. • When the subject is dark, you can fire the assist light for focusing by pressing the REC button down halfway. See "Setting the LEDs" p.138. • The assist light can be kept normally on by pressing the assist light button. See "Photography Using the Assist Light" p.66.
-
 1
1 -
2
-
3
-
4
-
5
-
6
-
7
-
8
-
9
-
10
-
11
-
12
-
13
-
14
-
15
-
16
-
17
-
18
-
19
-
20
-
21
-
22
-
23
-
24
-
25
-
26
-
27
-
28
-
29
-
30
-
31
-
32
-
33
-
34
-
35
-
36
-
37
-
38
-
39
-
40
-
41
-
42
-
 43
43 -
 44
44 -
 45
45 -
 46
46 -
 47
47 -
 48
48 -
 49
49 -
 50
50 -
 51
51 -
 52
52 -
 53
53 -
54
-
55
-
56
-
57
-
58
-
59
-
60
-
61
-
62
-
63
-
64
-
65
-
66
-
67
-
68
-
69
-
70
-
71
-
72
-
73
-
74
-
75
-
76
-
77
-
78
-
79
-
80
-
81
-
82
-
83
-
84
-
85
-
86
-
87
-
88
-
89
-
90
-
91
-
92
-
93
-
94
-
95
-
96
-
97
-
98
-
99
-
100
-
101
-
102
-
103
-
104
-
105
-
106
-
107
-
108
-
109
-
110
-
111
-
112
-
113
-
114
-
115
-
116
-
117
-
118
-
119
-
120
-
121
-
122
-
123
-
124
-
125
-
126
-
127
-
128
-
129
-
130
-
131
-
132
-
133
-
134
-
135
-
136
-
137
-
138
-
139
-
140
-
141
-
142
-
143
-
144
-
145
-
146
-
147
-
148
-
149
-
150
-
151
-
152
-
153
-
154
-
155
-
156
-
157
-
158
-
159
-
160
-
161
-
162
-
163
-
164
-
165
-
166
-
167
-
168
-
169
-
170
-
171
-
172
-
173
-
174
-
175
-
176
-
177
-
178
-
179
-
180
-
181
-
182
-
183
-
184
-
185
-
186
-
187
-
188
-
189
-
190
-
191
-
192
-
193
-
194
-
195
-
196
-
197
-
198
-
199
-
200
-
201
-
202
-
203
-
204
-
205
-
206
-
207
-
208
-
209
-
210
-
211
-
212
-
213
-
214
-
215
-
216
-
217
-
218
-
219
-
220
-
221
-
222
-
223
-
224
-
225
-
226
-
227
-
228
-
229
-
230
-
231
-
232
-
233
-
234
-
235
-
236
-
237
-
238
-
239
-
240
-
241
-
242
-
243
-
244
-
245
-
246
-
247
-
248
-
249
-
250
-
251
-
252
-
253
-
254
-
255
-
256
-
257
-
258
-
259
-
260
-
261
-
262
-
263
-
264
-
265
-
266
-
267
 |
 |
