Toshiba GSC-R60 Owners Manual - Page 82
Shooting with Natural Color Tones White Balance
 |
View all Toshiba GSC-R60 manuals
Add to My Manuals
Save this manual to your list of manuals |
Page 82 highlights
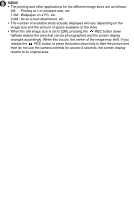
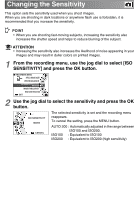
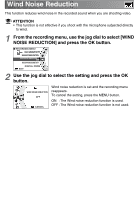
Shooting with Natural Color Tones (White Balance) When you take pictures under a range of different light sources, you can use the white balance (see "Glossary" p.198) setting to obtain more natural-looking colors. POINT • If the stored white balance setting is unsuitable, you can use presets to manually set the white balance. ATTENTION • If you use a setting other than [AUTO] and the selected setting does not match the light source, the color tones may appear unnatural. 1 From the recording menu, use the jog dial to select [WHITE BALANCE] and press the OK button. ■ RECORDING MENU VIDEO QUALITY STILL IMAGE SIZE WHITE BALANCE SUNLIGHT ISO SENSITIVITY IMAGE STABILIZATION EXIT 2 Use the jog dial to select the white balance and press the OK button. If you selected [PRESET], proceed to "Overwriting preset data" or "Using preset data". If you selected another setting, the camera reverts to recording mode. To cancel the setting, press the MENU button. AUTO OK CANCEL AUTO : Automatic adjustment SUNLIGHT : For recording in sunlight CLOUD : For recording under cloudy skies FLUORESCENT LIGHT 1 : For recording under daylight fluorescent lights (fluorescent lights with a bluish cast) FLUORESCENT LIGHT 2 : For recording under neutral fluorescent lights (fluorescent lights with a reddish cast) INCANDESCENT LAMP : For recording under incandescent lights PRESET : Presets (using data stored by the user)
-
 1
1 -
2
-
3
-
4
-
5
-
6
-
7
-
8
-
9
-
10
-
11
-
12
-
13
-
14
-
15
-
16
-
17
-
18
-
19
-
20
-
21
-
22
-
23
-
24
-
25
-
26
-
27
-
28
-
29
-
30
-
31
-
32
-
33
-
34
-
35
-
36
-
37
-
38
-
39
-
40
-
41
-
42
-
43
-
44
-
45
-
46
-
47
-
48
-
49
-
50
-
51
-
52
-
53
-
54
-
55
-
56
-
57
-
58
-
59
-
60
-
61
-
62
-
63
-
64
-
65
-
66
-
67
-
68
-
69
-
70
-
71
-
72
-
73
-
74
-
75
-
76
-
 77
77 -
 78
78 -
 79
79 -
 80
80 -
 81
81 -
 82
82 -
 83
83 -
 84
84 -
 85
85 -
 86
86 -
 87
87 -
88
-
89
-
90
-
91
-
92
-
93
-
94
-
95
-
96
-
97
-
98
-
99
-
100
-
101
-
102
-
103
-
104
-
105
-
106
-
107
-
108
-
109
-
110
-
111
-
112
-
113
-
114
-
115
-
116
-
117
-
118
-
119
-
120
-
121
-
122
-
123
-
124
-
125
-
126
-
127
-
128
-
129
-
130
-
131
-
132
-
133
-
134
-
135
-
136
-
137
-
138
-
139
-
140
-
141
-
142
-
143
-
144
-
145
-
146
-
147
-
148
-
149
-
150
-
151
-
152
-
153
-
154
-
155
-
156
-
157
-
158
-
159
-
160
-
161
-
162
-
163
-
164
-
165
-
166
-
167
-
168
-
169
-
170
-
171
-
172
-
173
-
174
-
175
-
176
-
177
-
178
-
179
-
180
-
181
-
182
-
183
-
184
-
185
-
186
-
187
-
188
-
189
-
190
-
191
-
192
-
193
-
194
-
195
-
196
-
197
-
198
-
199
-
200
-
201
-
202
-
203
-
204
-
205
-
206
-
207
-
208
-
209
-
210
-
211
-
212
-
213
-
214
-
215
-
216
-
217
-
218
-
219
-
220
-
221
-
222
-
223
-
224
-
225
-
226
-
227
-
228
-
229
-
230
-
231
-
232
-
233
-
234
-
235
-
236
-
237
-
238
-
239
-
240
-
241
-
242
-
243
-
244
-
245
-
246
-
247
-
248
-
249
-
250
-
251
-
252
-
253
-
254
-
255
-
256
-
257
-
258
-
259
-
260
-
261
-
262
-
263
-
264
-
265
-
266
-
267
 |
 |