Toshiba GSC-R60 Owners Manual - Page 60
Setting the Flash
 |
View all Toshiba GSC-R60 manuals
Add to My Manuals
Save this manual to your list of manuals |
Page 60 highlights
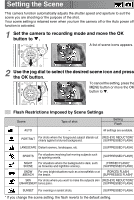
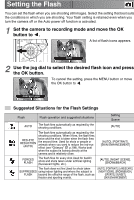
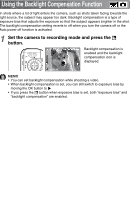
Setting the Flash You can set the flash when you are shooting still images. Select the setting that best suits the conditions in which you are shooting. Your flash setting is retained even when you turn the camera off or the Auto power off function is activated. 1 Set the camera to recording mode and move the OK button to . A list of flash icons appears. AUTO OK CANCEL 2 Use the jog dial to select the desired flash icon and press the OK button. To cancel the setting, press the MENU button or move the OK button to . FORCED FLASH OK CANCEL Suggested Situations for the Flash Settings Flash Flash operation and suggested situations Setting Scene AUTO The flash fires automatically as required by the shooting conditions. [AUTO] The flash fires automatically as required by the shooting conditions. When it fires, the flash fires RED-EYE REDUCTION (AUTO) twice and the shot is taken when the flash fires the second time. Used for shots or people or animals where you want to reduce the red-eye effect (see "Glossary" p.198). Works best when the subject is looking directly at the camera and is relatively close. [AUTO], [PORTRAIT], [SKIN ENHANCEMENT] FORCED FLASH The flash fires for every shot.Used for backlit shots and shots taken under artificial lighting (fluorescent lights, etc.). The flash does not fire.Used for shots taken SUPPRESSED using indoor lighting and where the subject is FLASH beyond the effective range of the flash, such as theater and sporting events. [AUTO], [NIGHT SCENE], [SNOW&BEACH] [AUTO], [PORTRAIT], [LANDSCAPE], [NIGHT SCENE], [SNOW&BEACH], [SPORTS], [SUNSET], [SKIN ENHANCEMENT]
-
 1
1 -
2
-
3
-
4
-
5
-
6
-
7
-
8
-
9
-
10
-
11
-
12
-
13
-
14
-
15
-
16
-
17
-
18
-
19
-
20
-
21
-
22
-
23
-
24
-
25
-
26
-
27
-
28
-
29
-
30
-
31
-
32
-
33
-
34
-
35
-
36
-
37
-
38
-
39
-
40
-
41
-
42
-
43
-
44
-
45
-
46
-
47
-
48
-
49
-
50
-
51
-
52
-
53
-
54
-
 55
55 -
 56
56 -
 57
57 -
 58
58 -
 59
59 -
 60
60 -
 61
61 -
 62
62 -
 63
63 -
 64
64 -
 65
65 -
66
-
67
-
68
-
69
-
70
-
71
-
72
-
73
-
74
-
75
-
76
-
77
-
78
-
79
-
80
-
81
-
82
-
83
-
84
-
85
-
86
-
87
-
88
-
89
-
90
-
91
-
92
-
93
-
94
-
95
-
96
-
97
-
98
-
99
-
100
-
101
-
102
-
103
-
104
-
105
-
106
-
107
-
108
-
109
-
110
-
111
-
112
-
113
-
114
-
115
-
116
-
117
-
118
-
119
-
120
-
121
-
122
-
123
-
124
-
125
-
126
-
127
-
128
-
129
-
130
-
131
-
132
-
133
-
134
-
135
-
136
-
137
-
138
-
139
-
140
-
141
-
142
-
143
-
144
-
145
-
146
-
147
-
148
-
149
-
150
-
151
-
152
-
153
-
154
-
155
-
156
-
157
-
158
-
159
-
160
-
161
-
162
-
163
-
164
-
165
-
166
-
167
-
168
-
169
-
170
-
171
-
172
-
173
-
174
-
175
-
176
-
177
-
178
-
179
-
180
-
181
-
182
-
183
-
184
-
185
-
186
-
187
-
188
-
189
-
190
-
191
-
192
-
193
-
194
-
195
-
196
-
197
-
198
-
199
-
200
-
201
-
202
-
203
-
204
-
205
-
206
-
207
-
208
-
209
-
210
-
211
-
212
-
213
-
214
-
215
-
216
-
217
-
218
-
219
-
220
-
221
-
222
-
223
-
224
-
225
-
226
-
227
-
228
-
229
-
230
-
231
-
232
-
233
-
234
-
235
-
236
-
237
-
238
-
239
-
240
-
241
-
242
-
243
-
244
-
245
-
246
-
247
-
248
-
249
-
250
-
251
-
252
-
253
-
254
-
255
-
256
-
257
-
258
-
259
-
260
-
261
-
262
-
263
-
264
-
265
-
266
-
267
 |
 |
