Toshiba GSC-R60 Owners Manual - Page 175
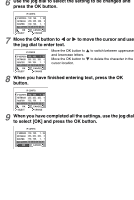
the jog dial to enter text., When you have finished entering text, press the OK
 |
View all Toshiba GSC-R60 manuals
Add to My Manuals
Save this manual to your list of manuals |
Page 175 highlights
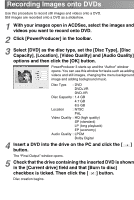
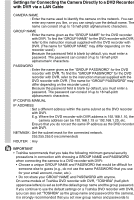
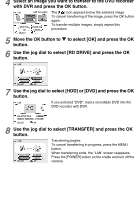
1 From the setup menu, use the jog dial to select [LAN SETTINGS] and press the OK button. ■ SETUP AUTO POWER OFF LCD-LINKED POWER LAN SETTINGS VIDEO OUTPUT LANGUAGE EXIT 2 Use the jog dial to select the setting to be changed and press the OK button. LAN SETTINGS CAMERA NAME GSC-R60 GROUP NAME PASSWORD IP CONFIG DHCP OK CANCEL SELECT CHANGE 3 Move the OK button to or to move the cursor and use the jog dial to enter text. LAN SETTINGS CAMERA NAME GSC-R60 GROUP NAME PASSWORD IP CONFIG DHCP CHARACTER TYPE DELETE SELECT OK Move the OK button to and lowercase letters. Move the OK button to cursor location. to switch between uppercase to delete the character in the 4 When you have finished entering text, press the OK button. LAN SETTINGS CAMERA NAME GSC-R60 GROUP NAME TOSHIBA PASSWORD IP CONFIG DHCP CHARACTER TYPE DELETE SELECT OK 5 When you have completed all the settings, use the jog dial to select [OK] and press the OK button. LAN SETTINGS CAMERA NAME GSC-R60 GROUP NAME TOSHIBA PASSWORD IP CONFIG MANUAL OK CANCEL If the IP CONFIG setting is [DHCP], this completes the settings. If the IP CONFIG setting is [MANUAL], proceed to step 6.
-
 1
1 -
2
-
3
-
4
-
5
-
6
-
7
-
8
-
9
-
10
-
11
-
12
-
13
-
14
-
15
-
16
-
17
-
18
-
19
-
20
-
21
-
22
-
23
-
24
-
25
-
26
-
27
-
28
-
29
-
30
-
31
-
32
-
33
-
34
-
35
-
36
-
37
-
38
-
39
-
40
-
41
-
42
-
43
-
44
-
45
-
46
-
47
-
48
-
49
-
50
-
51
-
52
-
53
-
54
-
55
-
56
-
57
-
58
-
59
-
60
-
61
-
62
-
63
-
64
-
65
-
66
-
67
-
68
-
69
-
70
-
71
-
72
-
73
-
74
-
75
-
76
-
77
-
78
-
79
-
80
-
81
-
82
-
83
-
84
-
85
-
86
-
87
-
88
-
89
-
90
-
91
-
92
-
93
-
94
-
95
-
96
-
97
-
98
-
99
-
100
-
101
-
102
-
103
-
104
-
105
-
106
-
107
-
108
-
109
-
110
-
111
-
112
-
113
-
114
-
115
-
116
-
117
-
118
-
119
-
120
-
121
-
122
-
123
-
124
-
125
-
126
-
127
-
128
-
129
-
130
-
131
-
132
-
133
-
134
-
135
-
136
-
137
-
138
-
139
-
140
-
141
-
142
-
143
-
144
-
145
-
146
-
147
-
148
-
149
-
150
-
151
-
152
-
153
-
154
-
155
-
156
-
157
-
158
-
159
-
160
-
161
-
162
-
163
-
164
-
165
-
166
-
167
-
168
-
169
-
 170
170 -
 171
171 -
 172
172 -
 173
173 -
 174
174 -
 175
175 -
 176
176 -
 177
177 -
 178
178 -
 179
179 -
 180
180 -
181
-
182
-
183
-
184
-
185
-
186
-
187
-
188
-
189
-
190
-
191
-
192
-
193
-
194
-
195
-
196
-
197
-
198
-
199
-
200
-
201
-
202
-
203
-
204
-
205
-
206
-
207
-
208
-
209
-
210
-
211
-
212
-
213
-
214
-
215
-
216
-
217
-
218
-
219
-
220
-
221
-
222
-
223
-
224
-
225
-
226
-
227
-
228
-
229
-
230
-
231
-
232
-
233
-
234
-
235
-
236
-
237
-
238
-
239
-
240
-
241
-
242
-
243
-
244
-
245
-
246
-
247
-
248
-
249
-
250
-
251
-
252
-
253
-
254
-
255
-
256
-
257
-
258
-
259
-
260
-
261
-
262
-
263
-
264
-
265
-
266
-
267
 |
 |
