Toshiba GSC-R60 Owners Manual - Page 144
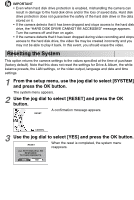
Resetting the System, and press the OK button.
 |
View all Toshiba GSC-R60 manuals
Add to My Manuals
Save this manual to your list of manuals |
Page 144 highlights
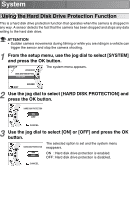
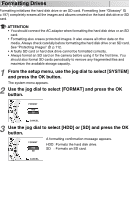
IMPORTANT • Even when hard disk drive protection is enabled, mishandling the camera can result in damage to the hard disk drive and/or the loss of saved data. Hard disk drive protection does not guarantee the safety of the hard disk drive or the data stored on it. • If the camera detects that it has been dropped and stops access to the hard disk drive, the "HARD DISK DRIVE CANNOT BE ACCESSED" message appears. Turn the camera off and then on again. • If the camera detects that it has been dropped during video recording and stops access to the hard disk drive, the video file may be created incorrectly and you may not be able to play it back. In this event, you should erase the video. Resetting the System This option returns the camera settings to the values specified at the time of purchase (factory default). Note that this does not reset the settings for Drive & Album, the white balance presets, the LAN settings, or the video output, language and date and time settings. 1 From the setup menu, use the jog dial to select [SYSTEM] and press the OK button. The system menu appears. 2 Use the jog dial to select [RESET] and press the OK button. RESET A confirmation message appears. CANCEL 3 Use the jog dial to select [YES] and press the OK button. RESET When the reset is completed, the system menu reappears. ALL SETTINGS WILL BE RESTORED TO THEIR DEFAULTS. YES NO
-
 1
1 -
2
-
3
-
4
-
5
-
6
-
7
-
8
-
9
-
10
-
11
-
12
-
13
-
14
-
15
-
16
-
17
-
18
-
19
-
20
-
21
-
22
-
23
-
24
-
25
-
26
-
27
-
28
-
29
-
30
-
31
-
32
-
33
-
34
-
35
-
36
-
37
-
38
-
39
-
40
-
41
-
42
-
43
-
44
-
45
-
46
-
47
-
48
-
49
-
50
-
51
-
52
-
53
-
54
-
55
-
56
-
57
-
58
-
59
-
60
-
61
-
62
-
63
-
64
-
65
-
66
-
67
-
68
-
69
-
70
-
71
-
72
-
73
-
74
-
75
-
76
-
77
-
78
-
79
-
80
-
81
-
82
-
83
-
84
-
85
-
86
-
87
-
88
-
89
-
90
-
91
-
92
-
93
-
94
-
95
-
96
-
97
-
98
-
99
-
100
-
101
-
102
-
103
-
104
-
105
-
106
-
107
-
108
-
109
-
110
-
111
-
112
-
113
-
114
-
115
-
116
-
117
-
118
-
119
-
120
-
121
-
122
-
123
-
124
-
125
-
126
-
127
-
128
-
129
-
130
-
131
-
132
-
133
-
134
-
135
-
136
-
137
-
138
-
 139
139 -
 140
140 -
 141
141 -
 142
142 -
 143
143 -
 144
144 -
 145
145 -
 146
146 -
 147
147 -
 148
148 -
 149
149 -
150
-
151
-
152
-
153
-
154
-
155
-
156
-
157
-
158
-
159
-
160
-
161
-
162
-
163
-
164
-
165
-
166
-
167
-
168
-
169
-
170
-
171
-
172
-
173
-
174
-
175
-
176
-
177
-
178
-
179
-
180
-
181
-
182
-
183
-
184
-
185
-
186
-
187
-
188
-
189
-
190
-
191
-
192
-
193
-
194
-
195
-
196
-
197
-
198
-
199
-
200
-
201
-
202
-
203
-
204
-
205
-
206
-
207
-
208
-
209
-
210
-
211
-
212
-
213
-
214
-
215
-
216
-
217
-
218
-
219
-
220
-
221
-
222
-
223
-
224
-
225
-
226
-
227
-
228
-
229
-
230
-
231
-
232
-
233
-
234
-
235
-
236
-
237
-
238
-
239
-
240
-
241
-
242
-
243
-
244
-
245
-
246
-
247
-
248
-
249
-
250
-
251
-
252
-
253
-
254
-
255
-
256
-
257
-
258
-
259
-
260
-
261
-
262
-
263
-
264
-
265
-
266
-
267
 |
 |
