Yamaha MD4S Owner's Manual - Page 27
Find a blank area, Select the track for recording, Check the recording level, Press the SONG SEARCH - 4 track recorder
 |
View all Yamaha MD4S manuals
Add to My Manuals
Save this manual to your list of manuals |
Page 27 highlights
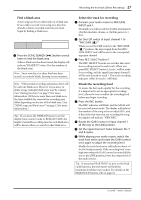
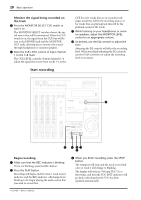
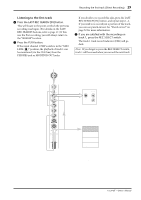
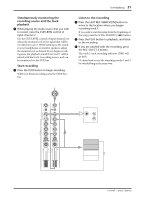
Recording the first track (Direct Recording) 27 s Find a blank area A new song can be recorded only on a blank area. If you wish to record a new song on a disc that already contains recorded material, you must begin by finding a blank area. Unrecorded area Song 1 Song 2 Blank area 1 Press the SONG SEARCH [ ] button several times to find the blank area. When a blank area has been found, the display will indicate "BLANK X" (where X is the number of the blank area). Note: Since new discs (or discs that have been erased) are entirely blank, this step is not necessary. Note: With normal recording operations, there will be only one blank area. However if you move or delete songs, multiple blank areas may be created. (See "Editing functions" on page 73 for more information.) If there is more than one blank area, the time available for consecutive recording may differ depending on the size of the blank area. (See "MD4S songs and blank areas" on page 12 for more information.) Tip: If you press the DISPLAY button to set the display time counter mode to REMAIN TIME, the length of available recording time for each blank area will be shown when you search to that blank area. s Select the track for recording 2 Connect your audio source to MIC/LINE INPUT jack 1. Normally, you will record the rhythm instruments (rhythm machine, drums, or rhythm guitar etc.) first. 3 Set the FLIP switch of input channel 1 to "MIC/LINE ( )." When you set the FLIP switch to the "MIC/LINE ( )" position, the input signal from the MIC/ LINE INPUT jack will be sent to the corresponding input channel. 4 Press REC SELECT button 1. The REC SELECT buttons are switches that select the recording source for each track. When you press REC SELECT button 1, track 1 will be ready for recording, and the signal from input channel 1 will be sent directly to track 1. The track recording indicator (DIR) for track 1 will blink. s Check the recording level To insure the best audio quality for the recording, it is important to set an appropriate recording level. Always be sure to adjust the recording level before you begin recording. 5 Press the REC button. The REC indicator will blink, and the MD4S will be in record-pause mode. The display will indicate the number of the song to be recorded (001), and if this is the first time you are recording the song, the display will indicate "NEW REC." 6 Rotate the GAIN control of input channel 1 all the way to the LINE position. 7 Set the input channel 1 fader between the 7 and 8 marks. 8 While playing your audio source, watch the track level meter and rotate the GAIN control once again to adjust the recording level. Ideally, the track level meter will indicate about -3 for the loudest sounds. If the recording level is too high even when the GAIN control is rotated all the way to the LINE position, lower the output level of the audio source. Tip: If you press PEAK HOLD to turn on the Peak Hold function, the level meter will hold the maximum level that was reached. For details on the PEAK HOLD button, refer to page 18. -Owner's Manual
-
 1
1 -
2
-
3
-
4
-
5
-
6
-
7
-
8
-
9
-
10
-
11
-
12
-
13
-
14
-
15
-
16
-
17
-
18
-
19
-
20
-
21
-
 22
22 -
 23
23 -
 24
24 -
 25
25 -
 26
26 -
 27
27 -
 28
28 -
 29
29 -
 30
30 -
 31
31 -
 32
32 -
33
-
34
-
35
-
36
-
37
-
38
-
39
-
40
-
41
-
42
-
43
-
44
-
45
-
46
-
47
-
48
-
49
-
50
-
51
-
52
-
53
-
54
-
55
-
56
-
57
-
58
-
59
-
60
-
61
-
62
-
63
-
64
-
65
-
66
-
67
-
68
-
69
-
70
-
71
-
72
-
73
-
74
-
75
-
76
-
77
-
78
-
79
-
80
-
81
-
82
-
83
-
84
-
85
-
86
-
87
-
88
-
89
-
90
-
91
-
92
-
93
-
94
-
95
-
96
-
97
-
98
-
99
-
100
-
101
-
102
-
103
-
104
-
105
-
106
-
107
-
108
-
109
-
110
-
111
-
112
-
113
-
114
-
115
 |
 |
