Yamaha MD4S Owner's Manual - Page 29
Listening to the first track, Press the LAST REC SEARCH [IN] button., Press the PLAY button.
 |
View all Yamaha MD4S manuals
Add to My Manuals
Save this manual to your list of manuals |
Page 29 highlights
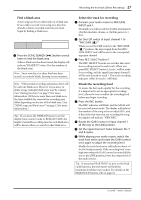
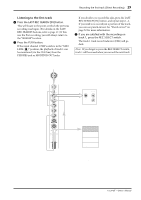
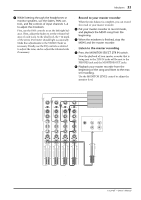
Recording the first track (Direct Recording) 29 s Listening to the first track 4 Press the LAST REC SEARCH [IN] button. This will locate to the point at which the previous recording was begun. (For details on the LAST REC SEARCH buttons, refer to page 17.) If this was the first recording, you will always return to the "00:00.00" location. 5 Press the PLAY button. If the input channel 1 FLIP switch is in the "MIC/ LINE ( )" position, the playback of track 1 can be monitored (via the CUE bus) from the PHONES jack or MONITOR OUT jacks. If you decide to re-record this take, press the LAST REC SEARCH [IN] button, and repeat steps 1-4. If you wish to re-record just a portion of the track, you can use punch-in/out. See "Punch-in/out" on page 52 for more information. 6 If you are satisfied with the recording on track 1, press the REC SELECT switch. The track 1 track record indicator (DIR) will go dark. Note: If you forget to press the REC SELECT switch, track 1 will be erased when you record the next track. 1 GAIN LINE MIC MIC/ LINE PB CUE FLIP P A N L R 0 HIGH L E V E L 10 -15 +15 MID -15 +15 LOW -15 +15 AUX 1 2 PAN L R 10 9 8 7 6 5 4 3 2 1 0 CUE Bus MONITOR OUT L PHONES R Track 1 Track 2 Track 3 Track 4 Signal flow during track recording -Owner's Manual
-
 1
1 -
2
-
3
-
4
-
5
-
6
-
7
-
8
-
9
-
10
-
11
-
12
-
13
-
14
-
15
-
16
-
17
-
18
-
19
-
20
-
21
-
22
-
23
-
 24
24 -
 25
25 -
 26
26 -
 27
27 -
 28
28 -
 29
29 -
 30
30 -
 31
31 -
 32
32 -
 33
33 -
 34
34 -
35
-
36
-
37
-
38
-
39
-
40
-
41
-
42
-
43
-
44
-
45
-
46
-
47
-
48
-
49
-
50
-
51
-
52
-
53
-
54
-
55
-
56
-
57
-
58
-
59
-
60
-
61
-
62
-
63
-
64
-
65
-
66
-
67
-
68
-
69
-
70
-
71
-
72
-
73
-
74
-
75
-
76
-
77
-
78
-
79
-
80
-
81
-
82
-
83
-
84
-
85
-
86
-
87
-
88
-
89
-
90
-
91
-
92
-
93
-
94
-
95
-
96
-
97
-
98
-
99
-
100
-
101
-
102
-
103
-
104
-
105
-
106
-
107
-
108
-
109
-
110
-
111
-
112
-
113
-
114
-
115
 |
 |