Yamaha MD4S Owner's Manual - Page 28
Start recording, Monitor the signal being recorded on, the track, Begin recording
 |
View all Yamaha MD4S manuals
Add to My Manuals
Save this manual to your list of manuals |
Page 28 highlights
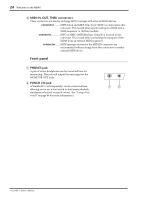
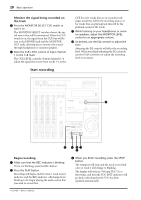
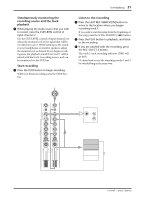
28 Basic operation s Monitor the signal being recorded on the track 9 Press the MONITOR SELECT CUE switch to turn it on. The MONITOR SELECT switches choose the signal source that will be monitored. When the CUE switch is on, the signal from the CUE bus will be sent to the PHONES jack and the MONITOR OUT jacks, allowing you to monitor the sound through headphones or monitor speakers. 0 Raise the CUE LEVEL control of input channel 1 to the 7-8 mark. The CUE LEVEL controls of input channels 1-4 adjust the signal that is sent from tracks 1-4 to the CUE bus (for tracks that are in record/recordpause mode this will be the recording source, or for tracks that are playing back this will be the playback sound of the track). A While listening to your headphones or monitor speakers, adjust the MONITOR LEVEL control to an appropriate volume. B As desired, use the EQ controls to adjust the tone. Adjusting the EQ controls will affect the recording level. When you finish adjusting the EQ controls, use the GAIN control to re-adjust the recording level as necessary. Start recording IN OUT THRU MIDI TRACK DIRECT OUT 2TR IN STEREO MONITOR OUT OUT 1 2 AUX SEND 1 2 INSERT I/O MIC/LINE INPUT INSERT I/O 3 4 LINE INPUT 5 6 7 8 1 GAIN 2 GAIN 3 GAIN 4 GAIN 5/6 7/8 LINE MIC MIC/ LINE PB CUE FLIP P A N L R 0 HIGH L E V E L 10 LINE MIC MIC/ LINE PB CUE FLIP P A N L R 0 HIGH L E V E L 10 LINE MIC MIC/ LINE PB CUE FLIP P A N L R 0 HIGH L E V E L 10 LINE MIC MIC/ LINE PB CUE FLIP P A N L R 0 HIGH L E V E L 10 0 10 0 10 CUE MIX TO STEREO MONITOR SELECT 2TR IN -15 +15 -15 +15 -15 +15 -15 +15 MID MID MID MID -15 +15 -15 +15 -15 +15 -15 +15 LOW LOW LOW LOW -15 +15 -15 +15 -15 +15 -15 +15 AUX AUX AUX AUX STEREO CUE BUS MULTITRACK MD RECORDER 1 2 1 2 1 2 1 2 PAN PAN PAN PAN L R L R L R L R 10 10 10 10 9 9 9 9 8 8 8 8 7 7 7 7 6 6 6 6 5 5 5 5 4 4 4 4 3 3 3 3 2 2 2 2 1 1 1 1 0 0 0 0 MONITOR LEVEL MIN 10 9 8 7 6 5 4 3 2 1 0 MAX 10 9 8 7 6 5 4 3 2 1 0 1 2 3 4 STEREO REPEAT MARK SEARCH AB AUTO PUNCH I/O LAST REC SEARCH IN OUT SONG SEARCH REHE REC PLAY MARK SET PAUSE STOP TOC WRITE CH1 1 L REC SELECT CH2 CH3 2 3 R L CH4 4 R EJECT PEAK HOLD DISPLAY PITCH ADJUST EDIT UTILITY EXIT ENTER DATA CURSOR PHONES PUNCH I/O 4 1 53 2 6 s Begin recording 1 Make sure that the REC indicator is blinking. If it is not blinking, press the REC button. 2 Press the PLAY button. Recording will begin, and the track 1 track record indicator and the REC indicator will change from blinking to lit. Begin playing the audio source that you wish to record first. 3 When you finish recording, press the STOP button. The transport will stop, and the track record indicator of track 1 will change to blinking. The display will indicate "Writing TOC" for a short time, and then the TOC EDIT indicator will go dark, indicating that the TOC has been updated automatically. -Owner's Manual
-
 1
1 -
2
-
3
-
4
-
5
-
6
-
7
-
8
-
9
-
10
-
11
-
12
-
13
-
14
-
15
-
16
-
17
-
18
-
19
-
20
-
21
-
22
-
 23
23 -
 24
24 -
 25
25 -
 26
26 -
 27
27 -
 28
28 -
 29
29 -
 30
30 -
 31
31 -
 32
32 -
 33
33 -
34
-
35
-
36
-
37
-
38
-
39
-
40
-
41
-
42
-
43
-
44
-
45
-
46
-
47
-
48
-
49
-
50
-
51
-
52
-
53
-
54
-
55
-
56
-
57
-
58
-
59
-
60
-
61
-
62
-
63
-
64
-
65
-
66
-
67
-
68
-
69
-
70
-
71
-
72
-
73
-
74
-
75
-
76
-
77
-
78
-
79
-
80
-
81
-
82
-
83
-
84
-
85
-
86
-
87
-
88
-
89
-
90
-
91
-
92
-
93
-
94
-
95
-
96
-
97
-
98
-
99
-
100
-
101
-
102
-
103
-
104
-
105
-
106
-
107
-
108
-
109
-
110
-
111
-
112
-
113
-
114
-
115
 |
 |