Yamaha MD4S Owner's Manual - Page 88
Adjusting the display brightness, Selecting the type of Frame display, Frame Disp - 4 track minidisc recorder
 |
View all Yamaha MD4S manuals
Add to My Manuals
Save this manual to your list of manuals |
Page 88 highlights
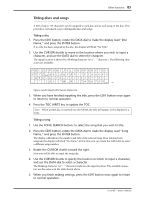
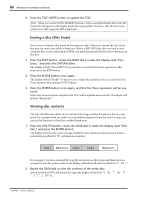
88 Advanced recording techniques Note: The recording mode setting is not reset when the power is turned off. If a recordable MiniDisc is inserted into the MD4S, it will automatically switch to 2TR mode, meaning that if you later insert an MD DATA disc and wish to perform 4 track recording, you will need to reset the recording mode to 4TR. Adjusting the display brightness The brightness of the display can be adjusted over five steps. 1. Press the UTILITY button, rotate the DATA dial to make the display read "Disp Dimmer," and press the ENTER button. The display will indicate "Dimmer X" (X will be a number between 1-5). 2. Rotate the DATA dial to adjust the brightness. The range of this parameter is 1-5, and higher settings will increase the brightness. The factory setting is 5. 3. Press the ENTER button to finalize the display brightness setting. 4. Press the UTILITY button or the EXIT button to return to normal operation. Tip: This setting is remembered when the MD4S power is turned off. Selecting the type of Frame display The frame display of the display counter can be switched to either 86 frames/second (MiniDisc/MD DATA audio frames) or 30 frames/second (MTC frames). 1. Press the UTILITY button, rotate the DATA dial to make the display read "Frame Disp," and press the ENTER button. The display will indicate "XX Frame" (XX will be either 86 or 30). 2. Rotate the DATA dial to select either "86" or "30." If "86" is selected, the "FRAMES" indicator will light in the Frame area of the time counter. If "30" is selected, the "MTC FRAMES" indicator will light. 3. Press the ENTER button to finalize the frame display setting. 4. Press the UTILITY button or the EXIT button to return to normal operation. Tip: This setting is remembered when the MD4S power is turned off. -Owner's Manual
-
 1
1 -
2
-
3
-
4
-
5
-
6
-
7
-
8
-
9
-
10
-
11
-
12
-
13
-
14
-
15
-
16
-
17
-
18
-
19
-
20
-
21
-
22
-
23
-
24
-
25
-
26
-
27
-
28
-
29
-
30
-
31
-
32
-
33
-
34
-
35
-
36
-
37
-
38
-
39
-
40
-
41
-
42
-
43
-
44
-
45
-
46
-
47
-
48
-
49
-
50
-
51
-
52
-
53
-
54
-
55
-
56
-
57
-
58
-
59
-
60
-
61
-
62
-
63
-
64
-
65
-
66
-
67
-
68
-
69
-
70
-
71
-
72
-
73
-
74
-
75
-
76
-
77
-
78
-
79
-
80
-
81
-
82
-
 83
83 -
 84
84 -
 85
85 -
 86
86 -
 87
87 -
 88
88 -
 89
89 -
 90
90 -
 91
91 -
 92
92 -
 93
93 -
94
-
95
-
96
-
97
-
98
-
99
-
100
-
101
-
102
-
103
-
104
-
105
-
106
-
107
-
108
-
109
-
110
-
111
-
112
-
113
-
114
-
115
 |
 |