Yamaha MD4S Owner's Manual - Page 82
Exchanging the order of songs Song Renumber
 |
View all Yamaha MD4S manuals
Add to My Manuals
Save this manual to your list of manuals |
Page 82 highlights
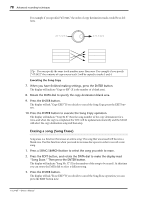
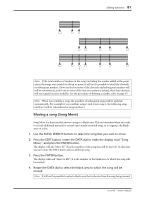
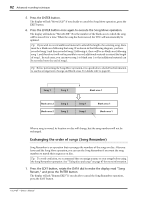
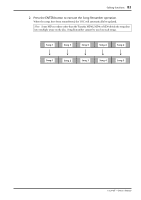
82 Advanced recording techniques 5. Press the ENTER button. The display will ask "Move EXE?" If you decide to cancel the Song Move operation, press the EXIT button. 6. Press the ENTER button once again to execute the Song Move operation. The display will indicate "MoveTo BX" (X is the number of the blank area to which the song will be moved) for a time. When the song has been moved, the TOC will automatically be updated. Tip: If you wish to record additional material to extend the length of an existing song, there must be a blank area following that song. If as shown in the following diagram, you have recorded song 1 and then recorded song 2 following it, there will be no blank area following song 1, and therefore it will not be possible to record additional material to extend the length of song 1. In such cases, you can move song 1 to blank area 1 so that additional material can be recorded onto the end of song 1. Tip: Before performing the Song Move operation, it is a good idea to check Disc Information to see the arrangement of songs and blank areas. For details refer to page 86. Move song 1 to blank area 1 Song 1 Song 2 Blank area 1 Blank area 2 Blank area 2 Song 2 Song 2 Song 1 Song 1 Blank area 1 Blank area 1 Now the length of song 1 can be extended When a song is moved, its location on disc will change, but the song numbers will not be exchanged. Exchanging the order of songs (Song Renumber) Song Renumber is an operation that rearranges the numbers of the songs on disc. After you have used the Song Move operation, you can use the Song Renumber if you want the song numbers to match their sequence on disc. Tip: To avoid confusion, we recommend that you assign a name to your songs before using the Song Renumber operation. See "Titling discs and songs" on page 85 for more information. 1. Press the EDIT button, rotate the DATA dial to make the display read "Song Renum," and press the ENTER button. The display will ask "Renum EXE?" If you decide to cancel the Song Renumber operation, press the EXIT button. -Owner's Manual
-
 1
1 -
2
-
3
-
4
-
5
-
6
-
7
-
8
-
9
-
10
-
11
-
12
-
13
-
14
-
15
-
16
-
17
-
18
-
19
-
20
-
21
-
22
-
23
-
24
-
25
-
26
-
27
-
28
-
29
-
30
-
31
-
32
-
33
-
34
-
35
-
36
-
37
-
38
-
39
-
40
-
41
-
42
-
43
-
44
-
45
-
46
-
47
-
48
-
49
-
50
-
51
-
52
-
53
-
54
-
55
-
56
-
57
-
58
-
59
-
60
-
61
-
62
-
63
-
64
-
65
-
66
-
67
-
68
-
69
-
70
-
71
-
72
-
73
-
74
-
75
-
76
-
 77
77 -
 78
78 -
 79
79 -
 80
80 -
 81
81 -
 82
82 -
 83
83 -
 84
84 -
 85
85 -
 86
86 -
 87
87 -
88
-
89
-
90
-
91
-
92
-
93
-
94
-
95
-
96
-
97
-
98
-
99
-
100
-
101
-
102
-
103
-
104
-
105
-
106
-
107
-
108
-
109
-
110
-
111
-
112
-
113
-
114
-
115
 |
 |
