Yamaha MD4S Owner's Manual - Page 40
Make sure that the MONITOR SELECT CUE, BUS/L, R will blink.
 |
View all Yamaha MD4S manuals
Add to My Manuals
Save this manual to your list of manuals |
Page 40 highlights
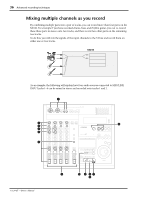
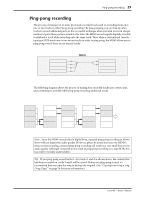
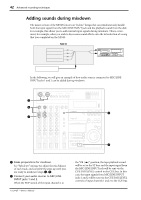
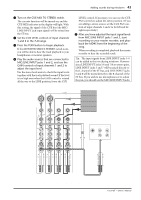
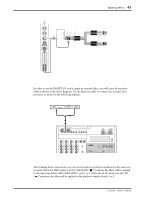
40 Advanced recording techniques In the following, we will give an example of mixing previously-recorded tracks 1-4 into a stereo pair, and ping-pong recording them to tracks 3 and 4. IN OUT THRU MIDI TRACK DIRECT OUT 2TR IN STEREO MONITOR OUT OUT 1 2 AUX SEND 1 2 INSERT I/O MIC/LINE INPUT INSERT I/O 3 4 LINE INPUT 5 6 7 8 1 7 1 GAIN 2 GAIN 3 GAIN 4 GAIN 5/6 7/8 LINE MIC MIC/ LINE PB CUE FLIP P A N L R 0 HIGH L E V E L 10 LINE MIC MIC/ LINE PB CUE FLIP P A N L R 0 HIGH L E V E L 10 LINE MIC MIC/ LINE PB CUE FLIP P A N L R 0 HIGH L E V E L 10 LINE MIC MIC/ LINE PB CUE FLIP P A N L R 0 HIGH L E V E L 10 0 10 0 10 CUE MIX TO STEREO MONITOR SELECT 2TR IN -15 +15 -15 +15 -15 +15 -15 +15 MID MID MID MID -15 +15 -15 +15 -15 +15 -15 +15 LOW LOW LOW LOW -15 +15 -15 +15 -15 +15 -15 +15 AUX AUX AUX AUX STEREO CUE 1 2 1 2 1 2 1 2 PAN PAN PAN PAN MONITOR LEVEL L R L R L R L R 10 10 10 10 9 9 9 9 8 8 8 8 7 7 7 7 6 6 6 6 5 5 5 5 4 4 4 4 3 3 3 3 2 2 2 2 1 1 1 1 0 0 0 0 MIN 10 9 8 7 6 5 4 3 2 1 0 MAX 10 9 8 7 6 5 4 3 2 1 0 1 2 3 4 STEREO BUS MULTITRACK MD RECORDER REPEAT MARK SEARCH AB AUTO PUNCH I/O LAST REC SEARCH IN OUT SONG SEARCH REHE REC PLAY MARK SET PAUSE STOP TOC WRITE CH1 1 L REC SELECT CH2 CH3 2 3 R L CH4 4 R EJECT PEAK HOLD DISPLAY PITCH ADJUST EDIT UTILITY EXIT ENTER DATA CURSOR PHONES PUNCH I/O 0 4568 9 78 2 9 3 A 1 Set the FLIP switches of input channels 1-4 to "PB ( )." The playback sound of tracks 1-4 will be sent via the input channels to the ST bus. Tip: If you use LINE INPUT jacks 5-8, the audio sources connected to LINE INPUT jacks 5-8 can be added to tracks 1-4 as you ping-pong record. The input level of LINE INPUT jacks 5-8 can be adjusted by the LEVEL controls 5/6 and 7/8. 2 While holding down the BUS button, press REC SELECT buttons 3 and 4. The ST bus will be selected as the recording source for tracks 3 and 4, and the track record indicators (BUS/L, R) will blink. Make sure that the track record indicators for tracks 1 and 2 are dark. 3 Turn on the MONITOR SELECT STEREO switch. The ST bus will be selected as the signal source for monitoring, allowing you to monitor the playback sound of tracks 1-4. Make sure that the MONITOR SELECT CUE switch is off. 4 Set the STEREO fader in the 7-8 range. 5 Press the SONG SEARCH [ ] button to locate to the beginning of the song. 6 Press the REHE button, and then press the PLAY button to begin rehearsing the pingpong recording. 7 While listening to your monitoring headphones or monitor speakers, use the faders and PAN controls of input channels 1-4 to adjust the mix balance of tracks 1-4. As necessary, use the EQ controls to adjust the tone. When you finish adjusting the mix balance, watch the track level meters of tracks 3 and 4 as you adjust the STEREO fader to set the recording level. (At the ideal level, the -3 segment of the meter will light at the peaks.) -Owner's Manual
-
 1
1 -
2
-
3
-
4
-
5
-
6
-
7
-
8
-
9
-
10
-
11
-
12
-
13
-
14
-
15
-
16
-
17
-
18
-
19
-
20
-
21
-
22
-
23
-
24
-
25
-
26
-
27
-
28
-
29
-
30
-
31
-
32
-
33
-
34
-
 35
35 -
 36
36 -
 37
37 -
 38
38 -
 39
39 -
 40
40 -
 41
41 -
 42
42 -
 43
43 -
 44
44 -
 45
45 -
46
-
47
-
48
-
49
-
50
-
51
-
52
-
53
-
54
-
55
-
56
-
57
-
58
-
59
-
60
-
61
-
62
-
63
-
64
-
65
-
66
-
67
-
68
-
69
-
70
-
71
-
72
-
73
-
74
-
75
-
76
-
77
-
78
-
79
-
80
-
81
-
82
-
83
-
84
-
85
-
86
-
87
-
88
-
89
-
90
-
91
-
92
-
93
-
94
-
95
-
96
-
97
-
98
-
99
-
100
-
101
-
102
-
103
-
104
-
105
-
106
-
107
-
108
-
109
-
110
-
111
-
112
-
113
-
114
-
115
 |
 |
