Yamaha MD4S Owner's Manual - Page 50
Applying an effect only to the monitor signal, Turn on the MONITOR SELECT CUE switch
 |
View all Yamaha MD4S manuals
Add to My Manuals
Save this manual to your list of manuals |
Page 50 highlights
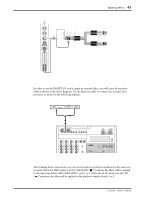
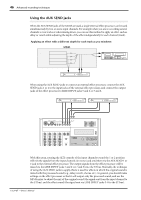
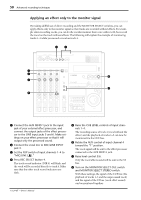
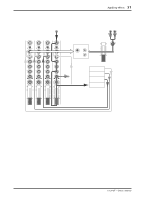
50 Advanced recording techniques Applying an effect only to the monitor signal By making skillful use of direct recording and the MONITOR SELECT switches, you can apply effects only to the monitor signal so that tracks are recorded without effects. For example when recording vocals, you can let the vocalist monitor their voice with reverb, but record the vocal on the track without effects. The following will explain the example of monitoring tracks 1-3 while you record a vocal on track 4. 21 IN OUT THRU TRACK 2TR IN STEREO MONITOR 2 MIDI DIRECT OUT OUT OUT 1 2 INSERT I/O MIC/LINE INPUT INSERT I/O 3 4 LINE INPUT 5 6 7 8 7 3 5 6 1 GAIN 2 GAIN 3 GAIN 4 GAIN 5/6 7/8 LINE MIC MIC/ LINE PB CUE FLIP P A N L R 0 HIGH L E V E L 10 LINE MIC MIC/ LINE PB CUE FLIP P A N L R 0 HIGH L E V E L 10 LINE MIC MIC/ LINE PB CUE FLIP P A N L R 0 HIGH L E V E L 10 LINE MIC MIC/ LINE PB CUE FLIP P A N L R 0 HIGH L E V E L 10 0 10 0 10 CUE MIX TO STEREO MONITOR SELECT 2TR IN -15 +15 -15 +15 -15 +15 -15 +15 MID MID MID MID -15 +15 -15 +15 -15 +15 -15 +15 LOW LOW LOW LOW -15 +15 -15 +15 -15 +15 -15 +15 AUX AUX AUX AUX STEREO CUE BUS MULTITRACK MD RECORDER 1 2 1 2 1 2 1 2 PAN PAN PAN PAN L R L R L R L R 10 10 10 10 9 9 9 9 8 8 8 8 7 7 7 7 6 6 6 6 5 5 5 5 4 4 4 4 3 3 3 3 2 2 2 2 1 1 1 1 0 0 0 0 MONITOR LEVEL MIN 10 9 8 7 6 5 4 3 2 1 0 MAX 10 9 8 7 6 5 4 3 2 1 0 1 2 3 4 STEREO REPEAT MARK SEARCH AB AUTO PUNCH I/O LAST REC SEARCH IN OUT SONG SEARCH REHE REC PLAY MARK SET PAUSE STOP TOC WRITE CH1 1 L REC SELECT CH2 CH3 2 3 R L CH4 4 R EJECT PEAK HOLD DISPLAY PITCH ADJUST EDIT UTILITY EXIT ENTER DATA CURSOR PHONES PUNCH I/O 4 8 1 Connect the AUX SEND 1 jack to the input jack of your external effect processor, and connect the output jacks of the effect processor to the LINE input jacks 5 and 6. Make settings on your effect processor so that it will output only the processed sound. 2 Connect the vocal mic to MIC/LINE INPUT jack 4. 3 Set the FLIP switch of input channels 1-4 to "MIC/LINE ( )." 4 Press REC SELECT button 4. The track record indicator (DIR 4) will blink, and the vocal will be recorded directly to track 4. Make sure that the other track record indicators are dark. 5 Raise the CUE LEVEL controls of input channels 1-4. The recording source of track 4 (vocal without the effect) and the playback of tracks 1-3 can now be monitored via the CUE bus. 6 Rotate the AUX control of input channel 4 toward the "1" position. The vocal signal will be sent to the effect processor connected to the AUX SEND 1 jack. 7 Raise level control 5/6. Only the vocal effect sound will be sent to the ST bus. 8 Turn on the MONITOR SELECT CUE switch and MONITOR SELECT STEREO switch. With these settings, the signal of the CUE bus (the playback of tracks 1-3 and the unprocessed vocal) and the signal of the ST bus (vocal effect sound) can be monitored together. -Owner's Manual
-
 1
1 -
2
-
3
-
4
-
5
-
6
-
7
-
8
-
9
-
10
-
11
-
12
-
13
-
14
-
15
-
16
-
17
-
18
-
19
-
20
-
21
-
22
-
23
-
24
-
25
-
26
-
27
-
28
-
29
-
30
-
31
-
32
-
33
-
34
-
35
-
36
-
37
-
38
-
39
-
40
-
41
-
42
-
43
-
44
-
 45
45 -
 46
46 -
 47
47 -
 48
48 -
 49
49 -
 50
50 -
 51
51 -
 52
52 -
 53
53 -
 54
54 -
 55
55 -
56
-
57
-
58
-
59
-
60
-
61
-
62
-
63
-
64
-
65
-
66
-
67
-
68
-
69
-
70
-
71
-
72
-
73
-
74
-
75
-
76
-
77
-
78
-
79
-
80
-
81
-
82
-
83
-
84
-
85
-
86
-
87
-
88
-
89
-
90
-
91
-
92
-
93
-
94
-
95
-
96
-
97
-
98
-
99
-
100
-
101
-
102
-
103
-
104
-
105
-
106
-
107
-
108
-
109
-
110
-
111
-
112
-
113
-
114
-
115
 |
 |
