Yamaha MD4S Owner's Manual - Page 59
TAKE X:MONI, Press the ENTER button.
 |
View all Yamaha MD4S manuals
Add to My Manuals
Save this manual to your list of manuals |
Page 59 highlights
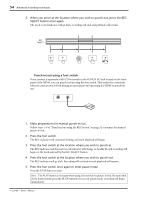
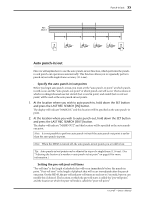
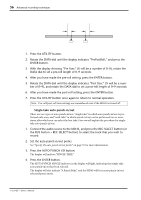
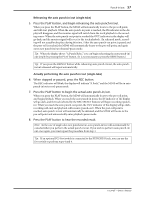
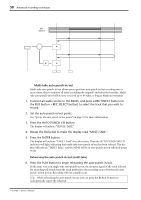
Punch-in/out 59 Actually performing the auto punch-in/out (multi-take) 7. From a stopped or paused condition, press the REC button. The REC indicator will blink, and the display will indicate "TAKE 1." Auto punch-in/out will be in record-pause mode, ready to record the first take (take 1). 8. Press the PLAY button to begin the actual auto punch-in/out. When you reach the post-roll point, the MD4S will automatically stop, and the display will indicate "NEXT TAKE." Recording the next take 9. With "NEXT TAKE" shown in the display, press the ENTER button. The display will briefly indicate "TAKE 2 Load." Then the display will change to "TAKE 2," and the MD4S will be in record-pause mode for take 2 of the auto punch-in/out. Note: Takes 2 and following will always begin with the actual auto punch-in/out. If you wish to rehearse, you must press the REHE button. 10. Press the PLAY button to begin auto punch-in/out. When you reach the post-roll point, the MD4S will automatically stop, and the display will indicate "NEXT TAKE." If you wish to record another take, press the ENTER button to enter record-pause mode for the next take. If you wish to listen to the takes that you have recorded, advance to the following procedure with "NEXT TAKE" still displayed. Auditioning each take 11. When you have finished recording auto punch-in/out takes and the display indicates "NEXT TAKE," rotate the DATA dial to make the display read "MONI TAKE." 12. Press the ENTER button. The display will indicate "TAKE X:MONI" (X will be the take number). 13. Rotate the DATA dial to select the take that you wish to hear, and press the ENTER button to playback the selected take. When you reach the post-roll point (or press the STOP button), the MD4S will stop, and you will again be able to select a take. If you press the EXIT button when the display reads "TAKE X:MONI," you will return to the "NEXT TAKE" display. Tip: To audition the original, rotate the DATA dial to make the display read "ORIGIN:MONI." Selecting the best take 14. When the display reads "TAKE X:MONI," rotate the DATA dial to select the best take. The "TAKE X" display will blink. 15. Rotate the CURSOR shuttle toward the right to make the "MONI" display blink. -Owner's Manual
-
 1
1 -
2
-
3
-
4
-
5
-
6
-
7
-
8
-
9
-
10
-
11
-
12
-
13
-
14
-
15
-
16
-
17
-
18
-
19
-
20
-
21
-
22
-
23
-
24
-
25
-
26
-
27
-
28
-
29
-
30
-
31
-
32
-
33
-
34
-
35
-
36
-
37
-
38
-
39
-
40
-
41
-
42
-
43
-
44
-
45
-
46
-
47
-
48
-
49
-
50
-
51
-
52
-
53
-
 54
54 -
 55
55 -
 56
56 -
 57
57 -
 58
58 -
 59
59 -
 60
60 -
 61
61 -
 62
62 -
 63
63 -
 64
64 -
65
-
66
-
67
-
68
-
69
-
70
-
71
-
72
-
73
-
74
-
75
-
76
-
77
-
78
-
79
-
80
-
81
-
82
-
83
-
84
-
85
-
86
-
87
-
88
-
89
-
90
-
91
-
92
-
93
-
94
-
95
-
96
-
97
-
98
-
99
-
100
-
101
-
102
-
103
-
104
-
105
-
106
-
107
-
108
-
109
-
110
-
111
-
112
-
113
-
114
-
115
 |
 |
