Yamaha MD4S Owner's Manual - Page 65
Erasing a marker or auto punch-in/out point, Rotate the CURSOR shuttle toward the right.
 |
View all Yamaha MD4S manuals
Add to My Manuals
Save this manual to your list of manuals |
Page 65 highlights
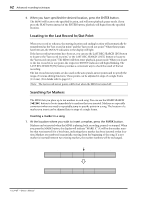
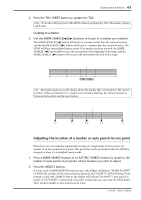
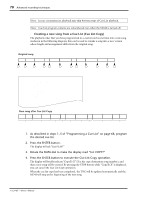
Quick search functions 65 Note: This method can be used to make fine adjustments in a range of approximately 10 seconds forward or backward from the selected marker (or auto punch-in/out point). If you wish to make adjustments that would be further than this range, you will need to either repeat steps 2-6, or re-set the point that you wish to adjust. If another marker has already been inserted before or after the marker (or auto punch-in/out point) that you are moving, it is not possible to move these markers past each other. Erasing a marker or auto punch-in/out point Here's how to erase a marker location or auto punch-in/out point that you have set. This procedure can be performed when the MD4S is either stopped or in playback-pause mode. 1. Press a MARK SEARCH or LAST REC SEARCH button to locate to the marker or the auto punch-in/out point that you wish to erase. 2. Press the ADJUST button. The display will indicate "MARK X:ADJST" or "IN:ADJST" or "OUT:ADJST," and the word on the left (MARK X/IN/OUT) will blink. At this time, you may rotate the DATA dial to select a different marker or auto punch-in/out point. 3. Rotate the CURSOR shuttle toward the right. The word "ADJST" in the display will blink. 4. Rotate the DATA dial toward the right. The word "ADJST" in the display will change to "CLEAR." 5. Press the ENTER button. If you are erasing a marker, the display will indicate "CLR MARKX?" (X will be the marker number). By pressing the EXIT button at this point you can cancel the Erase operation. 6. Press the ENTER button once again to erase the marker, or press the EXIT button to cancel the Erase operation. The marker indicator (or IN/OUT indicator) that corresponds to the erased marker (or auto punch-in/out point) will go dark. Depending on the marker that was erased, the marker numbers will change. Start marker Mark 1 Erase marker 3 Mark 2 Mark 3 Mark 4 End marker Start marker Mark 1 Mark 2 Mark 3 End marker 7. Press the ADJUST button or the EXIT button to return to normal operation, and press the TOC WRITE button to update the TOC. -Owner's Manual
-
 1
1 -
2
-
3
-
4
-
5
-
6
-
7
-
8
-
9
-
10
-
11
-
12
-
13
-
14
-
15
-
16
-
17
-
18
-
19
-
20
-
21
-
22
-
23
-
24
-
25
-
26
-
27
-
28
-
29
-
30
-
31
-
32
-
33
-
34
-
35
-
36
-
37
-
38
-
39
-
40
-
41
-
42
-
43
-
44
-
45
-
46
-
47
-
48
-
49
-
50
-
51
-
52
-
53
-
54
-
55
-
56
-
57
-
58
-
59
-
 60
60 -
 61
61 -
 62
62 -
 63
63 -
 64
64 -
 65
65 -
 66
66 -
 67
67 -
 68
68 -
 69
69 -
 70
70 -
71
-
72
-
73
-
74
-
75
-
76
-
77
-
78
-
79
-
80
-
81
-
82
-
83
-
84
-
85
-
86
-
87
-
88
-
89
-
90
-
91
-
92
-
93
-
94
-
95
-
96
-
97
-
98
-
99
-
100
-
101
-
102
-
103
-
104
-
105
-
106
-
107
-
108
-
109
-
110
-
111
-
112
-
113
-
114
-
115
 |
 |