Yamaha MD4S Owner's Manual - Page 85
Titling discs and songs, Titling a disc
 |
View all Yamaha MD4S manuals
Add to My Manuals
Save this manual to your list of manuals |
Page 85 highlights
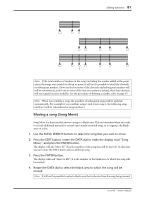
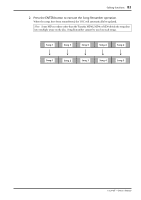
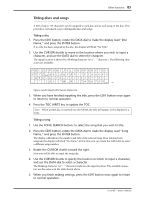
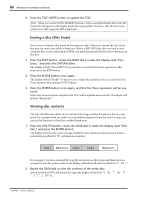
Other functions 85 Titling discs and songs A title of up to 127 characters can be assigned to each disc and to each song on the disc. This provides a convenient way to distinguish discs and songs. Titling a disc 1. Press the EDIT button, rotate the DATA dial to make the display read "Disc Name," and press the ENTER button. If no title has been assigned to the disc, the display will blink "No Title." 2. Use the CURSOR shuttle to move to the location where you wish to input a character, and use the DATA dial to select the character. The input location is shown by a blinking character (or a "s" character). The following characters are available. ( indicates a space) Spaces can be inserted between characters. 3. When you have finished inputting the title, press the EDIT button once again to return to normal operation. 4. Press the TOC WRITE key to update the TOC. Note: When a titled disc is inserted into the MD4S, the title will appear in the display for a time. Titling a song 1. Use the SONG SEARCH buttons to select the song that you wish to title. 2. Press the EDIT button, rotate the DATA dial to make the display read "Song Name," and press the ENTER button. The display will indicate the number and title of the selected song. If no title has been assigned, the display will blink "No Name." At this time you can rotate the DATA dial to select a different song number. 3. Rotate the CURSOR shuttle toward the right. Now you will be able to input the song title. 4. Use the CURSOR shuttle to specify the location at which to input a character, and use the DATA dial to select a character. The blinking character (or "s" character) indicates the input location. The available characters are the same as in the table shown above. 5. When you finish making settings, press the EDIT button once again to return to normal operation. -Owner's Manual
-
 1
1 -
2
-
3
-
4
-
5
-
6
-
7
-
8
-
9
-
10
-
11
-
12
-
13
-
14
-
15
-
16
-
17
-
18
-
19
-
20
-
21
-
22
-
23
-
24
-
25
-
26
-
27
-
28
-
29
-
30
-
31
-
32
-
33
-
34
-
35
-
36
-
37
-
38
-
39
-
40
-
41
-
42
-
43
-
44
-
45
-
46
-
47
-
48
-
49
-
50
-
51
-
52
-
53
-
54
-
55
-
56
-
57
-
58
-
59
-
60
-
61
-
62
-
63
-
64
-
65
-
66
-
67
-
68
-
69
-
70
-
71
-
72
-
73
-
74
-
75
-
76
-
77
-
78
-
79
-
 80
80 -
 81
81 -
 82
82 -
 83
83 -
 84
84 -
 85
85 -
 86
86 -
 87
87 -
 88
88 -
 89
89 -
 90
90 -
91
-
92
-
93
-
94
-
95
-
96
-
97
-
98
-
99
-
100
-
101
-
102
-
103
-
104
-
105
-
106
-
107
-
108
-
109
-
110
-
111
-
112
-
113
-
114
-
115
 |
 |