Yamaha MD4S Owner's Manual - Page 37
Press the LAST REC SEARCH [IN] button to, Turn on the MONITOR SELECT CUE switch.
 |
View all Yamaha MD4S manuals
Add to My Manuals
Save this manual to your list of manuals |
Page 37 highlights
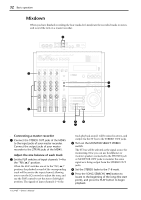
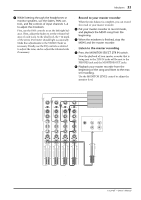
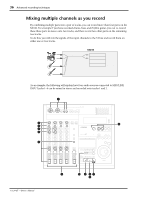
Mixing multiple channels as you record 37 1 Connect the audio sources to MIC/LINE INPUT jacks 1-4. If necessary, you can also mix line level devices such as synthesizers connected to LINE INPUT jacks 5 and 6 or 7 and 8. 2 Set the FLIP switch of input channels 1-4 to "MIC/LINE ( )." 3 While holding down the BUS button, press REC SELECT buttons 1 and 2. The track recording indicators for tracks 1 and 2 (BUS/L,R) will blink. The signal of an input channel whose FLIP switch is set to "MIC/LINE ( )" will be sent to the ST bus. Also, if the REC SELECT button of a track is pressed while holding down the BUS button, the signal from the ST bus will be selected as the recording source for that track. In this case, the L channel signal of the ST bus will be assigned to track 1, and the R channel signal of the ST bus will be assigned to track 2. 4 Press the REC button. The REC indicator will blink, and the MD4S will be in record-pause mode. 5 Set the faders of input channels 1-4 and the STEREO fader to the 7-8 mark. 6 Watch the track level meters, and use the GAIN control and faders of input channels 1- 4 and the STEREO fader to adjust the recording level. Use the PAN controls of input channels 1-4 to adjust the stereo position of each audio source. Tip: You may find it easiest to first adjust the GAIN controls while you play each audio source separately, then use the input channel faders to adjust the volume balance, and finally use the STEREO fader to adjust the overall recording level. 9 Rotate the CUE PAN controls of input channels 1 and 2 to far left and far right respectively. This makes the CUE bus signal stereo, and allows you to monitor the same sound image as is being recorded. Note: In this situation, the CUE bus and the ST bus have the same signal content. Be aware that if the MONITOR SELECT CUE switch and the STEREO switch are both on, the sound being monitored in the PHONES jack or the MONITOR OUT jacks will appear unnatural. 0 Listen to the headphones or monitor speakers, and adjust the volume and pan of each input channel. As necessary, use the EQ controls to adjust the tone. A Press the PLAY button to begin recording. The track recording indicators (BUS) of tracks 1 and 2 will change to steadily lit. B When you finish recording, press the STOP button. The TOC will be automatically updated, and the track recording indicators (BUS) of tracks 1 and 2 will change to blinking. C Press the LAST REC SEARCH [IN] button to locate to the point at which recording began, and press the PLAY button to hear the recording. If you are satisfied with the recording, press REC SELECT buttons 1 and 2. The track recording indicators (BUS/L,R) will go dark. 7 Turn on the MONITOR SELECT CUE switch. The signal of the CUE bus will be sent to the PHONES jack and the MONITOR OUT jacks. Turn off the MONITOR SELECT STEREO switch. 8 Set the CUE LEVEL controls of input channels 1 and 2 to the 7-8 range. This allows the recording source for tracks 1 and 2 (in this case, the signals from input channels 1-4) be monitored in the CUE bus. -Owner's Manual
-
 1
1 -
2
-
3
-
4
-
5
-
6
-
7
-
8
-
9
-
10
-
11
-
12
-
13
-
14
-
15
-
16
-
17
-
18
-
19
-
20
-
21
-
22
-
23
-
24
-
25
-
26
-
27
-
28
-
29
-
30
-
31
-
 32
32 -
 33
33 -
 34
34 -
 35
35 -
 36
36 -
 37
37 -
 38
38 -
 39
39 -
 40
40 -
 41
41 -
 42
42 -
43
-
44
-
45
-
46
-
47
-
48
-
49
-
50
-
51
-
52
-
53
-
54
-
55
-
56
-
57
-
58
-
59
-
60
-
61
-
62
-
63
-
64
-
65
-
66
-
67
-
68
-
69
-
70
-
71
-
72
-
73
-
74
-
75
-
76
-
77
-
78
-
79
-
80
-
81
-
82
-
83
-
84
-
85
-
86
-
87
-
88
-
89
-
90
-
91
-
92
-
93
-
94
-
95
-
96
-
97
-
98
-
99
-
100
-
101
-
102
-
103
-
104
-
105
-
106
-
107
-
108
-
109
-
110
-
111
-
112
-
113
-
114
-
115
 |
 |