Brother International BES Lettering INSTRUCTION MANUAL - English - Page 129
Printing Designs
 |
View all Brother International BES Lettering manuals
Add to My Manuals
Save this manual to your list of manuals |
Page 129 highlights
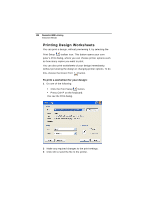
Editing Designs 127 To use the Color Sort tool: 1 Open an existing design. 2 Select one or more segments to which you want to apply the color sort feature. 3 From the Modify tool bar, click the Color Sort tool. You will see a dialog appear stating the number of colors reduced in your design. Click OK Printing Designs You can make print-outs of your designs in Pacesetter BES Lettering. These print-outs not only give you a preview of what the design will look like, but they have a lot of other information as well - the number of stitches in the design and its overall size. Also, by selecting the "Print Color Analysis" option in the Print settings dialog, you can also have printed the color, name, and length of each thread used. Previewing a Design before Printing You can preview a worksheet on the screen before sending it to the printer. To preview a design: 1 From the Quick Access Toolbar, click on the Print Preview button. 2 To zoom in and out of the previewed worksheet, do the following: To zoom in on the worksheet, click Zoom In and scroll to view specific parts of the design. To zoom out on the worksheet, click Zoom Out and scroll to view specific parts of the design. 3 To close print preview and return to the design window, click Close.
-
 1
1 -
2
-
3
-
4
-
5
-
6
-
7
-
8
-
9
-
10
-
11
-
12
-
13
-
14
-
15
-
16
-
17
-
18
-
19
-
20
-
21
-
22
-
23
-
24
-
25
-
26
-
27
-
28
-
29
-
30
-
31
-
32
-
33
-
34
-
35
-
36
-
37
-
38
-
39
-
40
-
41
-
42
-
43
-
44
-
45
-
46
-
47
-
48
-
49
-
50
-
51
-
52
-
53
-
54
-
55
-
56
-
57
-
58
-
59
-
60
-
61
-
62
-
63
-
64
-
65
-
66
-
67
-
68
-
69
-
70
-
71
-
72
-
73
-
74
-
75
-
76
-
77
-
78
-
79
-
80
-
81
-
82
-
83
-
84
-
85
-
86
-
87
-
88
-
89
-
90
-
91
-
92
-
93
-
94
-
95
-
96
-
97
-
98
-
99
-
100
-
101
-
102
-
103
-
104
-
105
-
106
-
107
-
108
-
109
-
110
-
111
-
112
-
113
-
114
-
115
-
116
-
117
-
118
-
119
-
120
-
121
-
122
-
123
-
 124
124 -
 125
125 -
 126
126 -
 127
127 -
 128
128 -
 129
129 -
 130
130 -
 131
131 -
 132
132 -
 133
133 -
 134
134 -
135
-
136
-
137
-
138
-
139
-
140
-
141
-
142
-
143
-
144
-
145
-
146
 |
 |
