Brother International BES Lettering INSTRUCTION MANUAL - English - Page 62
Changing the Font of Existing Text, Segment - font samples
 |
View all Brother International BES Lettering manuals
Add to My Manuals
Save this manual to your list of manuals |
Page 62 highlights
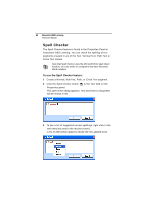
60 Pacesetter BES Lettering Instruction Manual Changing the Font of Existing Text Segment You can change the font type of text objects using the dropdown list of fonts in the Properties Panel. At the top of the area, you see a preview image showing a sample of the selected font. You can choose from two types of fonts at the outset; embroidery fonts or TrueType fonts. The default list of fonts you see in the Text area will be embroidery fonts; to show the TrueType fonts, check the box next to TTF. When TrueType fonts are used for embroidery letters, the satin stitches that comprise them will sew out horizontally. Note that, depending on the embroidery font you choose, there are different minimum and maximum height recommendations. For more information, see "Displaying font properties." To change a font type: 1 Select the text segment you want to alter. 2 In the Text Properties area, in the TTF field, do one of the following: To choose from the selection of Embroidery fonts, leave the TTF checkbox unchecked. To choose from the selection of TrueType fonts, check the TTF checkbox. The list of available fonts will change accordingly. 3 From the Font list, select the font you want to use.
-
 1
1 -
2
-
3
-
4
-
5
-
6
-
7
-
8
-
9
-
10
-
11
-
12
-
13
-
14
-
15
-
16
-
17
-
18
-
19
-
20
-
21
-
22
-
23
-
24
-
25
-
26
-
27
-
28
-
29
-
30
-
31
-
32
-
33
-
34
-
35
-
36
-
37
-
38
-
39
-
40
-
41
-
42
-
43
-
44
-
45
-
46
-
47
-
48
-
49
-
50
-
51
-
52
-
53
-
54
-
55
-
56
-
 57
57 -
 58
58 -
 59
59 -
 60
60 -
 61
61 -
 62
62 -
 63
63 -
 64
64 -
 65
65 -
 66
66 -
 67
67 -
68
-
69
-
70
-
71
-
72
-
73
-
74
-
75
-
76
-
77
-
78
-
79
-
80
-
81
-
82
-
83
-
84
-
85
-
86
-
87
-
88
-
89
-
90
-
91
-
92
-
93
-
94
-
95
-
96
-
97
-
98
-
99
-
100
-
101
-
102
-
103
-
104
-
105
-
106
-
107
-
108
-
109
-
110
-
111
-
112
-
113
-
114
-
115
-
116
-
117
-
118
-
119
-
120
-
121
-
122
-
123
-
124
-
125
-
126
-
127
-
128
-
129
-
130
-
131
-
132
-
133
-
134
-
135
-
136
-
137
-
138
-
139
-
140
-
141
-
142
-
143
-
144
-
145
-
146
 |
 |
