Brother International BES Lettering INSTRUCTION MANUAL - English - Page 65
Changing the Height of Lettering, Changing Font Spacing
 |
View all Brother International BES Lettering manuals
Add to My Manuals
Save this manual to your list of manuals |
Page 65 highlights
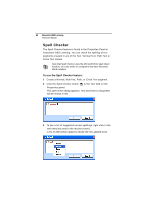
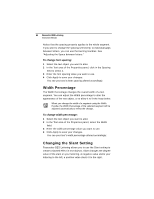
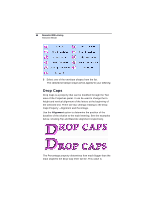
Text Properties 63 4 Click on the correct word that you want to replace the incorrect one, or directly type over the incorrect word to replace it. Your choice replaces the incorrect word. 5 Click Apply to create the text segment in your workspace. The corrected text appears in your workspace. Changing the Height of Lettering With Pacesetter BES Lettering, it is easy to change the height of any lettering. Height refers to the tallest character in the desired lettering. So, when a text segment contains both uppercase and lowercase letters, it is the size of largest uppercase letters (usually) that is set by this property. To change the height of lettering: 1 Select the text object you want to alter. 2 In the Text area of the Properties panel, select the Height field. The property label (Height) is highlighted in blue. 3 Type in the height you want your letters to be. 4 Click Apply to save your changes. You see your text's height altered accordingly. Changing Font Spacing The font spacing property controls the horizontal spacing between letters in a text segment. The normal (default) value for the font spacing is zero. You can set the font spacing to a negative or a positive value. If you set the value to less than zero, then the spacing between letters decreases; if you set the value to greater than zero, then the spacing increases.
-
 1
1 -
2
-
3
-
4
-
5
-
6
-
7
-
8
-
9
-
10
-
11
-
12
-
13
-
14
-
15
-
16
-
17
-
18
-
19
-
20
-
21
-
22
-
23
-
24
-
25
-
26
-
27
-
28
-
29
-
30
-
31
-
32
-
33
-
34
-
35
-
36
-
37
-
38
-
39
-
40
-
41
-
42
-
43
-
44
-
45
-
46
-
47
-
48
-
49
-
50
-
51
-
52
-
53
-
54
-
55
-
56
-
57
-
58
-
59
-
 60
60 -
 61
61 -
 62
62 -
 63
63 -
 64
64 -
 65
65 -
 66
66 -
 67
67 -
 68
68 -
 69
69 -
 70
70 -
71
-
72
-
73
-
74
-
75
-
76
-
77
-
78
-
79
-
80
-
81
-
82
-
83
-
84
-
85
-
86
-
87
-
88
-
89
-
90
-
91
-
92
-
93
-
94
-
95
-
96
-
97
-
98
-
99
-
100
-
101
-
102
-
103
-
104
-
105
-
106
-
107
-
108
-
109
-
110
-
111
-
112
-
113
-
114
-
115
-
116
-
117
-
118
-
119
-
120
-
121
-
122
-
123
-
124
-
125
-
126
-
127
-
128
-
129
-
130
-
131
-
132
-
133
-
134
-
135
-
136
-
137
-
138
-
139
-
140
-
141
-
142
-
143
-
144
-
145
-
146
 |
 |
