Brother International BES Lettering INSTRUCTION MANUAL - English - Page 85
Pull Compensation Settings
 |
View all Brother International BES Lettering manuals
Add to My Manuals
Save this manual to your list of manuals |
Page 85 highlights
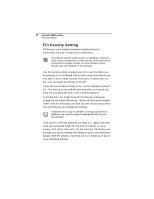
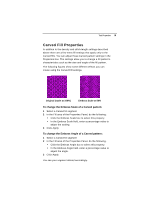
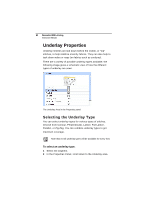
Text Properties 83 Pull Compensation Settings Pacesetter BES Lettering allows you to adjust the pull compensation in your design. In the Properties panel, you can use the settings available in the Pull Compensation area to adjust the pull compensation of text objects. There are two types of pull-compensation, which differ in the way that the pull compensation is determined. • A percentage pull-compensation calculates the change made to the stitches' width based on their original width. • An absolute pull compensation is simply an extra amount of width which is added to the stitches regardless of their original length. When you use percentage pull-compensation, you can also enter a value in the Max range box of the Pull Compensation area. This value sets an absolute maximum limit on the size of the pull compensation. If the calculated pull compensation value goes over this length, the actual stitches that are generated will be limited to this length. To adjust the pull compensation: 1 Select the item you want to adjust. 2 Press ALT + Enter to display the Properties panel, if it is not already visible. You see the Properties panel. 3 In the Pull Compensation Area of the Properties panel, click the down arrow to the right of the Type field. 4 A list of options is displayed. 5 Select one of the following options: None. Makes no adjustments to pull compensation. Percentage. Enter the percentage in the Value % box and, if necessary, enter the maximum value of pullcompensation in the Max Range box. You can also adjust the value % number using the value % slider.
-
 1
1 -
2
-
3
-
4
-
5
-
6
-
7
-
8
-
9
-
10
-
11
-
12
-
13
-
14
-
15
-
16
-
17
-
18
-
19
-
20
-
21
-
22
-
23
-
24
-
25
-
26
-
27
-
28
-
29
-
30
-
31
-
32
-
33
-
34
-
35
-
36
-
37
-
38
-
39
-
40
-
41
-
42
-
43
-
44
-
45
-
46
-
47
-
48
-
49
-
50
-
51
-
52
-
53
-
54
-
55
-
56
-
57
-
58
-
59
-
60
-
61
-
62
-
63
-
64
-
65
-
66
-
67
-
68
-
69
-
70
-
71
-
72
-
73
-
74
-
75
-
76
-
77
-
78
-
79
-
 80
80 -
 81
81 -
 82
82 -
 83
83 -
 84
84 -
 85
85 -
 86
86 -
 87
87 -
 88
88 -
 89
89 -
 90
90 -
91
-
92
-
93
-
94
-
95
-
96
-
97
-
98
-
99
-
100
-
101
-
102
-
103
-
104
-
105
-
106
-
107
-
108
-
109
-
110
-
111
-
112
-
113
-
114
-
115
-
116
-
117
-
118
-
119
-
120
-
121
-
122
-
123
-
124
-
125
-
126
-
127
-
128
-
129
-
130
-
131
-
132
-
133
-
134
-
135
-
136
-
137
-
138
-
139
-
140
-
141
-
142
-
143
-
144
-
145
-
146
 |
 |
