Brother International BES Lettering INSTRUCTION MANUAL - English - Page 43
Vertical Text Frame
 |
View all Brother International BES Lettering manuals
Add to My Manuals
Save this manual to your list of manuals |
Page 43 highlights
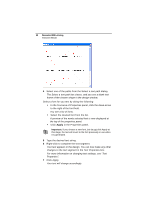
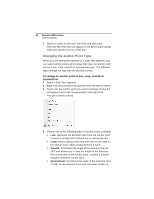
Creating Lettering 41 each side of the anchor point. Creates some curvature on both sides of the anchor point. You see the segment change accordingly. Vertical Text Frame Vertical Text items are created using the Vertical tool. Vertical text items are those that are created vertically. They start out with normal proportions for the font, and can be adjusted. To create vertical text: 1 On the Ribbon, select the Home tab. 2 On the Text bar, click on the Vertical Text 3 Click once in the design window. tool. If another text item was already selected, your first click only deselected that item. You will have to click again to place a new text segment. An empty vertical text frame appears in the workspace. 4 To choose a new font (i.e., other than the currently selected one) for the text string at this point, do the following: In the Text area of Properties panel, click the down-arrow to the right of the font field. You see a list of fonts. Select the desired font from the list. A preview of the newly selected font is now displayed at the top of the properties panel. Click Apply in the Properties panel. Important: If you choose a new font, but do not click Apply at this stage, the text will revert to the font previously in use when it is generated. 5 Type the desired text string. 6 Right-click to complete the text segment. Your text appears in the design. You can now make any other changes to the text segment in the Text Properties box.
-
 1
1 -
2
-
3
-
4
-
5
-
6
-
7
-
8
-
9
-
10
-
11
-
12
-
13
-
14
-
15
-
16
-
17
-
18
-
19
-
20
-
21
-
22
-
23
-
24
-
25
-
26
-
27
-
28
-
29
-
30
-
31
-
32
-
33
-
34
-
35
-
36
-
37
-
 38
38 -
 39
39 -
 40
40 -
 41
41 -
 42
42 -
 43
43 -
 44
44 -
 45
45 -
 46
46 -
 47
47 -
 48
48 -
49
-
50
-
51
-
52
-
53
-
54
-
55
-
56
-
57
-
58
-
59
-
60
-
61
-
62
-
63
-
64
-
65
-
66
-
67
-
68
-
69
-
70
-
71
-
72
-
73
-
74
-
75
-
76
-
77
-
78
-
79
-
80
-
81
-
82
-
83
-
84
-
85
-
86
-
87
-
88
-
89
-
90
-
91
-
92
-
93
-
94
-
95
-
96
-
97
-
98
-
99
-
100
-
101
-
102
-
103
-
104
-
105
-
106
-
107
-
108
-
109
-
110
-
111
-
112
-
113
-
114
-
115
-
116
-
117
-
118
-
119
-
120
-
121
-
122
-
123
-
124
-
125
-
126
-
127
-
128
-
129
-
130
-
131
-
132
-
133
-
134
-
135
-
136
-
137
-
138
-
139
-
140
-
141
-
142
-
143
-
144
-
145
-
146
 |
 |
