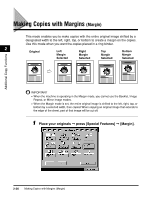
Canon imageCLASS 2220 User Guide - Page 132
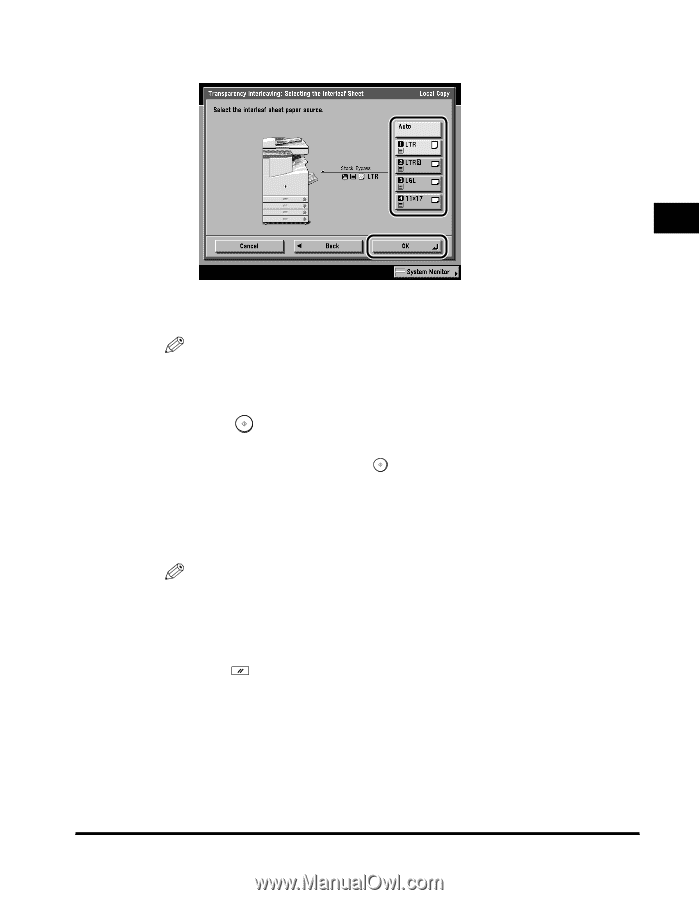
Select the size of the interleaf sheets, press [OK], Done]., Press, Start., Transparency Interleaving]
 |
View all Canon imageCLASS 2220 manuals
Add to My Manuals
Save this manual to your list of manuals |
Page 132 highlights
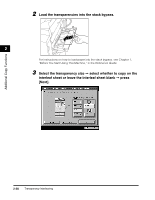
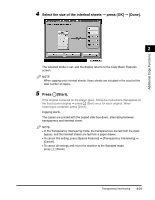
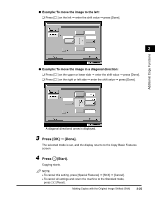
Additional Copy Functions 4 Select the size of the interleaf sheets © press [OK] © [Done]. 2 The selected mode is set, and the display returns to the Copy Basic Features screen. NOTE When copying onto interleaf sheets, these sheets are included in the count of the total number of copies. 5 Press (Start). If the original is placed on the platen glass, follow the instructions that appear on the touch panel display © press (Start) once for each original. When scanning is complete, press [Done]. Copying starts. The copies are printed with the copied side face down, alternating between transparency and interleaf sheet. NOTE • In the Transparency Interleaving mode, the transparencies are fed from the stack bypass, and the interleaf sheets are fed from a paper drawer. • To cancel this setting, press [Special Features] © [Transparency Interleaving] © [Cancel]. • To cancel all settings and return the machine to the Standard mode, press (Reset). Transparency Interleaving 2-21
-
 1
1 -
2
-
3
-
4
-
5
-
6
-
7
-
8
-
9
-
10
-
11
-
12
-
13
-
14
-
15
-
16
-
17
-
18
-
19
-
20
-
21
-
22
-
23
-
24
-
25
-
26
-
27
-
28
-
29
-
30
-
31
-
32
-
33
-
34
-
35
-
36
-
37
-
38
-
39
-
40
-
41
-
42
-
43
-
44
-
45
-
46
-
47
-
48
-
49
-
50
-
51
-
52
-
53
-
54
-
55
-
56
-
57
-
58
-
59
-
60
-
61
-
62
-
63
-
64
-
65
-
66
-
67
-
68
-
69
-
70
-
71
-
72
-
73
-
74
-
75
-
76
-
77
-
78
-
79
-
80
-
81
-
82
-
83
-
84
-
85
-
86
-
87
-
88
-
89
-
90
-
91
-
92
-
93
-
94
-
95
-
96
-
97
-
98
-
99
-
100
-
101
-
102
-
103
-
104
-
105
-
106
-
107
-
108
-
109
-
110
-
111
-
112
-
113
-
114
-
115
-
116
-
117
-
118
-
119
-
120
-
121
-
122
-
123
-
124
-
125
-
126
-
 127
127 -
 128
128 -
 129
129 -
 130
130 -
 131
131 -
 132
132 -
 133
133 -
 134
134 -
 135
135 -
 136
136 -
 137
137 -
138
-
139
-
140
-
141
-
142
-
143
-
144
-
145
-
146
-
147
-
148
-
149
-
150
-
151
-
152
-
153
-
154
-
155
-
156
-
157
-
158
-
159
-
160
-
161
-
162
-
163
-
164
-
165
-
166
-
167
-
168
-
169
-
170
-
171
-
172
-
173
-
174
-
175
-
176
-
177
-
178
-
179
-
180
-
181
-
182
-
183
-
184
-
185
-
186
-
187
-
188
-
189
-
190
-
191
-
192
-
193
-
194
-
195
-
196
-
197
-
198
-
199
-
200
-
201
-
202
-
203
-
204
-
205
-
206
-
207
-
208
-
209
-
210
-
211
-
212
-
213
-
214
-
215
-
216
-
217
-
218
-
219
-
220
-
221
-
222
-
223
-
224
-
225
-
226
-
227
-
228
-
229
-
230
-
231
-
232
-
233
-
234
-
235
-
236
-
237
-
238
-
239
-
240
-
241
-
242
 |
 |