Cisco 1601 Hardware Installation Guide - Page 130
Connecting an Analog DID Interface Card, Port Analog FXS/DID Voice Interface Card
 |
View all Cisco 1601 manuals
Add to My Manuals
Save this manual to your list of manuals |
Page 130 highlights
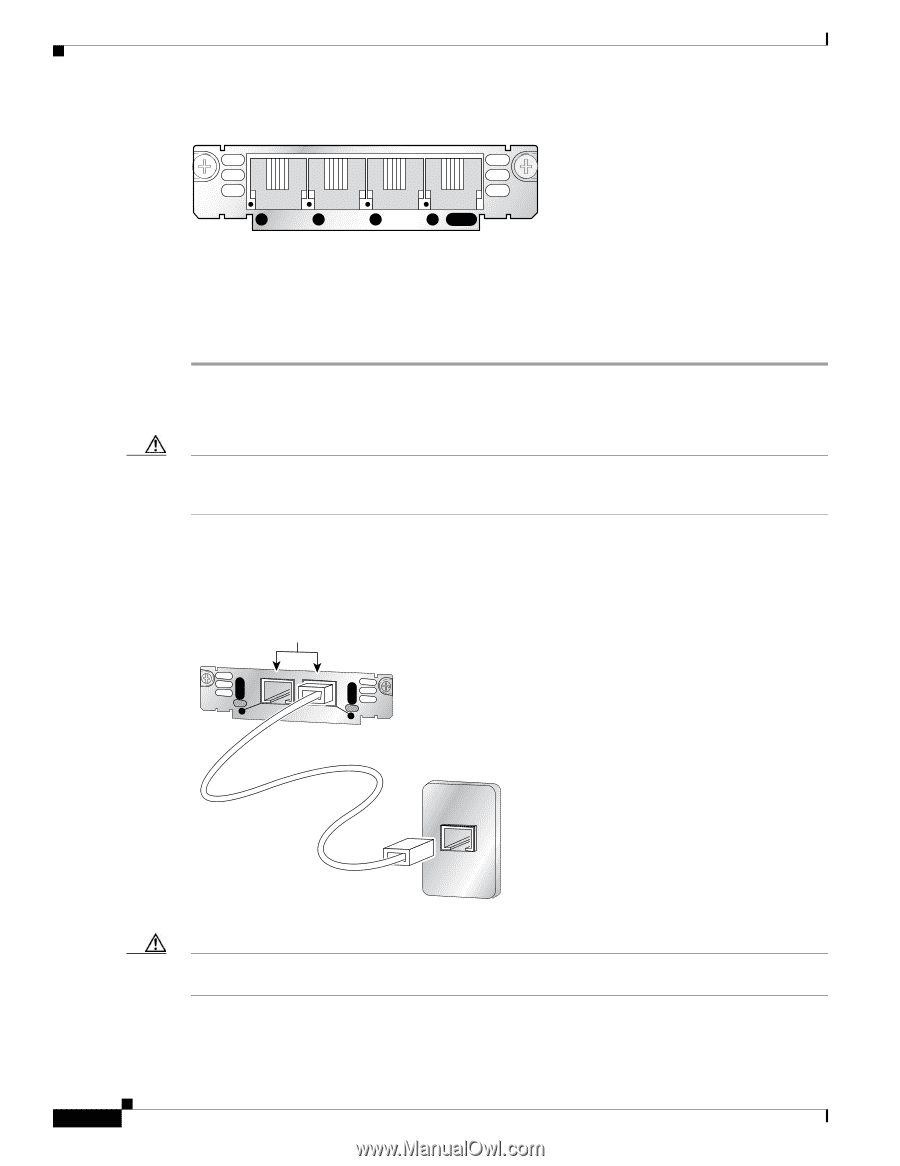
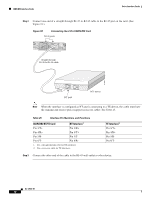
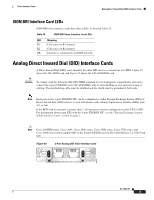
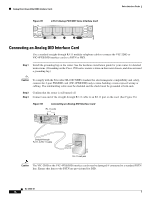
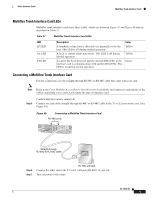
Analog Direct Inward Dial (DID) Interface Cards Figure 95 4-Port Analog FXS/DID Voice Interface Card Voice Interface Cards 65683 VIC 4FXS/DID 3 2 1 0 IN USE Connecting an Analog DID Interface Card Use a standard straight-through RJ-11 modular telephone cable to connect the VIC-2DID or VIC-4FXS/DID interface card to a PSTN or PBX. Step 1 Install the grounding lug on the router. See the hardware installation guide for your router for detailed instructions. (Grounding on the Cisco 1700 series routers is done on the router chassis, and does not need a grounding lug.) Caution To comply with the Telcordia GR-1089 NEBS standard for electromagnetic compatibility and safety, connect the 4-port FXS/DID card (VIC-4FXS/DID) only to intra-building or non-exposed wiring or cabling. The intrabuilding cable must be shielded and the shield must be grounded at both ends. Step 2 Confirm that the router is still turned off. Step 3 Connect one end of the straight-through RJ-11 cable to an RJ-11 port on the card. (See Figure 96.) Figure 96 Connecting an Analog DID Interface Card RJ-11 ports IN USE IN USE VIC DID 1 SEE MANUAL BEFORE INSTALLATION 0 36015 Straight-through RJ-11-to-RJ-11 cable RJ-11 wall jack Caution The VIC-2DID or the VIC-4FXS/DID interface cards may be damaged if connected to a standard PSTN line. Ensure that lines to the PSTN are provisioned for DID. OL-12847-01 14
-
 1
1 -
2
-
3
-
4
-
5
-
6
-
7
-
8
-
9
-
10
-
11
-
12
-
13
-
14
-
15
-
16
-
17
-
18
-
19
-
20
-
21
-
22
-
23
-
24
-
25
-
26
-
27
-
28
-
29
-
30
-
31
-
32
-
33
-
34
-
35
-
36
-
37
-
38
-
39
-
40
-
41
-
42
-
43
-
44
-
45
-
46
-
47
-
48
-
49
-
50
-
51
-
52
-
53
-
54
-
55
-
56
-
57
-
58
-
59
-
60
-
61
-
62
-
63
-
64
-
65
-
66
-
67
-
68
-
69
-
70
-
71
-
72
-
73
-
74
-
75
-
76
-
77
-
78
-
79
-
80
-
81
-
82
-
83
-
84
-
85
-
86
-
87
-
88
-
89
-
90
-
91
-
92
-
93
-
94
-
95
-
96
-
97
-
98
-
99
-
100
-
101
-
102
-
103
-
104
-
105
-
106
-
107
-
108
-
109
-
110
-
111
-
112
-
113
-
114
-
115
-
116
-
117
-
118
-
119
-
120
-
121
-
122
-
123
-
124
-
 125
125 -
 126
126 -
 127
127 -
 128
128 -
 129
129 -
 130
130 -
 131
131 -
 132
132 -
 133
133 -
 134
134 -
 135
135 -
136
-
137
-
138
-
139
-
140
-
141
-
142
-
143
-
144
-
145
-
146
-
147
-
148
-
149
-
150
-
151
-
152
-
153
-
154
-
155
-
156
-
157
-
158
-
159
-
160
-
161
-
162
-
163
-
164
-
165
-
166
-
167
-
168
-
169
-
170
-
171
-
172
-
173
-
174
-
175
-
176
-
177
-
178
-
179
-
180
-
181
-
182
-
183
-
184
-
185
-
186
-
187
-
188
-
189
-
190
-
191
-
192
-
193
-
194
-
195
-
196
-
197
-
198
-
199
-
200
-
201
-
202
-
203
-
204
-
205
-
206
-
207
-
208
-
209
-
210
-
211
-
212
-
213
-
214
-
215
-
216
 |
 |