Cisco 1601 Hardware Installation Guide - Page 156
Installing a Daughter Card on the HWIC-4ESW Card
 |
View all Cisco 1601 manuals
Add to My Manuals
Save this manual to your list of manuals |
Page 156 highlights
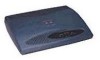
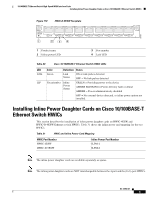
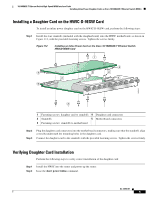
10/100BASE-T Ethernet Switch High-Speed WAN Interface Cards Installing Inline Power Daughter Cards on Cisco 10/100BASE-T Ethernet Switch HWICs Installing a Daughter Card on the HWIC-4ESW Card To install an inline power daughter card on the HWIC-4ESW card, perform the following steps: Step 1 Install the three standoffs (included with the daughter card) on the HWIC motherboard, as shown in Figure 111, with the provided fastening screws. Tighten the screws firmly. Figure 111 Installing an Inline Power Card on the Cisco 10/100BASE-T Ethernet Switch HWIC-4ESW Card 1 4 5 2 2 2 6 103113 3 1 Fastening screws: daughter card to 4 Daughter card standoffs 2 Standoffs (3) 5 Daughter card connector 3 Fastening screws: standoffs to motherboard 6 Motherboard connector Step 2 Step 3 Plug the daughter card connector into the motherboard connector, making sure that the standoffs align correctly underneath the mounting holes in the daughter card. Connect the daughter card to the standoffs with the provided fastening screws. Tighten the screws firmly. OL-12850-01 4
-
 1
1 -
2
-
3
-
4
-
5
-
6
-
7
-
8
-
9
-
10
-
11
-
12
-
13
-
14
-
15
-
16
-
17
-
18
-
19
-
20
-
21
-
22
-
23
-
24
-
25
-
26
-
27
-
28
-
29
-
30
-
31
-
32
-
33
-
34
-
35
-
36
-
37
-
38
-
39
-
40
-
41
-
42
-
43
-
44
-
45
-
46
-
47
-
48
-
49
-
50
-
51
-
52
-
53
-
54
-
55
-
56
-
57
-
58
-
59
-
60
-
61
-
62
-
63
-
64
-
65
-
66
-
67
-
68
-
69
-
70
-
71
-
72
-
73
-
74
-
75
-
76
-
77
-
78
-
79
-
80
-
81
-
82
-
83
-
84
-
85
-
86
-
87
-
88
-
89
-
90
-
91
-
92
-
93
-
94
-
95
-
96
-
97
-
98
-
99
-
100
-
101
-
102
-
103
-
104
-
105
-
106
-
107
-
108
-
109
-
110
-
111
-
112
-
113
-
114
-
115
-
116
-
117
-
118
-
119
-
120
-
121
-
122
-
123
-
124
-
125
-
126
-
127
-
128
-
129
-
130
-
131
-
132
-
133
-
134
-
135
-
136
-
137
-
138
-
139
-
140
-
141
-
142
-
143
-
144
-
145
-
146
-
147
-
148
-
149
-
150
-
 151
151 -
 152
152 -
 153
153 -
 154
154 -
 155
155 -
 156
156 -
 157
157 -
 158
158 -
 159
159 -
 160
160 -
 161
161 -
162
-
163
-
164
-
165
-
166
-
167
-
168
-
169
-
170
-
171
-
172
-
173
-
174
-
175
-
176
-
177
-
178
-
179
-
180
-
181
-
182
-
183
-
184
-
185
-
186
-
187
-
188
-
189
-
190
-
191
-
192
-
193
-
194
-
195
-
196
-
197
-
198
-
199
-
200
-
201
-
202
-
203
-
204
-
205
-
206
-
207
-
208
-
209
-
210
-
211
-
212
-
213
-
214
-
215
-
216
 |
 |