Cisco 1601 Hardware Installation Guide - Page 81
ISDN BRI U WIC LEDs, Prerequisites for Connecting an ISDN BRI U WIC to a Network, Installing a Cisco
 |
View all Cisco 1601 manuals
Add to My Manuals
Save this manual to your list of manuals |
Page 81 highlights
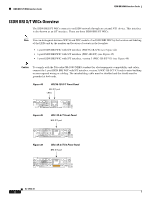
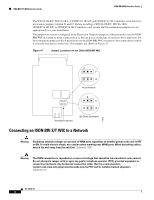
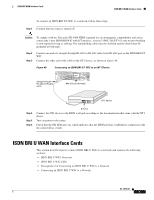
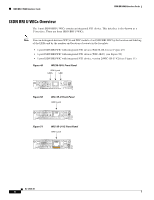
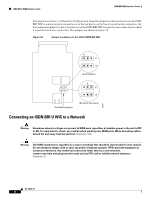
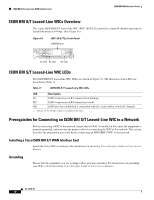
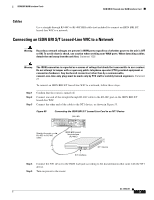
ISDN BRI WAN Interface Cards ISDN BRI U WAN Interface Cards ISDN BRI U WIC LEDs The ISDN BRI U WIC LEDs are shown in Figure 49, Figure 50, and Figure 51. The functions of the LEDs are described in Table 10. Table 10 LED B1 B2 OK ISDN BRI U WIC LEDs Description ISDN connection on B1 channel when blinking. ISDN connection on B2 channel when blinking. ISDN port has established a connection with the central office switch (D channel). Prerequisites for Connecting an ISDN BRI U WIC to a Network Before connecting a WIC to the network, ensure that the WIC is installed in the router, the equipment is properly grounded, and you have the proper cables for connecting the WIC to the network. This section describes the preparation necessary before connecting an ISDN BRI U WIC to the network. Installing a Cisco ISDN BRI S/T WAN Interface Card Install the Cisco WIC according to the instructions in Installing Cisco Interface Cards in Cisco Access Routers. Note Older WIC36-1B-S/T, WIC36-1B-U, CPAWIC36-1B-S/T, or CPAWIC36-1B-U interface cards mount only in the W1 slot of a 2-slot network module and provide a single BRI interface. Newer WIC-1B-S/T or WIC-1B-U interface cards can mount in either slot of a 2-slot network module. For more information on BRI network modules, see the Cisco Network Modules Hardware Installation Guide. Grounding For instructions on grounding your WIC, refer to Installing Cisco Interface Cards in Cisco Access Routers. Cables Use a straight-through RJ-48C-to-RJ-48C BRI cable (not included) to connect an ISDN BRI U WIC to a network. Setting Jumpers on ISDN BRI WICs The WIC-1B-S/T and WIC-1B-U interface cards do not have termination jumpers. The WIC36-1B-S/T, WIC36-1B-U, CPAWIC36-1B-S/T, and CPAWIC36-1B-U interface cards have two termination jumpers, labeled J1 and J2. Before installing a WIC36-1B-S/T, WIC36-1B-U, CPAWIC36-1B-S/T, or CPAWIC36-1B-U interface card, ensure that the termination jumpers are set appropriately for your installation. OL-12844-01 7
-
 1
1 -
2
-
3
-
4
-
5
-
6
-
7
-
8
-
9
-
10
-
11
-
12
-
13
-
14
-
15
-
16
-
17
-
18
-
19
-
20
-
21
-
22
-
23
-
24
-
25
-
26
-
27
-
28
-
29
-
30
-
31
-
32
-
33
-
34
-
35
-
36
-
37
-
38
-
39
-
40
-
41
-
42
-
43
-
44
-
45
-
46
-
47
-
48
-
49
-
50
-
51
-
52
-
53
-
54
-
55
-
56
-
57
-
58
-
59
-
60
-
61
-
62
-
63
-
64
-
65
-
66
-
67
-
68
-
69
-
70
-
71
-
72
-
73
-
74
-
75
-
 76
76 -
 77
77 -
 78
78 -
 79
79 -
 80
80 -
 81
81 -
 82
82 -
 83
83 -
 84
84 -
 85
85 -
 86
86 -
87
-
88
-
89
-
90
-
91
-
92
-
93
-
94
-
95
-
96
-
97
-
98
-
99
-
100
-
101
-
102
-
103
-
104
-
105
-
106
-
107
-
108
-
109
-
110
-
111
-
112
-
113
-
114
-
115
-
116
-
117
-
118
-
119
-
120
-
121
-
122
-
123
-
124
-
125
-
126
-
127
-
128
-
129
-
130
-
131
-
132
-
133
-
134
-
135
-
136
-
137
-
138
-
139
-
140
-
141
-
142
-
143
-
144
-
145
-
146
-
147
-
148
-
149
-
150
-
151
-
152
-
153
-
154
-
155
-
156
-
157
-
158
-
159
-
160
-
161
-
162
-
163
-
164
-
165
-
166
-
167
-
168
-
169
-
170
-
171
-
172
-
173
-
174
-
175
-
176
-
177
-
178
-
179
-
180
-
181
-
182
-
183
-
184
-
185
-
186
-
187
-
188
-
189
-
190
-
191
-
192
-
193
-
194
-
195
-
196
-
197
-
198
-
199
-
200
-
201
-
202
-
203
-
204
-
205
-
206
-
207
-
208
-
209
-
210
-
211
-
212
-
213
-
214
-
215
-
216
 |
 |